Tag: nbsp

  • Most common blackberry issues, errors, glitches and solutions [How to]

    Most common blackberry issues, errors, glitches and solutions [How to]

    It is obvious that thousands of people like blackberry phones, just because it has some unique features which are nowhere to be found. The mobile phone industry is at its peak and people are now seeking the generalised and simple — hassle-free device which can fulfill their basic needs.

    Although blackberry is popular enough to keep it’s fan base happy, it is not untouched from the mighty glitches, which makes it’s users frustrated. Blackberry has faced many up’s and down’s which somehow restricted its growth cycle over other companies in the industry.

    The most Blackberry problems can be solved by simply pulling out the battery (for 30-60 seconds) or freeing up some space on temporary memory. You should often (once a week) pull out the battery of your device and also free up space by deleting sample media files and internet cache. This is something most of us would not like to do often. It makes your experience with the device bitter.

    Sometimes when mobile devices hit the market and are used by a wide variety of consumers, glitches start to occur frequently. Sometimes these problems can have quick fixes that come out in an update to the software while other remedies are not so simple.

    One of the top smartphone makers, BlackBerry, has faced these issues – as do most companies making phones. Sometimes the problem can actually be caused by multiple smaller issues, which vary between phones and users.
    One common problem occurs when downloading and then installing a BlackBerry theme onto your BlackBerry.The problem is that even though you’ve paid for it and downloaded it, it doesn’t show up on your phone; therefore you are unable to activate the download and use it.

    There are several possible reasons for this: sometimes during the download process, the theme file becomes corrupted. This will lead to problems where the download doesn’t show up. If this is the reason, then you have to remove the battery and then reinstall it. When the BlackBerry starts up again, then you can download and install the theme file again.

    Another possible reason you are unable to install a theme is that the download is for another version. This happens more often when downloading from third party websites than it does from BlackBerry’s App World. If your BlackBerry device is a refurbished model or a pre-owned device, then this could be part of the problem.

    These BlackBerry devices are often restrictive in regards to their ability to download and use third-party themes.
    The issue can also sometimes stem from the fact that there could be a corruption of mismatched data within the BlackBerry’s given information. You can see the theme on your app list but cannot use it. If this is the problem, then again pulling your battery and restarting the device is best.


    Here are some other common issues blackberry users come along regularly:


    Problem: Your Blackberry gets hot or warm

    Solution: Your Blackberry may get hot/ warm and temperature of the phone may rise. The Blackberry Torch 9800 users are facing this problem more than others. This is most probably because of the reason that you have several applications running on your phone which you may not know.

    Another reason is that if you have constantly data connection open (like streaming music, an app that uses GPS, weather apps, Loopt), your phone will get hot and loose battery fast.

    To see what apps are running, go to Options > Device Application

    Management (you can also hold the Menu key on left of your trackpad/ back wheel, which brings up everything that is running).

    Close the unwanted apps by opening the app, click the menu and select close at the end.

    Problem: The Blackberry screen frozen

    Solution: This is a problem that can happen to any Blackberry device where the device gets stuck and the screen is frozen. There are two ways to fix this problem. You can soft reset your Blackberry by pressing Alt+Cap+Delete keys together.

    If this technique does not solve the problem, you can perform a hard reset. Find the Reset button on back the device (which can be near the bottom, under the battery cover) and press the button with a pin etc. You do not lose any data using any of these methods.

    Problem: Blackberry call logs and messages get deleted

    If you find out that suddenly your Blackberry’s call logs and saved messaged are deleted and disappeared without any reason, here is the solution to the problem. This happens if you have a large amount of images, ringtones, games etc and your memory is at or near its capacity. The phone will start deleting oldest call logs and text messages (SMS) entries to free up some space.

    To determine the free memory, go to Options, then Status, which will show you free memory. You can increase free space by deleting some stored stuff on your phone.

    Problem: Blackberry does not send/ receive emails

    Solution: Blackberry email problem can be due to GPRS services.

    GPRS is what allows your device to access data. The first thing to do is to perform soft reset and if that does not work perform hard reset (see methods above).

    After that check your wireless antenna signal strength. The antenna should show GPRS. If you can call and browse the web that means your GSM service is available.

    Problem: Blackberry Bluetooth problem

    If you are trying to send some files, music, photos etc from another device (i.e Nokia, Sony Ericsson etc) to your Blackberry and cannot do so via Bluetooth, it is because there is a special way to send stuff from another company device to Blackberry.

    •To transfer the files (MP3, video etc) from another device to BB, follow these steps.

    •Pair your Blackberry and your other device Blackberry

    •Choose the music files or other media that you want to transfer to your BB from another device

    •On your Blackberry, open ‘Media’ folder and press menu ‘BB

    Logos’ and you will see an option ‘receive using Bluetooth’

    •From your other phone, send the files to your BB.

    Already connected, your Blackberry will ask you to accept or refuse transfer

    •Accept the data transfer and you are done

    Problem: Blackberry Sync problem

    If you have Blackberry sync problem when you try to sync with Microsoft Outlook or calendar/contact sync, follow these steps to get rid of this problem.

    •Click on ‘Reset settings’ in Organiser

    •This will reset your phone’s Calendar, Address Book, Memo Pad and Task to default

    •You now have to configure Calendar, Address Book, Memo Pad by clicking ‘Configure Setting’

    •After completing, you should be able to sync your Blackberry with Outlook or any other medium.

    Problem: Blackberry trackpad stopped working?

    This problem is in Blackberry 8520 and other similar devices where trackpad stops working without any reason. To resolve the trackpad problem, you should start from updating your firmware to latest version.

    Another thing that worked for many users with this problem is a battery pull. Remember your device should be ON when you pull out the battery, wait for 30-60 seconds before you replace the battery. This should solve the problem.

    Problem: Blackberry synchronising problem

    Another Blackberry synchronizing problem is when after synchronising, email messages deleted from Blackberry are still there or messages deleted from Outlook are not deleted. The Same thing can happen with email messages. Blackberry website has a complete guide to solve this problem.

    Problem: Trackball stopped working

    This happens mostly with old devices. If your phone’s trackball stopped working, that is probably because of dust. You can clean the ball by turning the phone upside down and rolling it on a clean sheet of paper. Alternatively, you can change the damaged trackball with a new one.


    Register any other problem in the comment and we will try to get the solution for you. If you want you can get the solution for the problem yourself for other to read. !

  • [How to] Enable “Do Not Track” on Mozilla Firefox

    [How to] Enable “Do Not Track” on Mozilla Firefox

    The moment you connect to the Internet, your information is no more in safe hands. Everything you do on internet is being tracked via multiple websites and third party apps.

    There is nothing much you can do to stop such events to occur and stop other websites to track your behaviour over the Internet.

    Mozilla Firefox is the first web browser, which allows it’s users to enable a “Do not Track” Feature back in March 2011, which minimizes the occurrences of users identity tracking. Many other web browsers joined Mozilla, and now provides the option to enable do not track feature for it’s users.

    Google announced recently that they will support “Do Not Track” on their native browser “Google Chrome”.

    Here are the simple steps which can help you to enable it in Mozilla Firefox:

    Instructions:


    1. Open Mozilla Firefox

     mozilla-do-not-track-1


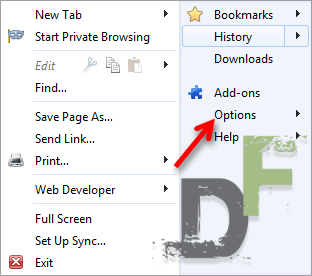
    2. click on Firefox on the top left corner of the window and then click on options.


    mozilla-do-not-track-2


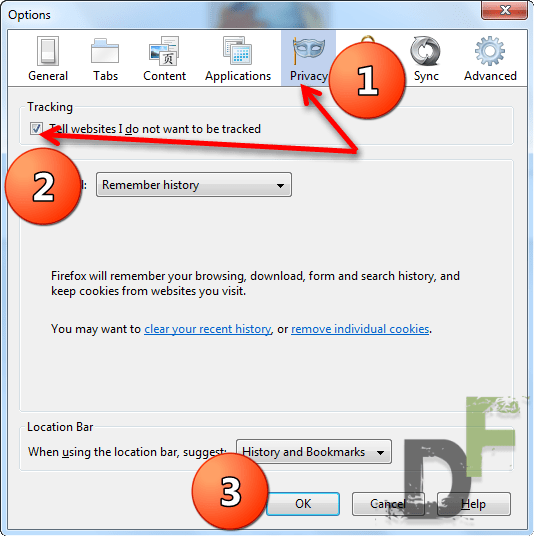
    3. Click on Privacy button and then Click on checkbox which reads “Tell browsers I do not want to be tracked”


    mozilla-do-not-track-3


    4. Click OK


    Requirements:

    1. Ability to follow simple instructions

    2. Mozilla Firefox should be installed on your computer.


    Watch this video if you still have doubts:

  • [How to] Wipe Google Search activity history from your account

    [How to] Wipe Google Search activity history from your account

    Google’s new Privacy Policy, allows them to collect the information from your account with your legal consent. Your search results lets Google bots determine your interests and serve the contents accordingly, which includes and not limited to all the services provided by Google. Google’s privacy Policy is somewhat controversial and there is less privacy.

    It is found that even if you delete the “web history” from your Google account, Google doesn’t stop storing information collected by it’s bots for internal usage and to improve users experience. So no matter what you do, you cannot stop Google from determining who you are, what you like, where do you live, your sexual orientation, religion and other sensitive information about you. 

    We don’t know whether the steps mentioned below will help you delete all the information collected by google prior to the new Google’s Privacy Policy, but you can have a shot, Just follow the steps:

    Instructions:

    1. Sign into your Google Account 

    z digitfreak 00401


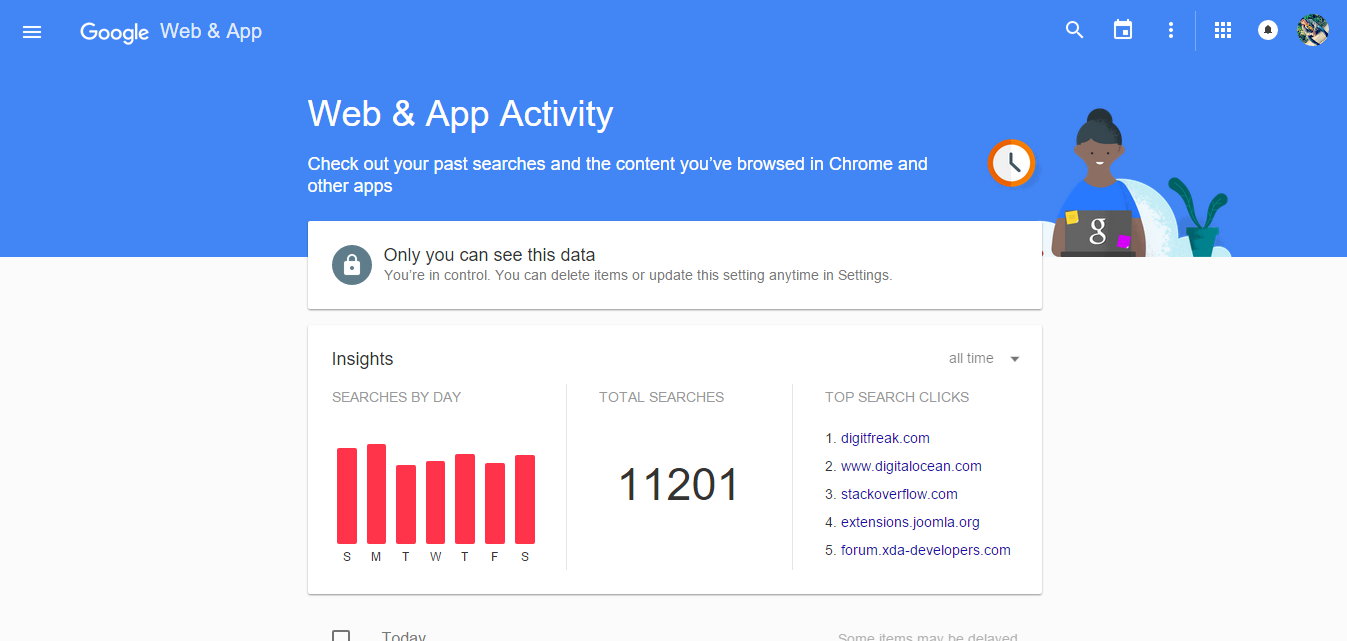
    1. Go to https://www.google.com/history

    z digitfreak 00397 


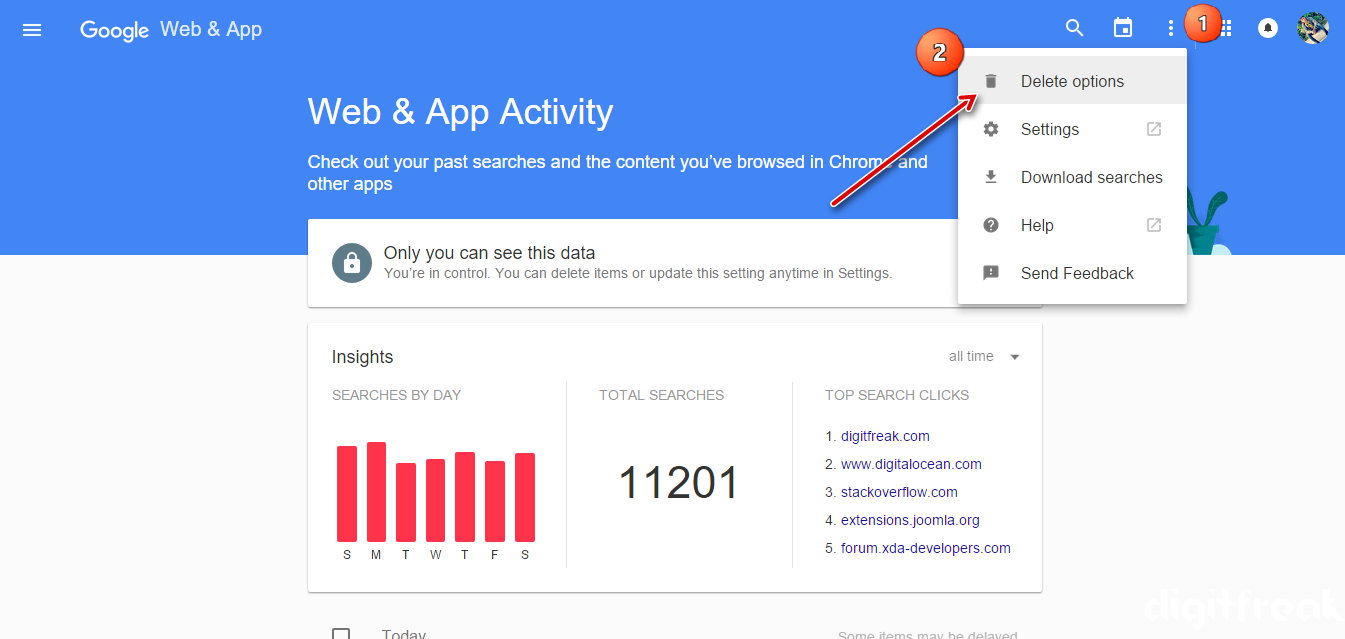
    1. Click on 3 dots on the top-right side of the page to reveal the options > Select “delete options” from the drop down list.

    z digitfreak 00398 


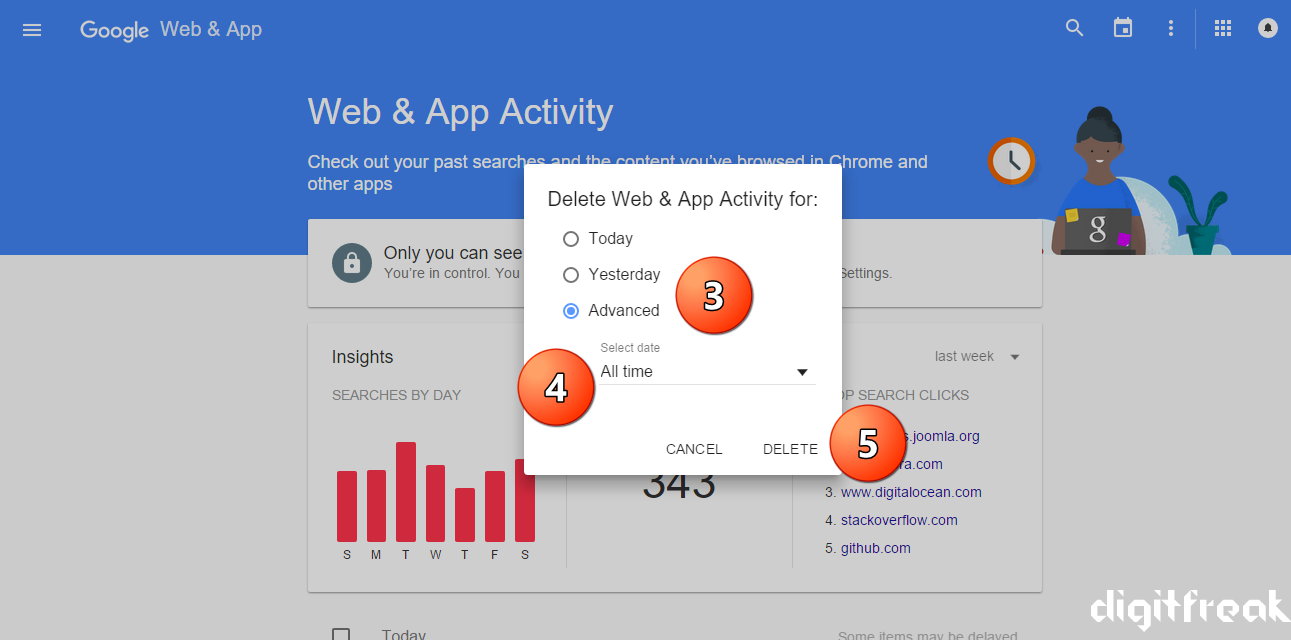
    1. In the pop-up window, select radio button next to the “advanced” option > select “All time” when asked to select date, and click on “delete”.

    z digitfreak 00400


     Requirements :

    • Internet Connection
    • A Google Account
    • Ability to follow simple instructions

    Note: Disabling Web History in your Google account will not prevent Google from collecting and storing this information and using it for internal purposes. It also does not change the fact that any information collected and stored by Google could be sought by law enforcement.

    With Web History enabled, Google will keep these records indefinitely; with it disabled, they will be partially anonymized after 18 months, and certain kinds of uses, including sending you customized search results, will be prevented.

  • [How to] Some common pratices to Keep your Laptop healthy

    You love your Gadgets and so does your gadgets in return, by providing the best platform they can. Every Gadget you use does their job, what they are best at and it is your responsibility to keep them healthy.

    Laptops are more delicate objects which performs jobs which are impossible without them. You get most of your work done by it and it never complains, except in some situation where you are the only one “guilty”. You have to take care of it at all situations and not to act lazy.

    Here are some common pratices you can adapt to  take care of your Laptop (or any other similar Gadget):

    • Keep it clean: When you get your new gadget you keep it as if it’s a “King of the world” and after few months it’s your “servant”? You have to change this attitude. Your gadget is your property and it is your responsibility to keep it clean. Always clean your gadgets twice a month for longer life span, cleaner you keep it longer it will be available for you and do your dirty jobs done.  Clean your battery’s metal contacts every couple of months with a cloth moistened with rubbing alcohol.  This keeps the transfer of power from your battery more efficient.
    • Do not use improper sanitation: ok, i am getting little into vacubular disaster, but you have to understand how delicate your gadgets are. They seem tough from outside but are never from inside. Never use manufactured detergents or any other similar household cleaner which contains acetone, ammonia, or alcohol, it can ruin the beautiful coating on your laptop or any other gadget.
    • React to the accidents immediately: You dropped your laptop, spilled water on it, bumped it on the desk or it is just banged against the wall, always react to such situations immediately. When you bump your laptop on the floor or spilled water on it, immediately remove the battery and check if anything damaged from the outside or clean the water immediately and make it dry (using your hair dryer or just the natural sunlight will do). Never act lazy. Some people suggests that you can place your laptop in a bag of rice, which helps soaking the water.
    • Never leave your laptop unattended for longer: You don’t use your laptop at regular intervals, well that could be the problem, specially when you live at someplace where climate is not stable (sudden temprature drops or environment change). Never leave your laptop in too cold or too hot situation, it might crash your harddisk. Yes you heard it right. Your hard drive can expand and fail in the heat and freeze in the cold if left unattended. Just like liquid, heat, cold, and your laptop are not good bedfellows. Not only do hot and freezing temps suck the life out of your battery, but they also cause damage to your internal components.
    • Always use Shutdown button: Some people just put their laptop on hibernation or standby mode. Well these options can come handy at some situations when you are in a hurry, but making it a habbit isn’t a good step for your laptop. Always use proper “Shut Down” process after work, which can help protect your internal delicate components.
    • Use Anti-Virus: Some people thinks if they are not using the internet or are just so careful they won’t need an Anti-virus to protect their laptop or computers. Well, this assumption is totally wrong. You must have a gatekeeper to protect your castle, it is not like your home where you live. Your computer stores sensitive data and some personal stuffs which you won’t like the world to see. For such purpose their must be a proper Anti-virus installed on your computer or laptop (DigitFreak suggests “Kaspersky Internet security 2012”). Some virus or malwares are capable of destroying your hard disk or other internal componetns, so better protect it. 
    • Defrag regularly:  The faster your hard drive does its work – less demand you are going to put on the hard drive and your battery.  Make your hard drive as efficient as possible by defragging it regularly. (but not while it’s on battery of course!) Mac OSX is better built to handle fragmentation so it may not be very applicable for Apple systems.
    • Dim your screen: Most laptops come with the ability to dim your laptop screen.  Some even come with ways to modify CPU and cooling performance.  Cut them down to the lowest level you can tolerate to squeeze out some extra battery juice.
    • Protect your investment:  If you’re going to be lugging a laptop around, make sure it’s protected in a padded case.
    • Cut down external devices: USB devices (including your mouse) & WiFi drain down your laptop battery.  Remove or shut them down when not in use.  It goes without saying that charging other devices (like your iPod) with your laptop when on battery is a surefire way of quickly wiping out the charge on your laptop battery.
  • How to make a bootable Windows USB anytime!  [windows and ubuntu platforms]

    How to make a bootable Windows USB anytime! [windows and ubuntu platforms]

    The only way to do was through a bootable pen drive carrying windows. I thought that I knew the method to do that but when I tried it all failed. I even looked for the method online but all I could find were complicated ones and required a software or two. Another trouble added to the heap was that they were all from windows point of view but as a user of ubuntu I was stuck there.

    Through this tutorial you can make a windows bootable pen drive anywhere anytime. It is so simple that now I think that I already knew it. yeah actually this was the method I kept forgetting and now when I remember it I can share it with you all.

    steps you need to follow :-

    1. Get a USB drive first but the drive must have space for the setup of windows you are intrested in making a bootable version of. For example if you wish to make a bootable USB for windows 7 then the USB must be of 4GB or above capacity as the setup size of windows 7 is about 3GB.

    windows 1windows 2
    2.
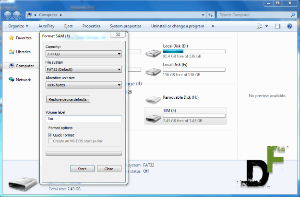
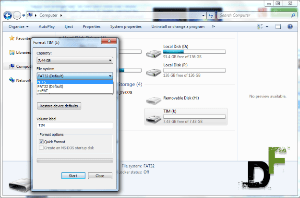
    Format the particular USB drive into NTFS partition.If you don’t know how to do that the following steps will lead you to it in windows platform:-
        – Go to “My Computer” and select the USB drive you have connected in the system.
        – Right click on the USB drive and select “Format”.
        – A window opens up where you can select the type of partition you wanna format that pen drive into. Select “NTFS” from the file system option.

        – Click on “Format” and you are done.

    If you are an ubuntu user then you need to follow the following steps:-
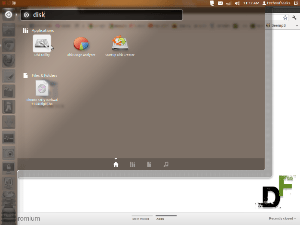
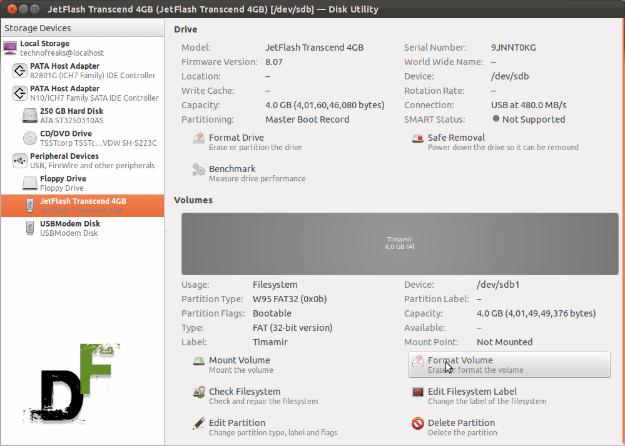
         – Open your “disk utility” by searching it through the ubuntu dashboard.
         – There select your USB drive from the left-hand side panel.
         – Now in the right pane click on “Unmount Volume”
         – Next click on the “format volume” button. A new window will come up where select the partition type as NTFS and format your drive through the wizard. If your formatting is done then you are also good to go to the next step.

    Now your USB drive is formatted in NTFS partition type we can move towards the third and final step.

    ubuntu 1ubuntu 2ubuntu 3
    3.
    For the last and final step of this tutorial you need to have the setup of the respective windows version, or you can even have the disc of that version. Just copy the whole setup of the operating system from that folder or CD and paste it into the USB drive. Don’t put the setup inside any folder inside the USB stick, just it paste it openly into the drive.


    If you wish to use the left over space in the drive for carrying something then you can make any folder inside the drive and put the content there.
    So it is as simple as that. Your bootable pen drive for windows is ready. Just restart your pc and boot from the drive using boot menu and you can now install windows on that pc without any worries. And also for your information i would like to add that this method is not limited to those who don’t have DVD drives but should be used by everyone as the installation process speeds up and your disk is also not scratched much.


    requirements:-

    1. A USB drive that has enough capacity to hold the setup files of windows.

    2. The installation disc or copied files of the same disc of windows.


    Hope this tutorial solves all your troubles, as it clearly solved all of mine. If not then you can ask for any other help from us freaks here as Digitfreak is always here to help you out when you are in a digital puddle. Feel free to write your views below.