Tag: nbsp

  • Ubuntu 11.04 : Using source code for Offline package installation

    Installing software in Ubuntu is a piece of cake. Just launch the Ubuntu software center and type in the name of the software in the search bar; click on ‘Install’ and you have it. This all seems and sounds so easy. The part we miss is : there is an Internet connection involved. If you do not have an Internet connection, installing software on Linux machine does not remain easy. In most cases, you cannot simply download a .DEB (or even a .RPM) file and double click to install it! There are a lot of dependencies to be resolved. Unless dependencies are resolved, the software will not behave well. Even it’s running is under question.

    However, it is important to understand how to install software on Ubuntu without an internet connection.

    Compiling programs from source code 

    ubuntu terminal

    This is the way preferred by geeks because there is no other way which can give more control over software installations. However, it is also complicated because of the technical details involved. If you have never compiled anything, maybe this method is not for you. To follow this method, you must have the source code of the package you want to install. Let us take the example of compiling php on our computer.


    1. Download the source package. In our case we need to go tohttp://www.php.net/downloads.php and select the package we want. We assume the php-5.3.6.tar.bz2 package is being used for the installtion.
    2. Now open a shell and go to the directory where the file gets downloaded
    • cd ~/Downloads/
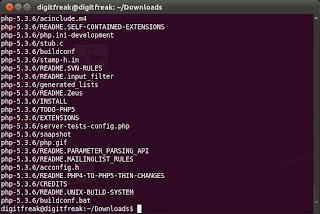
    1. Then unpack the file using the tar command. This will create the required files in the firectory php-5.3.6 and come back to prompt.
    • tar -xvf php-5.3.6.tar.bz2    <- Note:please replace the version number with the one you downloaded from the link above.
    1. Now change the directory to php-5.3.6 by using the cd command. Now run the command.
    • ./configure -help

    terminal

    1. This will list down the options which the software supports. You can add as many parameters as you want from the list (you should understand what they mean). Once you have done that, run the ./configure script again with the parameters you have selected beofre. Let us assume that we want to enable support for PostgreSQL. Since ./configure –help says : 
    • –disable-ipv6                       Disable Ipv6 support

    so we will run the command

    • ./configure –disable-ipv6
    1. The command checks whether the system meets the requirements or not. In the end it throws the error:
    • configure: error: xml2-config not found. Please check your libxml2 installation.

    Now, we have a problem. This command is a part of the package libxml2-dev. So we have to install that first. Only then shall we be able to compile the php program. Now, this is the most annoying part. The configure script does not report all errors in one go but stops at the first one. If you resolve the first one and then find another, it becomes much difficult. 

     
    A bigger problem comes when you are trying to install a dependency (in this case libxml2-dev) and you find that it too needs some other package. Now think of the situation when you hae multiple dependencies (say 7) and each dependency further relies on 4 other dependencies. So there are in total of 28 dependencies which you need to install, one after another. Since, we are talking about installing software on a machine with no Internet connection, and it is possible that you might be using the nearest cyber cafe or a friends’ computer to download packages (searching the right version is another problem rooted within this all), it will easily drive youmad! 
     
    However, for sake of simplicity, let us consider for the time being that we have to deal with only one single dependency – libxml2-dev and that we have installed it.
     
    Now run the command again and you should have a long output and the end of it should say “Thank you for using PHP.”
     
    This indicates that the PHP package is ready to be installed .
     

    Note: At this point of time, it has been verified that PHP can be installed on any system because the package was most probably tested by the developers). The only job the configure script does is to check whether the system satisfies the requirements and create other files called ‘makefiles’. A makefile is once again a type of configurationfile. It contains instructions for the compiler. 

     
    Now we have to actually compile the package. So call the program ‘make’ by typing the same at the command line. This will call the compiler for every file individually and compile the whole package. Make should produce a lot of output and then get ready with the command line once again. Do notice the last few lines though. If they mention that there was an error then you should ask the community for help (make help). If make did not report error, it’s time to finally install the package. Just say :
     
    • sudo make install

    Your software should be installed after ‘sudo make install’. But wait do not delete the php-5.3.6 directory. If later on, you want to remove PHP from the machine, you can go back in to the same directory and run ‘sudo make uninstall’ and the software would get removed from your system in an easy way. Otherwise, removing files individually is a real tough challenge, and one with no benefits in almost all cases.

     
    While all this might seem quite easy, the most difficult part of installing software by compilation is where you have to resolve dependencies. It is this part which make the task challenging and geeky. Keeping that part aside, there is almost nothing to be afraid of when it comes to installing software by compilation.
     
    Also, you might be wondering why we are providing with all this extra bit of information and getting you all confused and scared of the steps involved. The main motivation of doing this? We want you to know your Ubuntu better. However at the end it’s you who are going to use it and if you don’t know how Ubuntu works and how to make it do things it’s hard for a user to adopt it. At first it might be look like a little fuss but at the end it’s you who will be benefited the most.
  • Ubuntu 11.04 : Using synaptic for Offline package installation

    We have already shown you how to install software on Ubuntu without an Internet connection by compiling software on it. However, we believe we have also demonstrated that resolving dependencies and installing them before the software in need is a task challenging enough to make those tremble who use pacemakers to keep their heart running. It was this reason that package management was invented. Package manager like YUM and APT were created to be able to install a pre-compiled software package on computers and keep track of them. Since Installing software by source also takes a lot of time depending on the machine configuration and the amount of code, package management came up as a better solution. 

    It was because of such inventions that Ubuntu enjoys the ‘search-click-go’ style for software Installation.

    synapticHowever, this style involves heavy use of The internet, which for some is still a luxury, leave alone the matter of unlimited downloads and high speeds. If you think that it is going to be very tough, you are mistaken. It is even easier than our previous source code compilation method. This method is going to be a little different but not too tough. 

    Well, to begin with, ask yourself – how does someone install a software on Windows if he does not have it? In 99 out of 100 cases, the answer would be to download the software from the internet and run the set-up. Offline software installation for Ubuntu is not much different either. Although Ubuntu software center is what a user would prefer and the command line-apt-get is the friend of the one who loves to see everything happening in characters rather in graphs and bars. Synaptic is what you would need help from if you were to look for a method to install software without an Internet connection on the machine. 

    To be able to do so, follow the following steps:


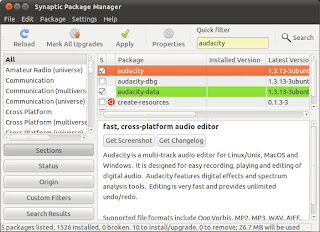
    1. Launch Synaptic Package Manager. This can be done by typing “synaptic” in unity, and by launching “synaptic Package Manager” from the system Administration menu in Gnome.
    2. Once Synaptic is up and running (it takes some time to rebuild its search index). Search the packages which you want to install and mark them for installation. Synaptic might also ask for installation of other packages as dependencies. Confirm them. Do not press the ‘Apply’ button. In this example, we will try to install ‘audacity’ which does not come with Ubuntu in the default package.
    3. Go to the ‘File’ menu on the synaptic window and click on the ‘Generate Package Download Script’ This will open a new window asking you to save your file. The file is a txt file which can be executed as a shell script on Linux Machines. 
    Here comes the twist, you can use the shell script on the other Linux Machine with internet and download the .deb files. But, if you cannot find the other Linux system around then what you would do?
    Well, we have the way to get around it somehow. Remember we just said that the shell script is just a txt file. so we can see what is there inside the shell script with any text viewer.
     

    1. In case you want to use the shell script on windows or other OS save the shell script with the .txt extension. The point here is to be able to view contents if you have to. You can use any extension as long as you are able to do ‘open with…’ on the file and open it with a text editor. For the sake of the example, we will use the name ‘audacity.sh’.
    2. If you run this script on Linux machine with an Internet connection, it will download the required set of packages. However, let us assume that we are using a Windows based machine and still want to use the generated file. To understand the procedure, we will tell you a few things about the generated file. To understand the procedure, we will tell you a few things about the generated script file. The first thing to be understood is: the file is basically a shell script file. All it does is to call the ‘Wget’ program to download the required packages. Wget is a command line program which can be used to perform HTTP downloads. The generated script file simply calls the wget program with the address of the packages. If you open the script file with any text editor, you shall see the commands and of course, the URLs of the packages to be downloaded.
    3. Now you know the trick. All you have to do is to go to the nearest friend or internet accessible area with an Internet connection and download the packages whose URLs are mentioned in the script file. For Example, if a line says.
     

    then you should download using the link

    1. Once you have downloaded the packages, all you have to do is save them all in the same directory and put them on the same machine (the one with no Internet connection) and launch Synaptic again.
    2. Now, go to File. Add Downloaded Packages. This will open a new window where you have to select that directory where you have placed all your.DEB files. Remember that you cannot select individual DEB files in the selection window (It’s for selection  of directory, not files). Synaptic will automatically install all of them and there to have it! The software is installed.
    3. Optionally you can also use the command 
    • sudo dpkg -i *.deb

    in the directory where you saved all the .deb files. 

  • What happens behind the scene when you press windows button?

    Ever wondered what goes on behind the scenes, when you press that win start button and get the pop up? Within that microsecond’s delay, here are some quick step-by-step explanation what goes behind the scenes.

    1) Process Initiation
    After the windows key is pressed, a scan code is generated, scan code is the binary code released to the pressed on the keyboard.

    2) Interrupting the processor
    Keyboard micro-controller interprets the scan code and stores it in the special memory till the processor is ready. A hardware interrupt is sent to the CPU for further action.

    3) The Processor
    Initially, the interrupt from the micro-controller is kept in a queue, till the processor is free. On coming across the scancode, it is routed to the operating system. The OS decides for what task the key was pressed.

    4) Calling RAM
    The OS involves the Explorer which determines that the win start key was pressed. Necessary 0s and 1s are generated to be sent to RAM.

    5) OS Role
    The explorer calls the OS to display the output on the monitor. OS reads RAM and sends the output to the video memory of the graphics card.

    6) Mission Achieved
    The graphics card shootout the relevant signals via the display port. This causes the Start Menu pop-up to display on your monitor, the next time it refreshes.

  • Secrets of Google search engine – what’s happens behind the scene

    Here is the quick step-by-step note, how all this happens just behind you naked eyes within a fraction of seconds.

    1) Entering Query in Google.
    This stage is the starting point for an end user. Guy sitting in frony of his computer, typing out a search term (keywords or query) on Google.com through his web browser. This is where the fun begins, an Alice in Wonderland moment for our search query.

    2) Query processing stage
    As you start entering your search term, Google tries to complete your query based on closest matching search terms entered by Google users around the world. This is done by a query processor that tries to predict and serve results (Google Instant) off Foofle’s servers.

    3) Index Servers
    After pressing Enter, the query hits Google’s Index servers. index servers are thousands of server farms housed in datacenters located around the globe that record every single webpage on the internet through “spiders”

    4) Using Page rank
    Next up, using page rank technology, the top search results for your query are calculated by document servers.

    5) Ad server
    Google’s Ad server then tries to plug in contextual ads in the search result page.

    6) Social
    As Google prepares to display your search result page, it also checks with facebook and Twitter to see if people are talking socially about your search query. It plugs in these links if necessary.

    7) Search Result
    Viola! within milliseconds, the Document Server’s top 10 search results, Ad sever links, and social elements come together to form the Google search result page.