Tag: nbsp

  • [How To] Change Startup Programs in Windows 7

    With the release of Windows 7, Microsoft has made many changes to the Windows operating system. How to make specific programs start as your computer starts and loads Windows 7 is similar to how it was done with previous versions of the Windows operating system. Startup programs are saved in a specific folder on the hard drive. When the operating system loads, links listed in this folder start their respective applications. Changing settings for current startup applications is accomplished through the system configuration tool.


    Instructions:


    1. Click the Windows “Start” button and type “msconfig” in the Search text box at the bottom of the menu. This opens the System Configuration console.

    2. Click the “Startup” tab. This allows you to see the programs installed as startup options on your computer.

    3. Check the boxes of the applications you want to start when your computer starts. For programs you no longer want to start when the computer starts, remove the check from the program’s corresponding check box.

    4. Click “Apply” and choose “OK.” A popup window will ask if you want to reboot the computer or exit without rebooting. Click “Restart” to reboot the computer and save the changes. Choose “Exit Without Rebooting” to exit the console and have the changes take effect the next time you start your computer.


    References:


  • How to Secure a Wireless Network from Hackers?

    How to Secure a Wireless Network from Hackers?

    The reason we secure a wireless network is to stop people from using the services of our network who don’t have permission to utilize them. It is harder to secure a wireless network from hackers as compared to a classic wired network. This is due to the fact that a wireless network can be accessed anywhere inside the range of its antenna.

    In order to secure a wireless network from hackers, we should take proper steps to save ourselves against security issues. If you don’t secure a wireless network from hackers, you might end up without its service. The consequence might also include the utilization of our network to attack further networks. To secure a wireless network from hackers, you should follow these simple wireless networking tips:

    1. Strategic antenna placement:

    The first thing you have to do is to position the access point’s antenna in a place which restricts the range of its signal to go further than the required area. You should not put the antenna close to a window because glass can’t obstruct its signals. Place it in a central location of the building.

    2. Use WEP:

    WEP stands for Wireless encryption protocol.  It’s a customary technique for encrypting traffic on a wireless network. You should never skip it as that will allow hackers to get instant access to the traffic over a wireless network.

    3. Change the SSID, disable the broadcast of SSID:

    SSID stands for service set identifier.  It is the recognition thread utilized by the wireless access point due to which the customers are capable of starting connections. For every wireless access point arranged, select an exclusive as well as unique SSID. Also, if it’s attainable, hold back the broadcast of the SSID out over the antenna. It won\t appear in the listing of offered networks, while being able to provide services as usual.

    4. Disable DHCP:

    By doing this, the hackers will have to decode the TCP/IP parameters, subnet mask as well as the IP address in order to hack your wireless network.

    5. Disable or modify SNMP settings:

    Change the private as well as public community settings of SNMP. You can also just disable it. Otherwise the hackers will be able to utilize SNMP to get significant info regarding your wireless network.

    6. Utilize access lists:

    For additional security of your wireless network, and if your access point support this feature, employ an access list. An access list lets us determine precisely which machinery is permitted to attach to an access point. The access points which include the access list can employ trivial file transfer protocol (TFTP) now and then in order to download modernized lists to steer clear of hackers.

  • how to display the hidden setting of iPhone? iPhone secret codes

    Today tip will help you to play with your iPhone mobile phones using secrets codes. These secret codes will work on most of the Apple mobile handsets. You can display the hidden information of Apple handsets and troubleshoot the routine problems with the help of these codes.

    Follow the list of latest Apple codes list: 

    CodeAction

    *#06# 

     To display the IMEI Number of the mobile 

    *225# 

     Use to display the balance detail of postpaid number    

    *#43#

     Use to verify if call waiting is enabled

    *#61#

    Verify the number for unanswered calls

    *#62#

     Verify the number for call forwarding if no service is available

    *#67#

     Verify the number for call forwarding if phone is busy

    *#646#

     Use to display the minute detail of postpaid number

    *777#

     Use to display the balance detail of prepaid number   

     *3001#12345#*

     Display the iphone inner settings

    *#33#

     To verify whether barring is enabled or disabled for outgoing

    *#21#

     To display the settings for your call forwarding

  • How to Hide Web Browsers Tracks

    Give your internet browser instant amnesia with these quick tricks. A lot of these tactics make surfing faster and safer, too.

    Cache out

    Back in the bad old days of dial-up internet, web browsers tried to be helpful and speed up browsing by downloading and storing a cached copy of the web pages we visited, since calling up that information from our hard drives was a lot faster than downloading it every time we went to one of our favorite sites. Now, with the

    widespread availability of fast internet connections, this cache of temporary internet files is more like our browsing software’s appendix than a must-have feature.

    Be sure to delete your digital trail

    Deleting these files when your browser closes, rather than letting them hang around, is definitely a good idea if you don’t want your computer — and anyone who happens to sit down at it — to know where you’ve been. Internet Explorer lets you do this automatically when the browser exits; Firefox, Safari, and Chrome all require you to delete these files by hand (though there are extensions for bothChrome and Firefox that let you automate the process).

    Don’t know much about history

    So, we’ve dumped out the temporary files that your computer has downloaded — but that’s only part of the solution. Your browser still remembers what pages you’ve been to (called the browsing history), a convenience that allows your browser to populate the address bar after you’ve only typed a few letters of the web address. However, by clicking the down arrow at the edge of the address bar, anyone can see at a glance a whole bunch of recent web destinations that browser has been to. Not exactly the way to keep a low profile if you’re doing some holiday shopping or job hunting on company time, to say the least.

    Deleting your history purges this information from your browser’s memory (since it persists from one browsing session to the next, even if you purge your temp files).

    Clearing your history is easy

    Cookie monsters

    Cookies, those tiny text files that let web pages know you’ve visited them before, are the third part of the equation. Their entire reason for being is to identify you and track your web habits when it comes to being a regular at a website, whether it’s Amazon or Facebook or Gmail. Tossing your cookies will allow you to visit websites as if you’d never been there before. Anyone snooping on your computer after you’ve cleared the cookies away won’t see their telltale leavings, even if the cookies themselves don’t contain anything but site addresses and the dates and times of your last visit.

    When convenience gets inconvenient

    Finally, there’s the matter of web browsers storing usernames, passwords, and other form data for sites you visit that require a username to log in. This information is a time-saver when you’ve got a million passwords to remember, but it can also be an Achilles’ heel if you’re trying to be stealthy about your web travels.

    If someone else sits down at your computer to check email on the same webmail service you use, it’s far too easy for browsers to auto-fill the login fields with your username (and maybe even a password), so this is something you may want to scrub from time to time, too. After all, it’s one thing for somebody to glance at your web history and something else altogether if up comes your email inbox!

    Private eyes

    All of the current crop of internet browsers include a feature that lets you in effect surf off the record. The programs themselves will empty the cache and delete the browsing history when you finish; they won’t load any add-ons, and they’ll ignore website requests to store cookies.

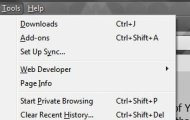
    No matter which of the major browsers you use, visit the Tools menu (or select the gear- or wrench-shaped icon that serves the same purpose) to choose to start a Teflon-coated browsing session, usually in a new window. The upside of explicitly opening a private browsing window is that it doesn’t inconvenience you by deleting your history, cookies, and any stored logins you normally use, while still cloaking what you do in that window from prying eyes.

    There are plenty of reasons why you might want to use private, no-traces-left-behind surfing sessions, like planning a surprise getaway for you and your partner or keeping tech-savvy youngsters from knowing where you’ve been shopping for their birthday present.

  • How to Connect your mobile or other wireless devices to laptop using Bluetooth technology

    How to Connect your mobile or other wireless devices to laptop using Bluetooth technology

    We can use Bluetooth technology to connect laptop and cell phone. We can move videos, images, photos etc from  desktop computer or a laptop to our cell phones. In order to use Bluetooth technology to connect laptop and cell phone we need a laptop and a cell phone which support this technology.

    If the laptop doesn’t support it, we can use a USB Bluetooth dongle. Just plug it into the USB port of the desktop computer or laptop. Leave the rest to Microsoft Windows. It will find the driver and install it itself. If it is not supported, we can manually install it via the manufacturer’s compact disk. Follow these simple steps in order to use Bluetooth technology to connect laptop and cell phone: (In this example, we are using Windows Vista.)

    Turn on the Bluetooth feature on your cell phone.

    Make this setting:  my Phone’s visibility -> Shown to all on the cell phone.

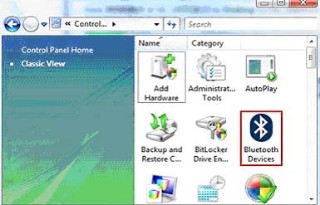
    Open Bluetooth Devices by clicking on its icon in the Control Panel.

    control-panel7

    OR,

    Look for the Bluetooth driver in the Device Manager and double-click on its icon.

    device-manager

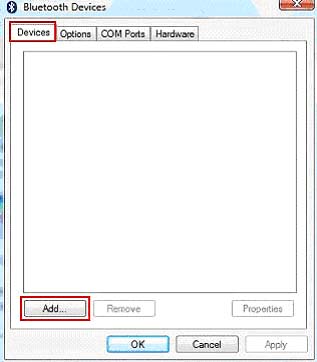
    Click on the Add button in Bluetooth Devices dialog box.

    bluetooth-devices

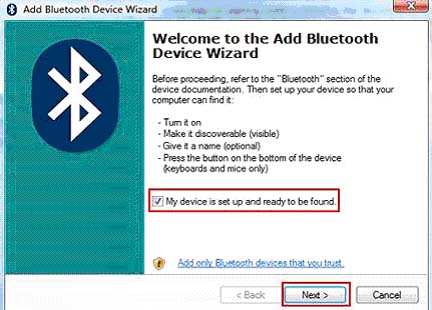
    Check the box for “My devices is set up and ready to be found” in the Add Bluetooth Device Wizard dialog box.

    Click on the Next button.

    add-bluetooth-device copy

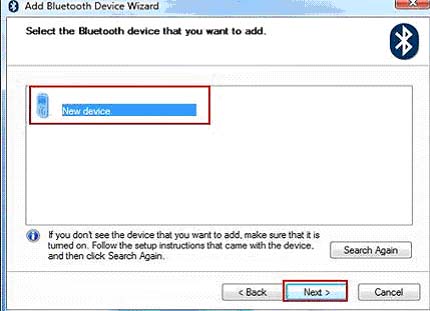
    This device wizard will display the name of the found Bluetooth device close by.

    Click on the device name that you would like to add and click on Next.

    bluetooth-devices-wizard

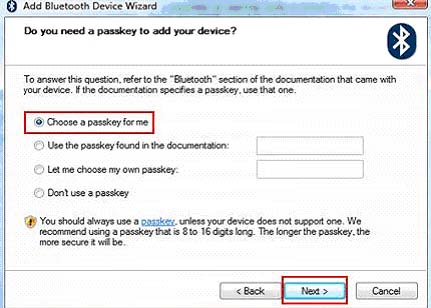
    Select “Let me choose my own key” or “Choose a passkey for me” and click on Next.

    select-bluetooth

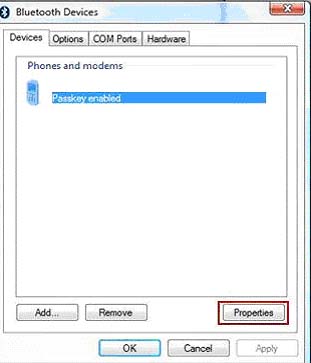
    The Bluetooth device (the cell phone) is now displayed in Bluetooth Devices dialog box. Select the Bluetooth device and click on the Properties button.

    bluetooth-modems

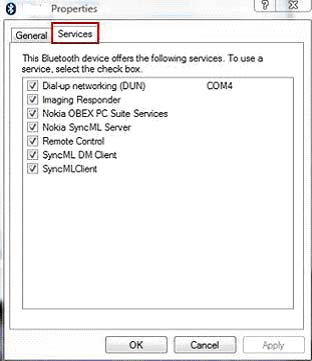
    The Properties dialog box for the device will become visible. Choose the Services tab.

    Check the boxes for the services you want.

    services 1

    In the end you can launch the items of the cell phone.  Transfer photos, videos etc to cell phone via Bluetooth technology.

  • How to Connect Internet On Ubuntu (3G/UTMS/2G/GPRS)

    How to Connect Internet On Ubuntu (3G/UTMS/2G/GPRS)

    Ubuntu detects all the external media by its own automatically without any problem, however, it is not fairly possible to detect all the devices out there without any issues, some devices cannot be detected (which is very rare). Here is the instruction you can follow to setup a new connection for GPRS/3G/4G network configuration. To set up a new connection you can follow these steps.

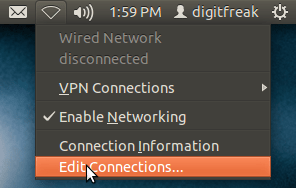
    1. on the upper right corner of the screen click on a triangular shape which is the indicator or internet connections on Ubuntu just like on Windows or Mac.

    task bar_Gnome_ubuntu_11_10

    2. After clicking on it, go to “Edit Connections” and click on it.

    3. You will be greeted with a new pop-up window.

    Screenshot at_2011-10-25_135920

    4. Click on “Mobile Broadband” tab. Click on “Add” button.

    6. Choose you country

    7. choose your internet service provider. If it is not listed by default you can add manually. But most likely it will be there.

    8. Click “Continue” and then “Apply.”

    9. Go to the triangular icon we clicked at the beginning and select your connection from the drop down list. Ubuntu will connect to your ISP and viola you can now surf the internet without any problem.

    10. If you want to get your internet connected automatically at the system startup, Go to “Edit Connections” (that we visited before), click on “Mobile Broadband” tab, select your connection from the list and click on “Edit” button. In the Next window you will see a checkbox at the top tick the “checkbox” where it says “Connect Automatically” and you will get connected to your internet connection automatically at the system start up.