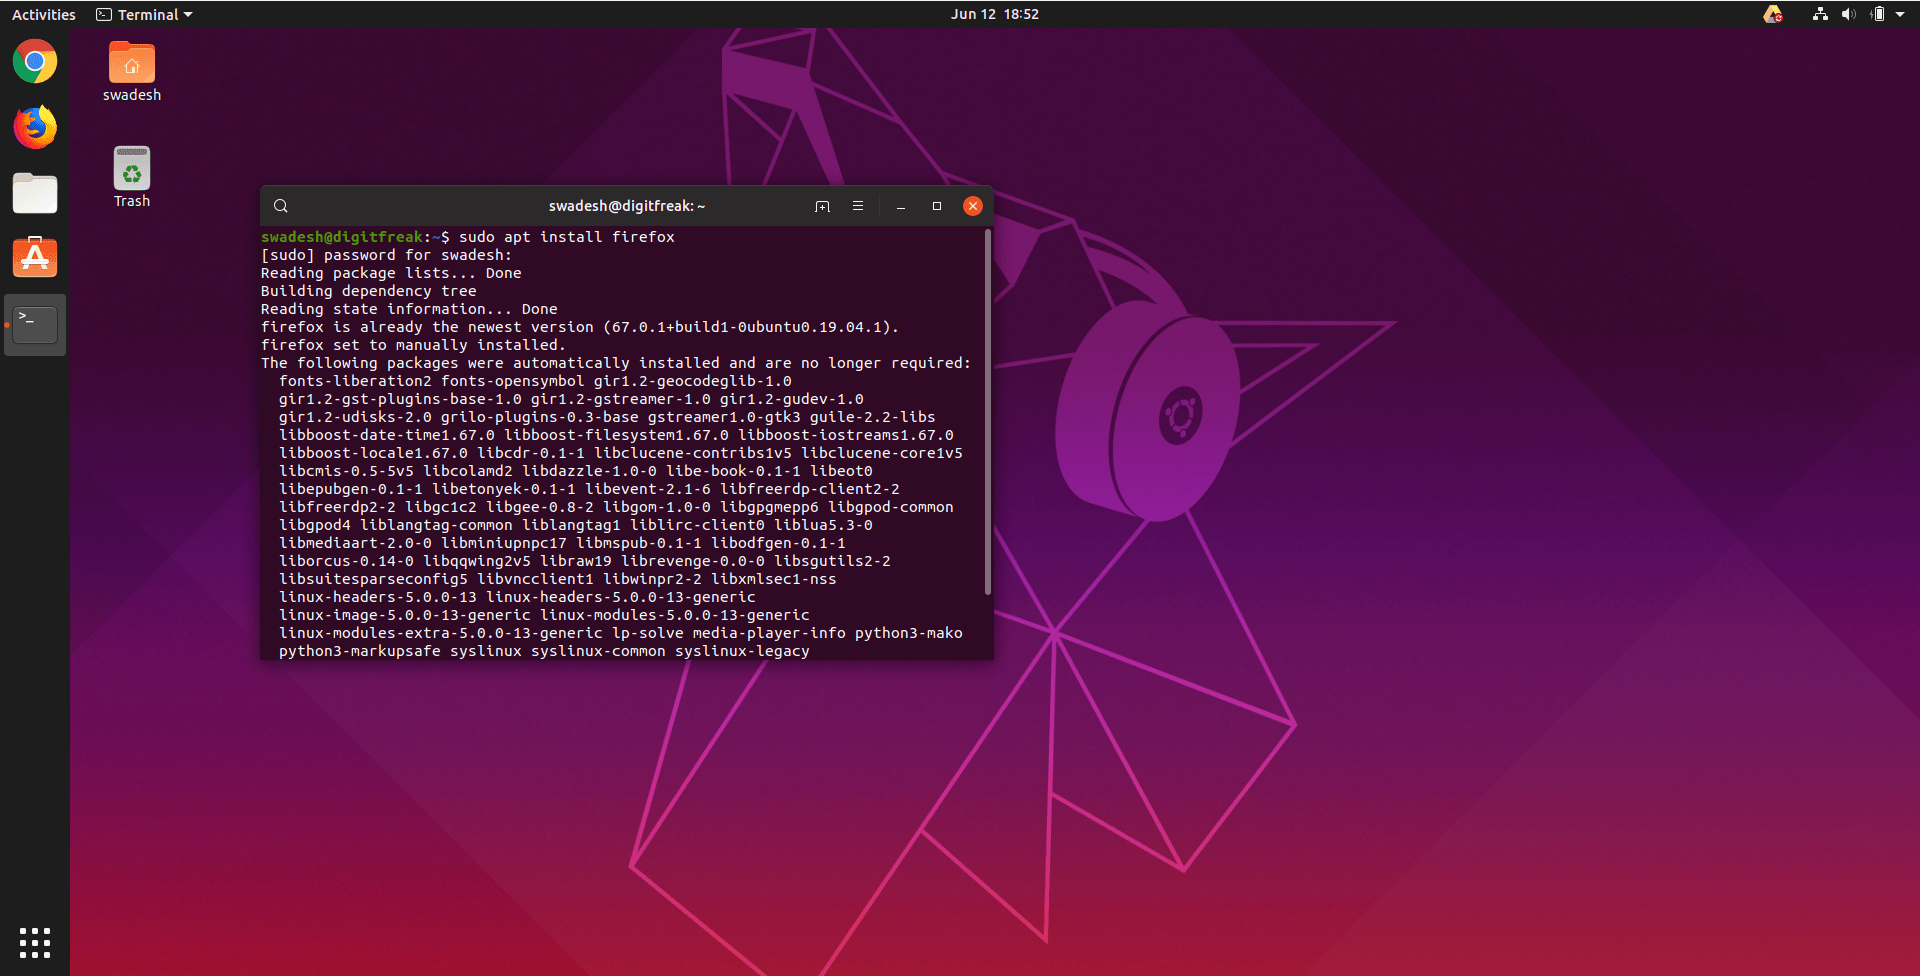
Basically Firefox on Ubuntu provides 4 modes of update. Daily Channels (nightly Builds), Firefox Beta, Firefox for future (named aurora), and then comes the stable release.
all you need to know is the basic terminal commnad to make everything simpler. Here you go.
Many howtos on this subject will tell you to install Firefox pre-versions through Mozilla’s ppa ubuntu-mozilla-daily.
Using this ppa will not only install the latest Firefox 10 nightly build, used to be called “minefield” – updated daily! It will also update your current Firefox and Thunderbird to test versions.
These testing versions are not meant to be stable. Avoid this ppa unless you know exactly what you’re doing! If you want to install firefox on production machine, scroll down to #4
The firefox-next ppa will replace your current Firefox installation with the current available version in Mozillas Beta channel. Simply run these two commands in a terminal:
Note: you can use only one of these three channels (Aurora, Beta, and Daily) at the same time! rememember that Aurora is not stable and is for developers only. It is the test version and a place where Mozilla team tests their new scripts and approach. So, until and unless you are a dev, we won’t recommend you to install Aurora for any purpose.
4. Firefox Stable Releases
Firefox Stable is comes bundled in most of the Linux distros. You won’t need to install or upgrade it manually because linux team updates it automatically each time you run the system update. Since Ubuntu 11.04 “Natty Narwhal”, Ubuntu will update automatically to the newest stable Firefox version when it is released. (it may take a few days more, though) This is also valid for Ubuntu 11.10 “Oneiric Ocelot” and upcoming releases.
However, if due to some reason you don’t have it installed already. you can follow the simple steps below.
That’s all you are ready to have Latest version of Mozilla Firefox. You just need to choose which channel you want to go with. We would prefer stable or beta version. nightly builds and aurora are unstable most of the time and they can really make you slam your head on the wall!
*Don’t subscribe/install two ppa channels at the same time, it would lead to a conflict.
*To remove the ppa, use this terminal command -> sudo apt-add-repository remove {channel name you want to remove}
After having an native option to upgrade the unity with New Gnome 3 with one click, thousands of Ubuntu users did the same. There are many who doesn’t like it and on the other side there are thousands who love the new Gnome interface. There are few glitches user think Gnome shouldn’t have. But, Eventually they figure it out that it has been hidden intentionally. One of it is missing Minimize and Maximize button.
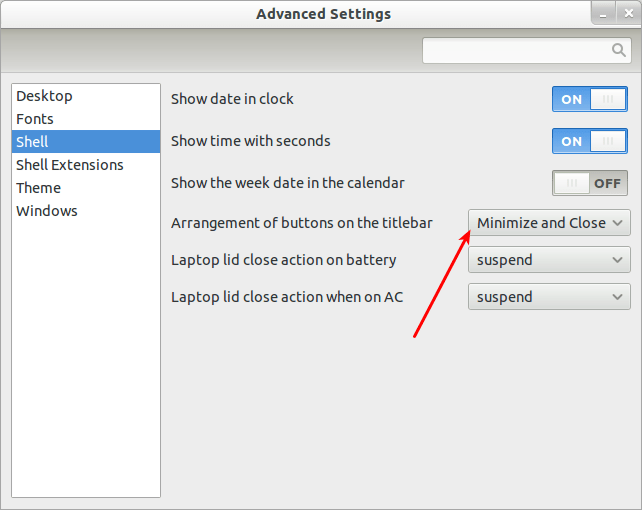
Yes, you heard me right. The new Gnome 3 for Linux doesn’t incorporate the Minimize and Maximize button by default. You have to enable them from the advanced settings. Well, the question is how you can find the advanced settings option in your Ubuntu?
Actually, we are talking about the “Ubuntu Tweak” Repository here. You can download Ubuntu Tweak from software center. or just click here.
Instructions:
1. search for “advanced Settings” in your Computer where you have installed Gnome.
2. Click on “Shell” from the list on the left-hand side of the window.
3. You will find an option “Arrangement of buttons on Titlebar” With the dropdown menu.
Gnome is getting a great shape and it is now stable and user-friendly. The best thing is that Ubuntu 11.10 + (one of Linux Member) can have the gnome interface without much hassle. There are no special tricks to do the specific job. You just need an internet connection and a brief knowledge (or work experience on Ubuntu OS).
Ubuntu 11.10 finally provides Gnome installation through “ubuntu Software Center.” Curious users who wants to try the new Gnome 3 on their Ubuntu 11.10, can now go through the easy and safe steps to try out and install “Gnome-Shell”.
This means that unlike previous releases of Ubuntu installing GNOME Shell in Ubuntu doesn’t require the addition of any extra ‘software repositories’, or the running of any dubious scripts: it can be installed directly from the Ubuntu Software Centre with a simple click.
To get the ‘best’ GNOME Shell experience in Ubuntu we should also install a number of additional ‘extras’.
These include GNOME Contacts – a slick Google-integrated address book: –
GNOME Sushi is a handy file preview tool integrates into Nautilus (the default file-manager). To preview an image, movie, audio track or text file just select it with your mouse or keyboard then tap the space key once to ‘peek’ inside: –
GNOME Tweak Tool lets you tweak the way GNOME Shell behaves. Whether you want to enable icons on the desktop, change the system theme, or adjust system font size, GNOME Tweak Tool lets you do it: –
Once all of the above applications have finished installing it’s time to dive on in to GNOME Shell. Hit the ‘Power Cog’ icon in the top right hand corner and choose ‘Log out’. Be sure to save any work or files before doing this.
Enabling Gnome-Shell
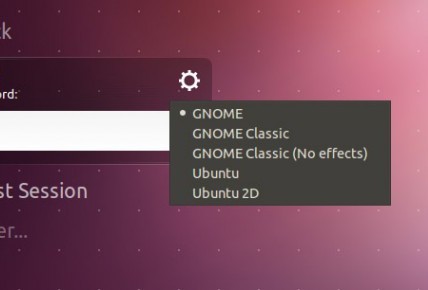
Now It’s time to rock-n-roll. follow the following simple steps toactivate gnome-shell on your Ubuntu 11.10 OS.
1. At the login screen click the ‘cog’ icon to the right of your username
2. Choose the session you want to log into from the menu. For GNOME Shell you’ll want to select ‘GNOME’
3. Enter your password and login as normal
And That’s it. But wait you might feel that Gnome 3 windows are ugly. Because of black and white tint of colors on the file manager and other windows.
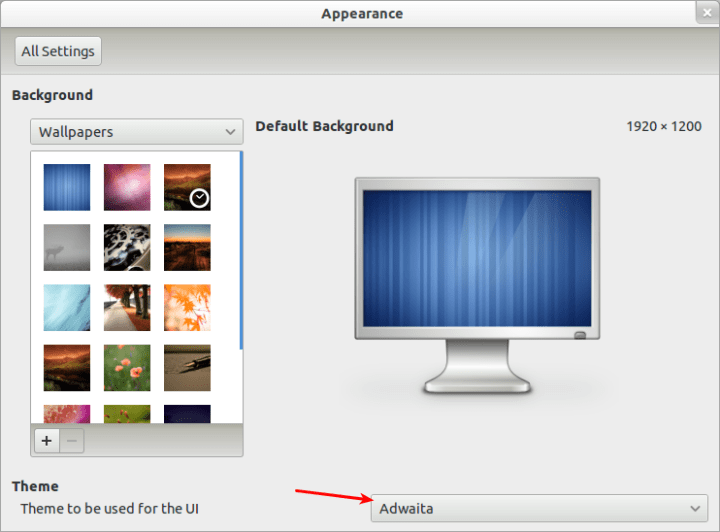
The thing is that you didn’t enable the Gnome Default theme. You are still using the Ubuntu 11.10 “Unity” Theme. So the next step is to change the Default Unity theme to “Adwaita” Gnome Theme. Here’s how:
1. Open ‘System Settings’ from the furthest right-hand menu.
2. In the window that opens we will select the ‘Appearance’ option.
3. From here use the drop-down box at the bottom of the window to choose the ‘Adwaita’ theme.
4. Log out and back in to see the theme take full effect.
Here are some Final ScreenShots, This is what you’ll get on finalized installation.
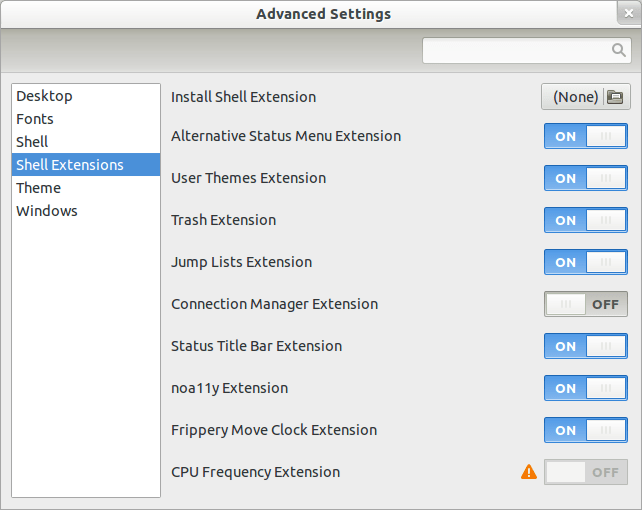
Note: Some Of the Snapshots shown in this article may be altered by extensions provided Gnome. For e.g. Gnome Has clock and calendar aligned center by default. You can force them to be on the right side as it used to be on Unity environment. You can find extensions for Gnome shell on their Official Website – https://extensions.gnome.orgYou can discover and review gnome on their official website here. -> http://www.gnome.org/gnome-3/
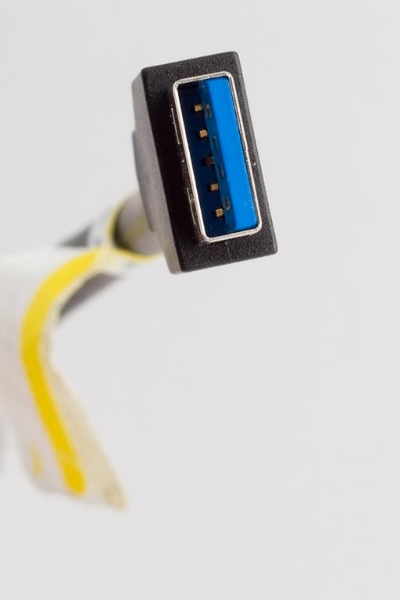
USB 3.0 (universal Serial Bus version 3.0) is a hybrid version of Ubiquitous Universal Serial Bus, Created in 1996 by a consortium of companies led by Intel to dramatically simplify the connection between host and the devices. If we fast forward to 2009, we will find that USB 2.0 has been firmly entrenched as the de-facto interface standard in the PC world for ages. Almost 6 billion (and still counting) devices has been sold ever since. But, we now belong to the era where data transfers @ 100 MBPS is still not enough. With faster computing hardware and ever greater bandwidth demands again drive us where speed is only thing that matters.
Earlier In 2007, Intel demonstrated Ultra High Speed (which was known as SuperSpeed USB) at Intel Developer Forum. It was version 1.0 of USB 3.0 (confusing Isn’t it? well i know that.). It was only on November 17, 2008 when They came up with final specifications. The USB Implementers Forum (USB-IF) has taken over managing the specification and publishes the relevant technical documents necessary to allow the world of developers and hardware manufacturers to begin to develop products which uses USB 3.0 Protocols and Technology.
Speed
There are currently 3-speed modes defined by the latest (known to us) USB 3.0 specification according to the context. They are SuperSpeed, Hi-Speed, Full-Speed. Now the words I am going to write now are stunning. The new SperSpeed mode has a transfer rate of 4.8 Gbps. While the specification retains Hi-Speed and Full-Speed mode, commonly known as USB 2.0 and 1.1 respectively (now you must be wondering, The names are even more confusing), they operates at 480Mbps and 12Mbps and are kept to maintain backward compatibility.
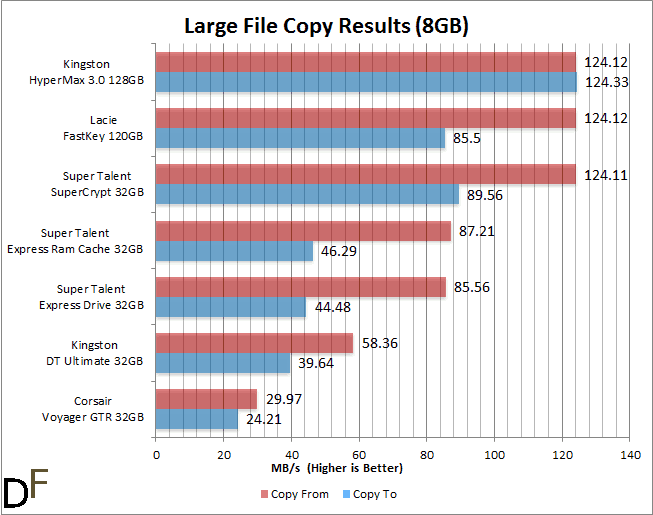
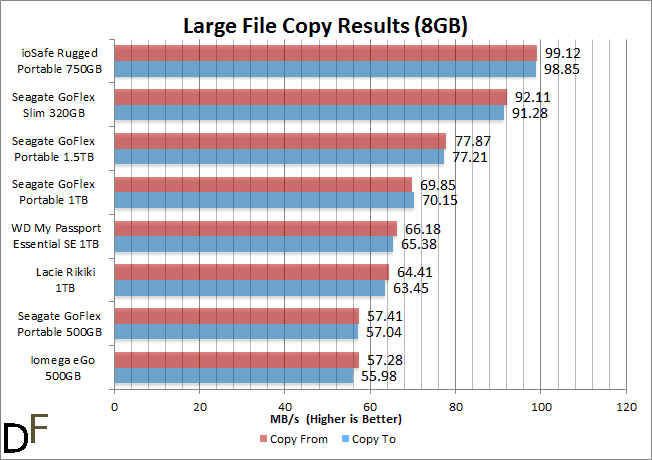
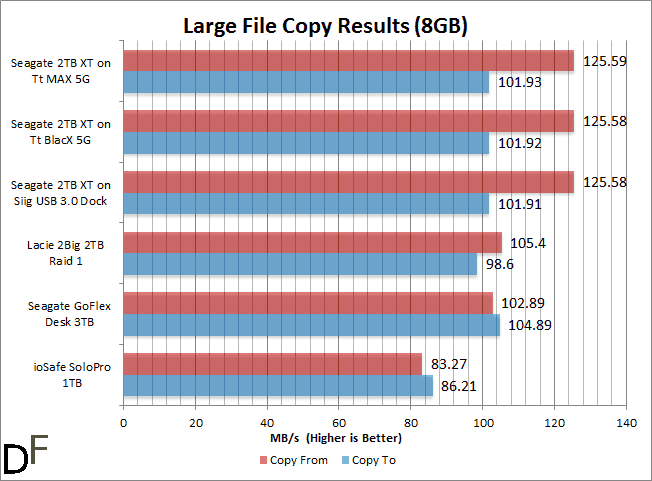
To illustrate how fast the USB 3.0 drives whether they be flash drives, 2.5″ portable drives, 3.5″ desktop drives, we plotted their RichCopy real-world benchmark data in bar graphs so you can easily tell the performance leader in each storage peripheral subcategory.
Flash Drives
2.5″ Portable Hard Drives
3.5″ Desktop Hard Drives
Isn’t USB 2.0 fast enough?
Well, yes and no. Usb 2.0 is fast, but not that fast which could meet the requirement of speed demand of today’s generation and higher computing processors and devices. However, with today’s ever increasing demands placed on data transfers with high-definition video content, terabyte storage devices, high megapixel count digital cameras, and HD video capture and portable media players, 480 Mbps is not really fast anymore.
The truth is, no Usb 2.0 connection could ever come close to the 480Mbps theoretical maximum throughput, making transfers at around 320Mbps (40MB/s) – the actual real world maximum. Similarly, 3.0 connections will never achieve 4.8Gbps either. We will likely see areal-world maximum rate of 400 MB/s with overheads. At this speed, USB 3.0 is a 10x improvement over 2.0
Applications
In a nutshell, any high-bandwidth device that works with USB 2.0 will become better if updated with USB 3.0 support. At the moment, devices that tax the throughput of USB 2.0 include:
External Hard Drives
Full HD Video Capture Solutions
High resolution webcams, surveillance cameras
Video display solutions – e.g. DisplayLink USB video technology
Camcoders
Digital Still Cameras
Multi-Channel audio Interfaces
External optical media – i.e. Blu-Ray Drives
High-end flash drives can also push USB 2.0 pretty hard, and oftentimes if multiple devices are connected via hub, throughput will suffer.
USB 3.0 Comparison
How does USB 3.0 compare to competing interfaces?
USB 3.0 versus Thunderbolt
Developed by Intel, the 10Gb/s bi-directional interface is technically PCI Express on a cable. It was originally designed to use fiber optics, but Intel later went with copper wiring as a mean to reduce cost and to supply power. The expansion bus can support both hubs as well as a daisy chain of up to 7 devices. Thunderbolt, which essentially takes over the Mini DisplayPort, is making its way into all Mac laptops and desktops.
While Thunderbolt is widely reported as USB 3.0 killer, it is not really a competing standard. Rather it is more a niche interface, whereas USB is more of a mainstream port. If you do have multiple RAID arrays and need to push large amount of data to and from it on a daily basis, then yes ThunderBolt is a viable option for you. For everyone else, Thunderbolt may not be cost effective. Just look at all the marketing spin and hype around USB 3.0 being ten times faster and how hard it is actually to get that. Ten times faster is more like 400MB/s as USB 2.0 averages at 40MB/s. To achieve 400MB/s, you need a $500 SSD. Now imagine how much more expensive it will be to get even more speed than what USB 3.0 can deliver and how much additional benefit you’ll get.
USB 3.0 versus USB 2.0
USB 3.0 (5Gbps) is theoretically 10 times faster than USB 2.0 (480Mbps). You can expect three-fold to ten-fold increase in performance with current generation of USB 3.0 devices but your mileage varies depending on the type of device. In real world, you’re going to see a SandForce-based flash drive topping 250MB/s and a 5400-rpm portable drive reaching 100MB/s. USB 3.0 also provides more power, 900mA up from 500mA of USB 2.0. This will allow some demanding devices, namely USB monitors and RAIDs, to be powered with just one cable.
Despite the USB 3.0’s advantages, USB 2.0 already serves as the ideal interface for a number of applications as it provides ample of bandwidth in these situations. USB 3.0, in this case, isn’t necessary and could increase the cost. For the reason, the market for USB 2.0 devices of all types isn’t going to dwindle in short to medium term.
USB 3.0 versus Firewire
The interface has long been the “forgotten” mass market, high-speed interface standard. Previously available in Firewire 400 or 800 flavors, it has gradually fallen in popularity as USB 2.0 has surged. Apple, the inventor of the original IEEE 1394 “Firewire” standard, has repeatedly sent mixed messages with the ditching of Firewire first from iPods and more recently from the mainstream MacBook laptops (except for the lowest-end MacBook, oddly enough).
In late 2007, the 1394 Trade Association announced Firewire 3200 (S3200) that builds upon the existing Firewire 800 standard that was released in 2002. Utilizing the very same connectors and cabling that is required for Firewire 800, S3200 is basically a drop-in replacement once the internal system components are updated in devices. To date, S3200 has not gained much traction, even in traditional Firewire markets such as digital video.
Firewire’s main claim to fame is that it is a highly efficient peer-to-peer, full-duplex, non-polling data communications protocol with very low overhead. Firewire delivers much higher actual throughput than USB 2.0 and can achieve much closer to its theoretical 800Mbps data rate than USB. Where a Firewire 800 7200-rpm hard drive can deliver sequential transfer rate of around 90MB/s, USB 2.0 hovers more around 40MB/s and USB 3.0 averages at 150MB/s. It remains to be seen what impact S3200 will have on the computing landscape, but with Apple backing Thunderbolt, there’s little hope for Firewire.
USB 3.0 versus eSATA
Brought to market in 2004 as a consumer interface targeted directly at the crowded external storage market, eSATA successfully address the issue of the interface bottleneck, and allowed fast hard drives to leverage their performance potential when located external to a server or PC. eSATA supports a data rate of 3.2Gbps, which is more than enough for the fastest hard drives, which can transfer about 120MB/s, easily better than USB 2.0 and significantly better than Firewire 800.
eSATA is not without drawbacks, however. Cable length is limited to a mere 2; it cannot supply power to devices connected on the eSATA bus, and the connectors are neither small nor terribly suitable for consumer devices where aesthetics are important. Over the last several years, eSATA has steadily eroded both USB and Firewire market share in the data storage space, although its applications are limited, and really not well-suited to the portable device market.
USB 3.0 versus ExpressCard 2.0
The notebook-exclusive slot interface was practically released the same day as the USB 3.0 specification (November 2008) and promises to enhance the ExpressCard standard for the increased speed requirements of today’s mobile technologies. Closely tied to both the PCI Express and USB 3.0 specifications, ExpressCard 2.0 supports a variety of applications involving high throughput data transfer and streaming. Maintaining backwards compatibility with the original ExpressCard specification, the hot-pluggable interface standard for I/O expansion in smaller form-factor systems will by definition coexist with the world of USB 3.0 devices. [source : Everything USB]
USB MILESTONES
2012
Intel integrates USB 3.0 into chipset Windows 8 begins USB 3.0 support
2009
NEC ships first USB 3.0 silicon SuperSpeed USB logo introduced Linux begins native USB 3.0 support
2008
USB 3.0 specs released
2005
Wireless USB 1.0 specs released
2002
Windows XP SP1 supports USB 2.0 natively
2001
USB OTG specification released.
2000
USB 2.0 specs released USB started to gain reputation as a mainstream bus technology
1998
Apple shipped iMac with USB ports USB 1.1 specification released
1997
USB-IF membership increased to over 400 companies Over 500 USB products were in development worldwide
1996
USB 1.0 specs released First USB product introduced. First USB Plugfest compliance workshop held.
1995
USB Implementers Forum (USB-IF) formed with an initial membership of 340 companies Intel introduced the first USB silicon.
1994
USB core companies assembled
In a nutshell, USB 3.0 promises the following:
*Higher transfer rates (up to 4.8Gbps)
*Increased maximum bus power
*New power management features
*Full-duplex data transfers
*Support for new transfer types
*Backward USB 2.0 compatibility
*New connectors and cables
The enhancements to SuperSpeed USB are not just for higher data rates, but for improving the interaction between device and host computer. While the core architectural elements are inherited from before, several changes were made to support the dual bus arrangement, and several more are notable for how users can experience the improvement that USB 3.0 makes over USB 2.0:
More power when needed
*50% more power is provided for unconfigured or suspended devices (150 mA up from 100 mA), and 80% more power is available for configured devices (900 mA up from 500 mA). This means that more power-hungry devices could be bus powered, and battery powered devices that previously charged using bus power could potentially charge more quickly.
*A new Powered-B receptable is defined with two extra contacts that enable a devices to provide up to 1000 mA to another device, such as a Wireless USB adapter. This eliminates the need for a power supply to accompany the wireless adapter…coming just a bit closer to the ideal system of a wireless link without wires (not even for power). In regular wired USB connections to a host or hub, these 2 extra contacts are not used.
Less power when it’s not needed
Power efficiency was a key objective in the move to USB 3.0. Some examples of more efficient use of power are:
*Link level power management, which means either the host computer or the device can initiate a power savings state when idle
*The ability for links to enter progressively lower power management states when the link partners are idle
Continuous device polling is eliminated
*Broadcast packet transmission through hubs is eliminated
*Device and individual function level suspend capabilities allow devices to remove power from all, or portions of their circuitry not in use
#Streaming for bulk transfers is supported for faster performance
Isochronous transfers allows devices to enter low power link states between service intervals
#Devices can communicate new information such as their latency tolerance to the host, which allows better power performance
Additionaly, I would like to mention that some SuperSpeed USB hardware, such as hubs, may always be more expensice than their USB 2.0 counterparts. This is because by definition, a SuperSpeed hub contains 2 hubs: One that enumerates as a SuperSpeed hub, and a second one that enumerates as a regular high-speed hub. Until the USB hub silicon becomes an integrated SuperSpeed USB + High Speed USB part, there may always be a significant price difference.
Some unofficial discussion has surfaced on the web with respect to fiver-optic cabling for longer cable length with USB 3.0. The specification makes no mention of optical cabling, so we conclude that this will be defined in a future spec revision, or left to 3rd party companies to implement cable extension solutions for Super Speed USB.
Though this process does not involve much effort, it can require more work to clear your recently watched movie titles if you do not know the correct functions with which to work.
Unfortunately, Some users reported that this feature/instructions are not working anymore. Netflix has disabled these features, and there are no official options to remove or hide the recently watched content on your Netflix account apart from removing your account and creating it again.
Instructions
1. Sign into the Netflix account that you use. Then, click on the “Your Queue” option with your computer mouse.
2. Go to the new page that comes up on your screen. Click on the blue tab that the word “Instant.” Go down the page until you reach the part of the page that displays the instant list, beneath the movies you recently watched portion of the page.
3. Go to “Remove.” Then click the “X” symbol adjacent to the names of movies you desire to remove from your list of recently watched titles.
With the release of Windows 7, Microsoft has made many changes to the Windows operating system. How to make specific programs start as your computer starts and loads Windows 7 is similar to how it was done with previous versions of the Windows operating system. Startup programs are saved in a specific folder on the hard drive. When the operating system loads, links listed in this folder start their respective applications. Changing settings for current startup applications is accomplished through the system configuration tool.
Instructions:
1. Click the Windows “Start” button and type “msconfig” in the Search text box at the bottom of the menu. This opens the System Configuration console.
2. Click the “Startup” tab. This allows you to see the programs installed as startup options on your computer.
3. Check the boxes of the applications you want to start when your computer starts. For programs you no longer want to start when the computer starts, remove the check from the program’s corresponding check box.
4. Click “Apply” and choose “OK.” A popup window will ask if you want to reboot the computer or exit without rebooting. Click “Restart” to reboot the computer and save the changes. Choose “Exit Without Rebooting” to exit the console and have the changes take effect the next time you start your computer.


 *A new Powered-B receptable is defined with two extra contacts that enable a devices to provide up to 1000 mA to another device, such as a Wireless USB adapter. This eliminates the need for a power supply to accompany the wireless adapter…coming just a bit closer to the ideal system of a wireless link without wires (not even for power). In regular wired USB connections to a host or hub, these 2 extra contacts are not used.
 Additionaly, I would like to mention that some SuperSpeed USB hardware, such as hubs, may always be more expensice than their USB 2.0 counterparts. This is because by definition, a SuperSpeed hub contains 2 hubs: One that enumerates as a SuperSpeed hub, and a second one that enumerates as a regular high-speed hub. Until the USB hub silicon becomes an integrated SuperSpeed USB + High Speed USB part, there may always be a significant price difference.