Category: Uncategorized

  • How to Connect your mobile or other wireless devices to laptop using Bluetooth technology

    How to Connect your mobile or other wireless devices to laptop using Bluetooth technology

    We can use Bluetooth technology to connect laptop and cell phone. We can move videos, images, photos etc from  desktop computer or a laptop to our cell phones. In order to use Bluetooth technology to connect laptop and cell phone we need a laptop and a cell phone which support this technology.

    If the laptop doesn’t support it, we can use a USB Bluetooth dongle. Just plug it into the USB port of the desktop computer or laptop. Leave the rest to Microsoft Windows. It will find the driver and install it itself. If it is not supported, we can manually install it via the manufacturer’s compact disk. Follow these simple steps in order to use Bluetooth technology to connect laptop and cell phone: (In this example, we are using Windows Vista.)

    Turn on the Bluetooth feature on your cell phone.

    Make this setting:  my Phone’s visibility -> Shown to all on the cell phone.

    Open Bluetooth Devices by clicking on its icon in the Control Panel.

    control-panel7

    OR,

    Look for the Bluetooth driver in the Device Manager and double-click on its icon.

    device-manager

    Click on the Add button in Bluetooth Devices dialog box.

    bluetooth-devices

    Check the box for “My devices is set up and ready to be found” in the Add Bluetooth Device Wizard dialog box.

    Click on the Next button.

    add-bluetooth-device copy

    This device wizard will display the name of the found Bluetooth device close by.

    Click on the device name that you would like to add and click on Next.

    bluetooth-devices-wizard

    Select “Let me choose my own key” or “Choose a passkey for me” and click on Next.

    select-bluetooth

    The Bluetooth device (the cell phone) is now displayed in Bluetooth Devices dialog box. Select the Bluetooth device and click on the Properties button.

    bluetooth-modems

    The Properties dialog box for the device will become visible. Choose the Services tab.

    Check the boxes for the services you want.

    services 1

    In the end you can launch the items of the cell phone.  Transfer photos, videos etc to cell phone via Bluetooth technology.

  • How to Connect Internet On Ubuntu (3G/UTMS/2G/GPRS)

    How to Connect Internet On Ubuntu (3G/UTMS/2G/GPRS)

    Ubuntu detects all the external media by its own automatically without any problem, however, it is not fairly possible to detect all the devices out there without any issues, some devices cannot be detected (which is very rare). Here is the instruction you can follow to setup a new connection for GPRS/3G/4G network configuration. To set up a new connection you can follow these steps.

    1. on the upper right corner of the screen click on a triangular shape which is the indicator or internet connections on Ubuntu just like on Windows or Mac.

    task bar_Gnome_ubuntu_11_10

    2. After clicking on it, go to “Edit Connections” and click on it.

    3. You will be greeted with a new pop-up window.

    Screenshot at_2011-10-25_135920

    4. Click on “Mobile Broadband” tab. Click on “Add” button.

    6. Choose you country

    7. choose your internet service provider. If it is not listed by default you can add manually. But most likely it will be there.

    8. Click “Continue” and then “Apply.”

    9. Go to the triangular icon we clicked at the beginning and select your connection from the drop down list. Ubuntu will connect to your ISP and viola you can now surf the internet without any problem.

    10. If you want to get your internet connected automatically at the system startup, Go to “Edit Connections” (that we visited before), click on “Mobile Broadband” tab, select your connection from the list and click on “Edit” button. In the Next window you will see a checkbox at the top tick the “checkbox” where it says “Connect Automatically” and you will get connected to your internet connection automatically at the system start up.

  • How to Install TeamViewer on Ubuntu via Terminal

    How to Install TeamViewer on Ubuntu via Terminal

    TeamViewer works on a variety of operating systems including Windows, Mac OS X and Linux. After downloading the TeamViewer .deb installation package for Ubuntu, open a terminal window and use the dpkg command to install the program on your computer.

    Step 1

    Navigate in your browser to TeamViewer.com and click

    Download” at the top of the page.

    Step 2

    Click the “Linux” icon, and then click the link to download the 32-bit or 64-bit .deb package for Ubuntu. Save the file on the desktop.

    Step 3

    Click the “Applications” pull-down menu at the top of the screen, and then click “Accessories” and “Terminal.”

    Step 4

    Type “cd Desktop” and press “Enter.”

    Step 5

    Type “sudo dpkg -i teamviewer_linux.deb” and press “Enter.” Ubuntu prompts you to enter your user password. Type the password and press “Enter” again. Ubuntu begins unpacking and installing the package. When the installation process is complete, the terminal window returns to the “/Desktop$” prompt.

    Step 6

    Close the Terminal window. Click the “Applications” pull-down. Open the “Internet” section and click “TeamViewer 6” to launch TeamViewer.

  • How to Use Trial Software Version Forever

    Now we download stuff almost daily. New products pop out so often. You can use any software forever you want. You can download trial version, right. Trial version expires after some days. You can stop that expiration. You can tell trial version of the software to not count days or do not bother about time. The software will stay and keep working like original software forever and will not expire or cease to work. You do not have to change your system clock. This little software does it all.

    Time Stopper is the software which can stop the time for try out version software. When you stop the time you can use your try-out versions forever. When you stop the time of a try-out version using this Time Stopper it works via this Time Stopper. Real time and date run normally on your system. You can use any number of try-out version software with this software.

    How It Works

    1. Open Time Stopper
    2. Browse and select .exe of required trial software
    3. Choose the new date (Any date which occurs in between your trial software time period before expiration, suggestion: set it to two days before trial software expiration date.)
    4. Choose any time
    5. Click open software on your selected date

    If you wish to create an icon for your modified trial software and do not want to open Time stopper every time then use last button in software to create new icon. open that trial software after that from that newly created icon always otherwise it can expire. Size: 844 KB 

    Download [Time Stopper]

  • Ubuntu 11.04 : Using source code for Offline package installation

    Installing software in Ubuntu is a piece of cake. Just launch the Ubuntu software center and type in the name of the software in the search bar; click on ‘Install’ and you have it. This all seems and sounds so easy. The part we miss is : there is an Internet connection involved. If you do not have an Internet connection, installing software on Linux machine does not remain easy. In most cases, you cannot simply download a .DEB (or even a .RPM) file and double click to install it! There are a lot of dependencies to be resolved. Unless dependencies are resolved, the software will not behave well. Even it’s running is under question.

    However, it is important to understand how to install software on Ubuntu without an internet connection.

    Compiling programs from source code 

    ubuntu terminal

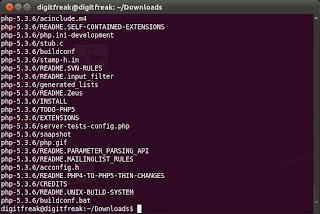
    This is the way preferred by geeks because there is no other way which can give more control over software installations. However, it is also complicated because of the technical details involved. If you have never compiled anything, maybe this method is not for you. To follow this method, you must have the source code of the package you want to install. Let us take the example of compiling php on our computer.


    1. Download the source package. In our case we need to go tohttp://www.php.net/downloads.php and select the package we want. We assume the php-5.3.6.tar.bz2 package is being used for the installtion.
    2. Now open a shell and go to the directory where the file gets downloaded
    • cd ~/Downloads/
    1. Then unpack the file using the tar command. This will create the required files in the firectory php-5.3.6 and come back to prompt.
    • tar -xvf php-5.3.6.tar.bz2    <- Note:please replace the version number with the one you downloaded from the link above.
    1. Now change the directory to php-5.3.6 by using the cd command. Now run the command.
    • ./configure -help

    terminal

    1. This will list down the options which the software supports. You can add as many parameters as you want from the list (you should understand what they mean). Once you have done that, run the ./configure script again with the parameters you have selected beofre. Let us assume that we want to enable support for PostgreSQL. Since ./configure –help says : 
    • –disable-ipv6                       Disable Ipv6 support

    so we will run the command

    • ./configure –disable-ipv6
    1. The command checks whether the system meets the requirements or not. In the end it throws the error:
    • configure: error: xml2-config not found. Please check your libxml2 installation.

    Now, we have a problem. This command is a part of the package libxml2-dev. So we have to install that first. Only then shall we be able to compile the php program. Now, this is the most annoying part. The configure script does not report all errors in one go but stops at the first one. If you resolve the first one and then find another, it becomes much difficult. 

     
    A bigger problem comes when you are trying to install a dependency (in this case libxml2-dev) and you find that it too needs some other package. Now think of the situation when you hae multiple dependencies (say 7) and each dependency further relies on 4 other dependencies. So there are in total of 28 dependencies which you need to install, one after another. Since, we are talking about installing software on a machine with no Internet connection, and it is possible that you might be using the nearest cyber cafe or a friends’ computer to download packages (searching the right version is another problem rooted within this all), it will easily drive youmad! 
     
    However, for sake of simplicity, let us consider for the time being that we have to deal with only one single dependency – libxml2-dev and that we have installed it.
     
    Now run the command again and you should have a long output and the end of it should say “Thank you for using PHP.”
     
    This indicates that the PHP package is ready to be installed .
     

    Note: At this point of time, it has been verified that PHP can be installed on any system because the package was most probably tested by the developers). The only job the configure script does is to check whether the system satisfies the requirements and create other files called ‘makefiles’. A makefile is once again a type of configurationfile. It contains instructions for the compiler. 

     
    Now we have to actually compile the package. So call the program ‘make’ by typing the same at the command line. This will call the compiler for every file individually and compile the whole package. Make should produce a lot of output and then get ready with the command line once again. Do notice the last few lines though. If they mention that there was an error then you should ask the community for help (make help). If make did not report error, it’s time to finally install the package. Just say :
     
    • sudo make install

    Your software should be installed after ‘sudo make install’. But wait do not delete the php-5.3.6 directory. If later on, you want to remove PHP from the machine, you can go back in to the same directory and run ‘sudo make uninstall’ and the software would get removed from your system in an easy way. Otherwise, removing files individually is a real tough challenge, and one with no benefits in almost all cases.

     
    While all this might seem quite easy, the most difficult part of installing software by compilation is where you have to resolve dependencies. It is this part which make the task challenging and geeky. Keeping that part aside, there is almost nothing to be afraid of when it comes to installing software by compilation.
     
    Also, you might be wondering why we are providing with all this extra bit of information and getting you all confused and scared of the steps involved. The main motivation of doing this? We want you to know your Ubuntu better. However at the end it’s you who are going to use it and if you don’t know how Ubuntu works and how to make it do things it’s hard for a user to adopt it. At first it might be look like a little fuss but at the end it’s you who will be benefited the most.
  • Ubuntu 11.04 : Using synaptic for Offline package installation

    We have already shown you how to install software on Ubuntu without an Internet connection by compiling software on it. However, we believe we have also demonstrated that resolving dependencies and installing them before the software in need is a task challenging enough to make those tremble who use pacemakers to keep their heart running. It was this reason that package management was invented. Package manager like YUM and APT were created to be able to install a pre-compiled software package on computers and keep track of them. Since Installing software by source also takes a lot of time depending on the machine configuration and the amount of code, package management came up as a better solution. 

    It was because of such inventions that Ubuntu enjoys the ‘search-click-go’ style for software Installation.

    synapticHowever, this style involves heavy use of The internet, which for some is still a luxury, leave alone the matter of unlimited downloads and high speeds. If you think that it is going to be very tough, you are mistaken. It is even easier than our previous source code compilation method. This method is going to be a little different but not too tough. 

    Well, to begin with, ask yourself – how does someone install a software on Windows if he does not have it? In 99 out of 100 cases, the answer would be to download the software from the internet and run the set-up. Offline software installation for Ubuntu is not much different either. Although Ubuntu software center is what a user would prefer and the command line-apt-get is the friend of the one who loves to see everything happening in characters rather in graphs and bars. Synaptic is what you would need help from if you were to look for a method to install software without an Internet connection on the machine. 

    To be able to do so, follow the following steps:


    1. Launch Synaptic Package Manager. This can be done by typing “synaptic” in unity, and by launching “synaptic Package Manager” from the system Administration menu in Gnome.
    2. Once Synaptic is up and running (it takes some time to rebuild its search index). Search the packages which you want to install and mark them for installation. Synaptic might also ask for installation of other packages as dependencies. Confirm them. Do not press the ‘Apply’ button. In this example, we will try to install ‘audacity’ which does not come with Ubuntu in the default package.
    3. Go to the ‘File’ menu on the synaptic window and click on the ‘Generate Package Download Script’ This will open a new window asking you to save your file. The file is a txt file which can be executed as a shell script on Linux Machines. 
    Here comes the twist, you can use the shell script on the other Linux Machine with internet and download the .deb files. But, if you cannot find the other Linux system around then what you would do?
    Well, we have the way to get around it somehow. Remember we just said that the shell script is just a txt file. so we can see what is there inside the shell script with any text viewer.
     

    1. In case you want to use the shell script on windows or other OS save the shell script with the .txt extension. The point here is to be able to view contents if you have to. You can use any extension as long as you are able to do ‘open with…’ on the file and open it with a text editor. For the sake of the example, we will use the name ‘audacity.sh’.
    2. If you run this script on Linux machine with an Internet connection, it will download the required set of packages. However, let us assume that we are using a Windows based machine and still want to use the generated file. To understand the procedure, we will tell you a few things about the generated file. To understand the procedure, we will tell you a few things about the generated script file. The first thing to be understood is: the file is basically a shell script file. All it does is to call the ‘Wget’ program to download the required packages. Wget is a command line program which can be used to perform HTTP downloads. The generated script file simply calls the wget program with the address of the packages. If you open the script file with any text editor, you shall see the commands and of course, the URLs of the packages to be downloaded.
    3. Now you know the trick. All you have to do is to go to the nearest friend or internet accessible area with an Internet connection and download the packages whose URLs are mentioned in the script file. For Example, if a line says.
     

    then you should download using the link

    1. Once you have downloaded the packages, all you have to do is save them all in the same directory and put them on the same machine (the one with no Internet connection) and launch Synaptic again.
    2. Now, go to File. Add Downloaded Packages. This will open a new window where you have to select that directory where you have placed all your.DEB files. Remember that you cannot select individual DEB files in the selection window (It’s for selection  of directory, not files). Synaptic will automatically install all of them and there to have it! The software is installed.
    3. Optionally you can also use the command 
    • sudo dpkg -i *.deb

    in the directory where you saved all the .deb files.