We haven’t heard any fixed official release date from Apple about their next Operating system to control their flagship devices. While, we are eager to see what hidden features the iOS 7 has to offer beside its hideous app icons and not too adaptive UI; some developers are already trying to port the apps and UI to the current OS.
Apple has introduced some very customizable and exclusive features in iOS7 at WWDC13 this year, and We are really excited about it. But, if you really want to get hold of some of the features of upcoming iOS, you can possibly do that right now.
Jony Ive may not have got the icons and the glossy effects right, but the weather app is right on and if you don’t want to bother upgrading to iOS 7, which is still not out of the Beta stages, just for the weather app, then we have the perfect solution for you in the form of a new app!
So, How to Get the iOS 7 weather app now? Luckily you don’t have to do any dirty work, like – hacking into the system to modify some files or create an app yourself. — You just need to download an app from iTunes and you are done.
Developed by Robert Paul Neagru, “Aero” is a new app that is currently topping App Store charts mainly due to its elegantly designed UI which also closely resembles the UI on the new Weather app in iOS 7. Following the new iOS 7 edge-to-edge guidelines set by Apple, the developer of Aero has managed to make a very intuitive UI that is unmatched by any other weather apps on iOS.
Untill, we get our hands on the new iOS 7, this weather app is the best bet for you.
Bitdefender is a behemoth in the Antivirus industry, but before trusting an antivirus with your inestimable data, you need a solid background check (Just like you need with your kid’s nanny, yeah I said it, data is as precious as one’s own kid).
I installed the new Bitdefender 2014 in my laptop and ran an extensive background check, which included- downloading viruses, visiting malware webpages, inserting pen drives/hard-drives infected with viruses and installing keyloggers.
Bitdefender has been selected as no. 1 antivirus on top10reviews — proving to be a strong competitor to the Russian security giant – Kaspersky. Here is a detailed review and test of the new Bitdefender Internet Security 2014.
The initial download is 5.44 MB, which seems very small, isn’t it?
Well, unless you have bought a hard copy of the software by your retail shop, you’ll need to download the actual setup with the help of the installer that you’ve downloaded, which requires you to download additional file of size ~400 MB (which is original setup file).
Real troublesome? Not really! You just need to run the intial setup file you downloaded from their website and it controls the rest.
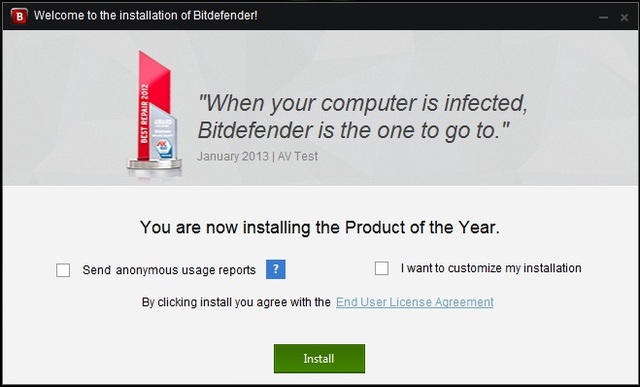
After the whole setup is downloaded, you see a screen where you can choose if you want to share your scan results and the virus logs with Bitdefender (the screen also includes Bitdefender patting itself on it’s back, just saying).
Well, I know that no one reads the End User License Agreement, so here is a summary-
Bitdefender does not collect your personal data/information.
You are not supposed to sell the software.
You will get into trouble if you tamper with the verification process.
The installation is a piece of cake, you just need to hit the install button.
Then BOOM, another freaking download, yeah this gets a little annoying, they could have just given one installation step which includes download, for the sake of common sense.
But then, you don’t need to press many “Next” buttons (only if you didn’t choose the “Customize my Installation” option, if you did they just ask you the directory where you want to install the antivirus). You are done with the installation, restart your computer and you’re good to go.
Tour:
Not the tour you were expecting, it’s just the tour to the security tools and options the antivirus has to offer!
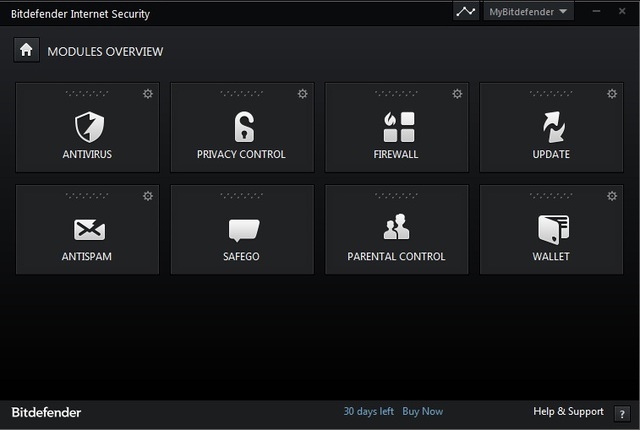
When you run the antivirus for the first time, it asks to run an update, this will not take long if you have downloaded the software from their website, for it is regulary updated, but if you purchase the CD it may take long. After running the update you can freely use the software, you are greeted with the screen shown below.
To get to the screen on the right, you need to hit the right arrow four times (how convinient).
The good thing about the Home-Screen of this antivirus is that it’s fully customizable, you can choose the order in which the options are shown, by clicking the “Grid” icon next to the scroll bar.
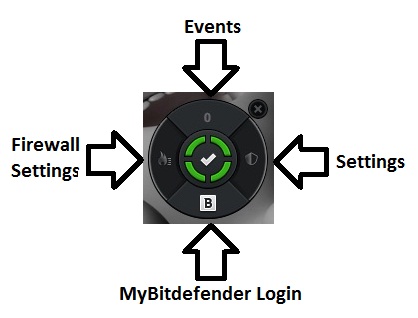
The antivirus comes with an interactive and rather useful widget, which can be used in Windows Vista, 7 and 8. The widget has the following options:
Events: When clicked, this takes you to the virus detection log, where you can choose to delete or allow specific files, it also shows the virus details and the known threats. (When connected to the internet.)
Settings: Here you can customize the usual antivirus settings, like creating scan exception locations and setting automatic scan timings.
My Bitdefender Login: You can login to your Bitdefender account from here, but you can choose not to, no restrictions there. I would recommend signing in, they have 24 hours support.
Firewall Settings: Here you can change the firewall settings, turn it on or off, create exceptions or block specific websites.
The Virus Scanner:
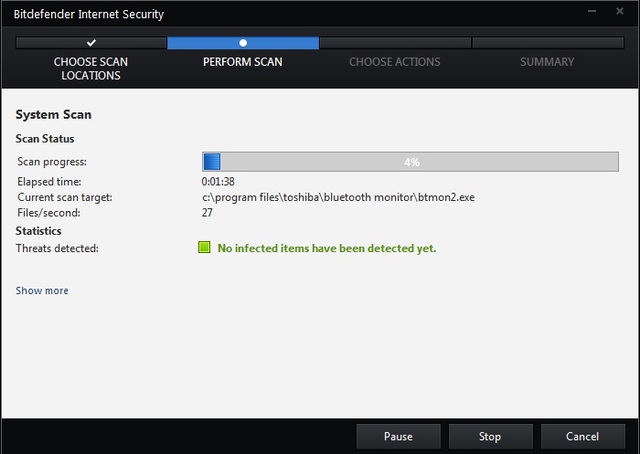
Now, the most important part of an antivirus and an Internet security program, “The virus scan.” The process is comparatively faster than most of the antivirus softwares available in the market. The scan process is pretty simple and just one click away, you can scan specific folders and files by right-clicking on them, or you can create custom scan and add the drives you want to scan.
You can also select the “Quick scan” option, it just scans the C drive (The one with the OS installed on it.) And it shows the threats found in realtime. You can also click on the “Events” on the widget and choose the action to be taken on the file while the scan is in progress.
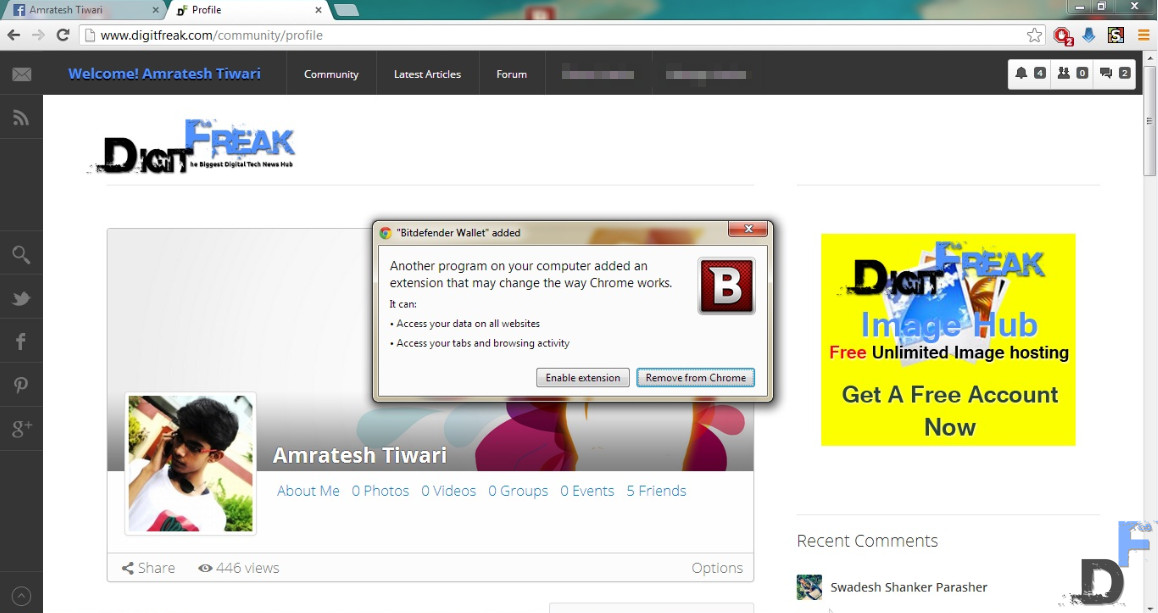
The antivirus also comes with a “Bitdefender Wallet” feature, this feature securely stores your billing information which includes your credit/debit card number and the code. They do not access the information, it’s just securely stored, eliminating the risk of Keylogger programs, as many of the premium keyloggers are immune to antivirus softwares.
You just need to allow the “Bitdefender Wallet” extention on the Chrome browser, the extention also comes for Mozilla Firefox.
Hope, you enjoyed the tour, now comes the most IMPORTANT part, the test.
THE TEST:
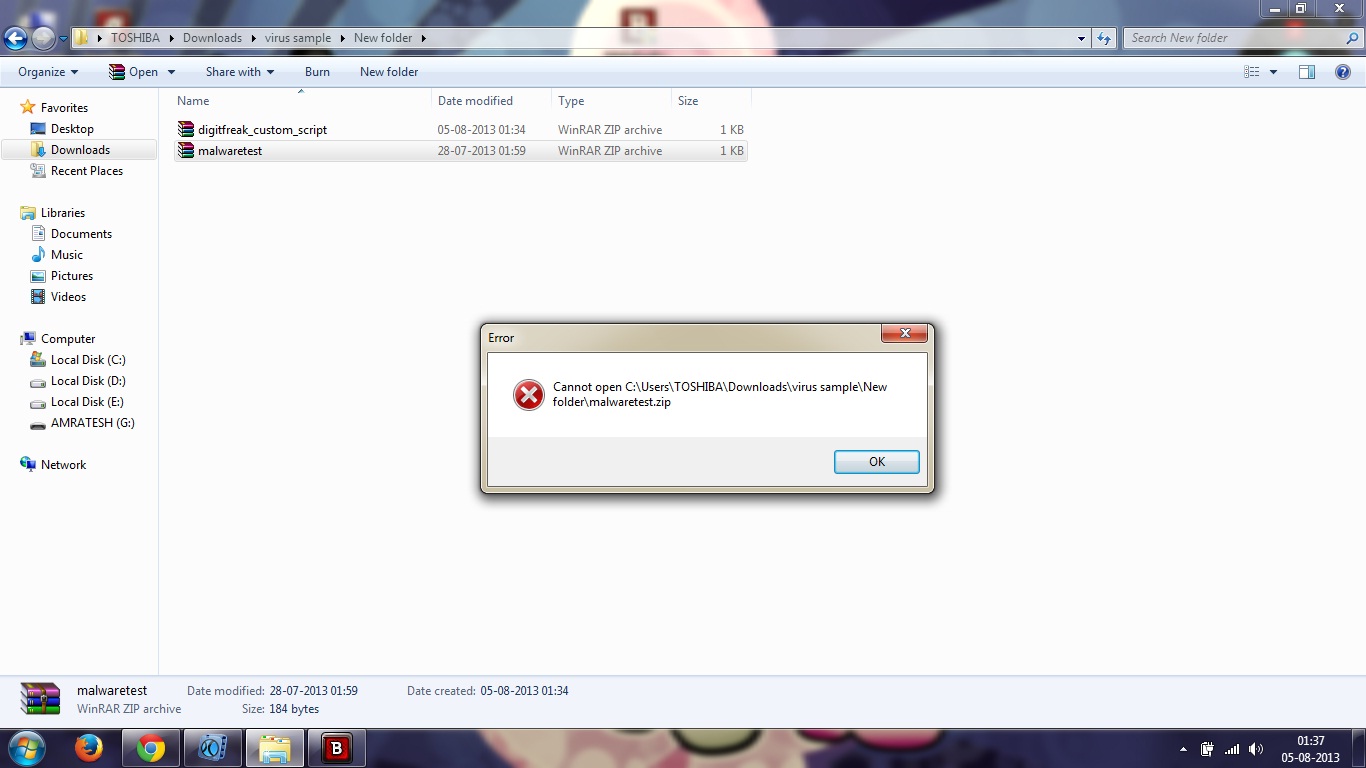
The test, as important as it is, it puts the computer to a great risk. But then, as mentioned earlier, it is the most important part of determining the worth of an antivirus. I downloaded two deadly viruses, one “not-so-known” virus and one virus created by the digitfreak team, the software performed exceptionally well.
It detected the two viruses as soon as they were downloaded and quarantined them (It also showed a warning just before the download was started.) The antivirus also has more than three brain cells, it could tell the difference between a software crack and a virus. It did warn about the crack being harmful. The antivirus performs well when it comes to the virus detection.
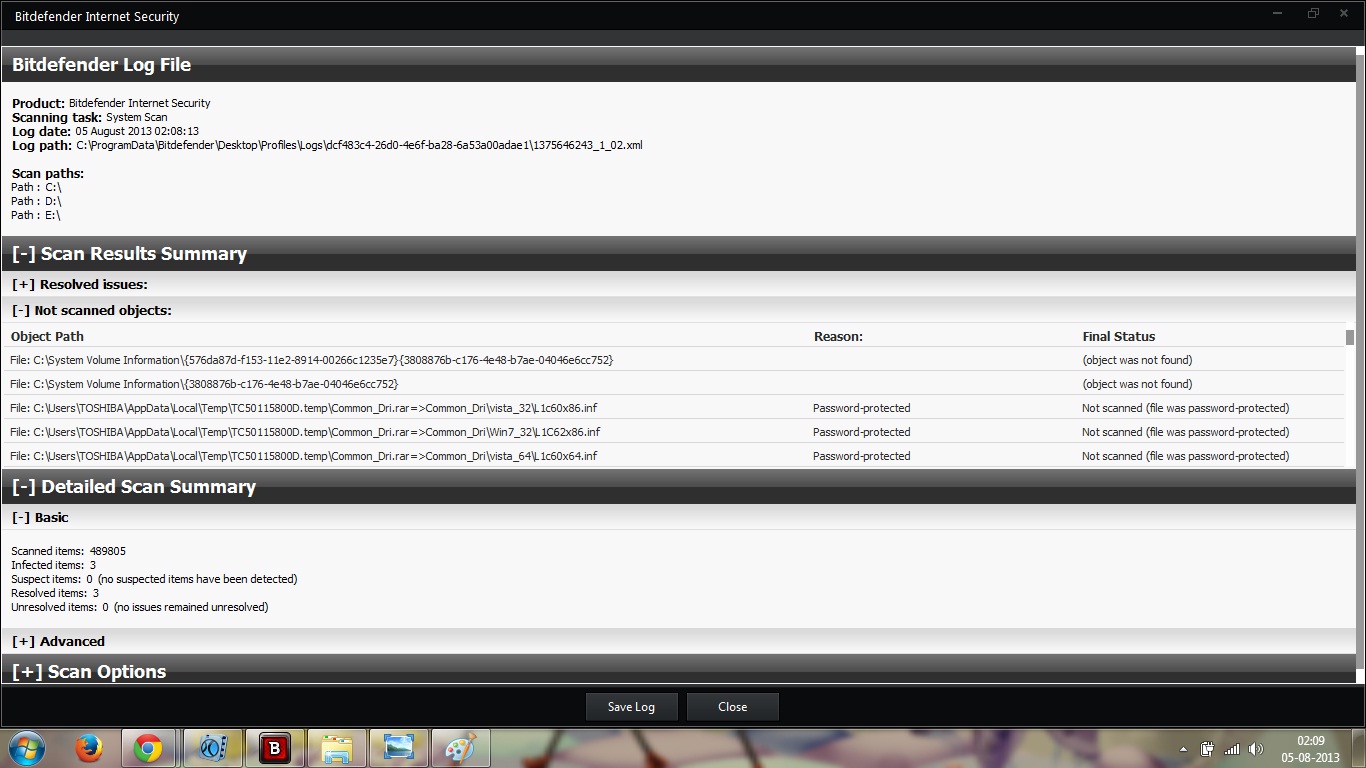
After the scan has been completed, you get a screen which shows the scan results, which includes the list of viruses detected and it also shows if a file needs your attention. It also shows an option to check the antivirrus logs, which is vividly detailed. The log includes the viruses detected in the last scan, number of files scanned and the number of threats detected.
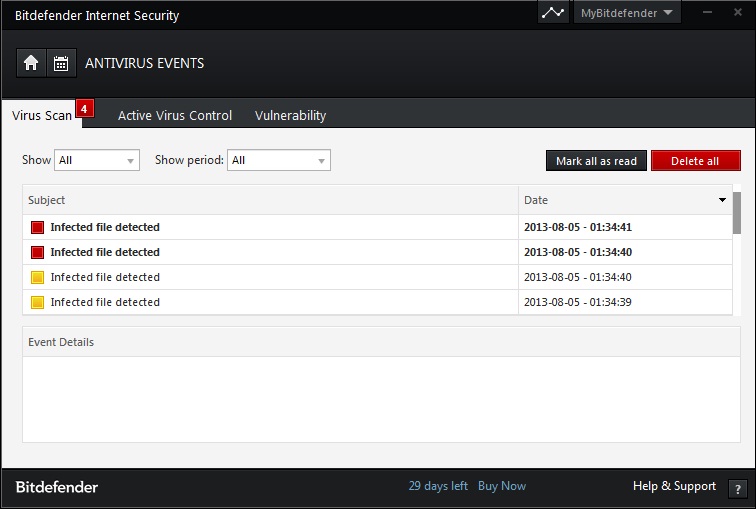
The screen below shows the events screen, which is just the non-detailed summary of all the viruses detected.
The firewall also performs really well, I went to a ton of popular malware infected webpages and a couple of very discrete malware webpages. It instantly displayed a warning page even when Chrome didn’t show a security risk page. The firewall is completely customizeable, you can create exceptions and block specific websites.
THE VERDICT:
Well, honestly, I’m impressed, the only thing I didn’t like was that, the installation included two downloads. The antivirus performs exceptionally well, the firewall is good and customizable, the Wallet feature is really thoughtful, considering the amount of online shopping these days, the antivirus also has parental controls. It detects viruses in realtime and we can also choose the action to be performed on them, by clicking on the widget events while the scan is still in progress.
PROS:
CONS:
Impressive User Interface.
Exceptionally well antivirus performance.
Bitdefender Wallet.
The widget.
24 hour support.
Two downloads during the setup.
Need to press the right arrow four times to get to the new home screen. (Each click displays just one new option.)
The Blackberry 10.2 OS doesn’t seems to be announced officially by the company any sooner, but we are already tempted to try the new software for Blackberry 10 devices.
Some members requested to post a brief tutorial to upgrade the device to the leaked Operating system that has been circulating recently.
While we strongly recommend control your whispering mind that is compelling you to do the dirty job and wait for the official release, but at the same time we can understand how tempting it might be.
The process is really straight forward and simple — one can easily upgrade their blackberry 10 powered smartphone to the new leaked OS by following the simple steps.
What you’ll need
Your BlackBerry 10 device
microUSB cable
Autoloader for the OS you are installing
A Windows PC (the autoloader won’t run in a virtual machine)
Make Backups:
Make sure you have everything backed up on other reliable device. “Blackberry link” will help you do the job and you can backup your contacts, BBM, messages, call logs, system settings or other important files, so that you can restore them once you have successfully upgraded your device.
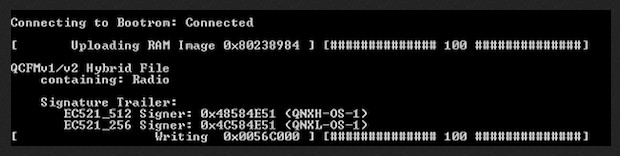
Updating device:
After backing up, run the autoloader file for the OS you are installing. You’ll see a screen that looks something like this:
Connect your device to your PC via microUSB. Once the device is recognized the autoloader will do its thing. Your device will reboot and the LED will change from red to green. Don’t touch it!
Let the autoloader work its magic. You’ll be able to see the progress of the autoloader while it’s running.
When it’s done installing, the autoloader will quit automatically and your device will reboot once more. If everything worked as it should you’re phone will be up as new and running with the new OS.
Restoring backup:
From here you can either set up the device from scratch or restore using the backup file you created earlier. Note that with some OS leaks you may not be able to restore from an earlier backup.
Note:DigitFreak and DigitFreak Media Inc. is not responsible for the damage it might cause while commencing and performing the steps mentioned in the tutorial. All the tools, MOD’s or ROM’s described in this article belongs sto their respected owners/developers. We are just representing the method in a Pre-described manner so that you can Integrate this Update Method in your device easily. We are not forcing you to do this. This is only for education purpose.
I will admit — I was one of the victim who had probably never spent a single day without playing the CityVille or Farmville at least once.
Then there came a deteriorating moment when 40% of ancestors of online gaming on Facebook started following up with what is more important in life and followed up with ditching this whole time killer crap. We started hating it so much that – even a single invitation from one of our old “gaming friends” irritates us!!!
Let’s dump my individual scenario (however, it is true for most of us) and accept the fact that you don’t like the game invitation at all. If you are reading this article it signifies the same. So, let’s figure out how to block these game invitations for good.
Option 1 : Block it!
If you don’t like a friend of yours sending an invitation for Candy crush, CityVille, FarmVille, Lucky Slots, Dragon City, Hidden Express, Diamond Dash or millions of other apps on Facebook. Actually, you can block any Facebook app – let it be game, social, health or other services.
You’ll find four different level to choose your invitation restrictions – users, event, app or to block the whole app at once.
You can provide the username, event name or app name.
Option 2: Custom mode
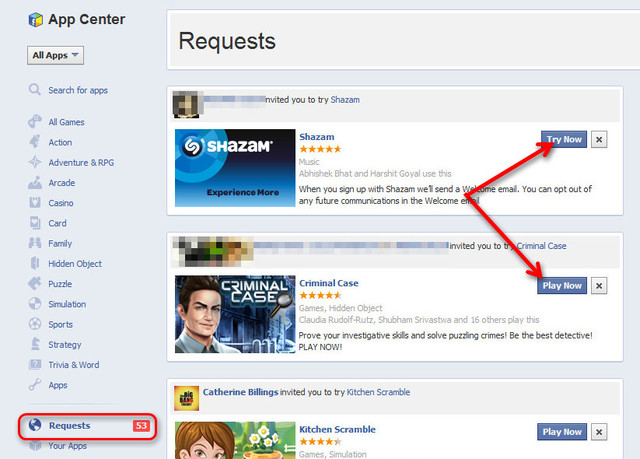
You can also block apps from your previous game/app invitation lists. To use this option go to appcenter and click on requests at the bottom left corner of the page. There you can also block future invites for a specific app, stop a certain user from sending you requests, or both.
Click on Requests tab.
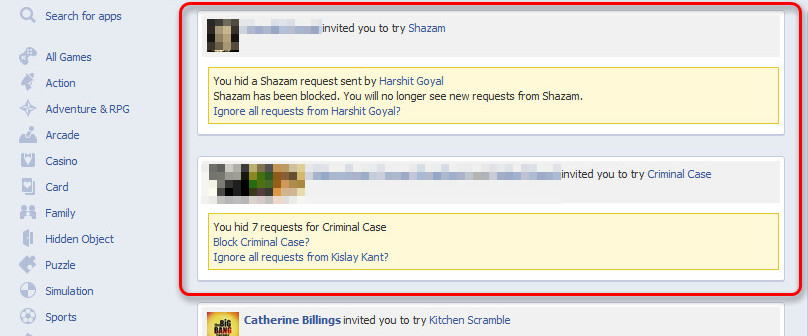
Click on “x” as stated in the above image. To block the individual app click on “Block Appname” (where “appname” is the name of the app you are about to block).
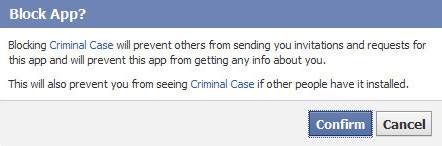
Confirm the app block in the next pop-up window.
Option 3: Block from notification
Stopping the onslaught on game invite notifications is actually as simple as clicking an X button next to the offending notice. Yes, it would be oh-so-nice if Facebook could learn that after clicking “no” 37 times, you don’t want to play. But it’s just not that smart (or maybe it’s laziness), so turn ’em off.
Doing all this game app-blocking business may have put you in a cleaning mood, so why not go the extra mile? Check out the apps you yourself have installed in the past and delete those you don’t use anymore by clicking on the X next to the app. You can also modify the visibility of your app’s posts on your behalf by clicking on the Settings link.
FTP (File Transfer Protocol) has been a popular method to transfer files easily over the network. If you are a tech savvy or managing a server for your website or contents – you might have stumbled upon this handy feature.
FTP is quite useful when you need to transfer files over a network or to your computer from a server (or vise Versa).
If you are a webmaster or web developer – this is something you use on a regular basis. It helps you effectively manage your files on the server and upload or download the contents with ease.
Needless to say that most of the people are using seedboxes for downloading contents over p2p network and sometimes they just can’t figure out how to transfer the files from their seedbox to the computer.
Some of us are not too tech savvy and wonder how to do this magic. If you are reading this article – you must be looking for the same answer.
Instructions:
1. Download & Run FileZilla (You can use any FTP client according to your choice)
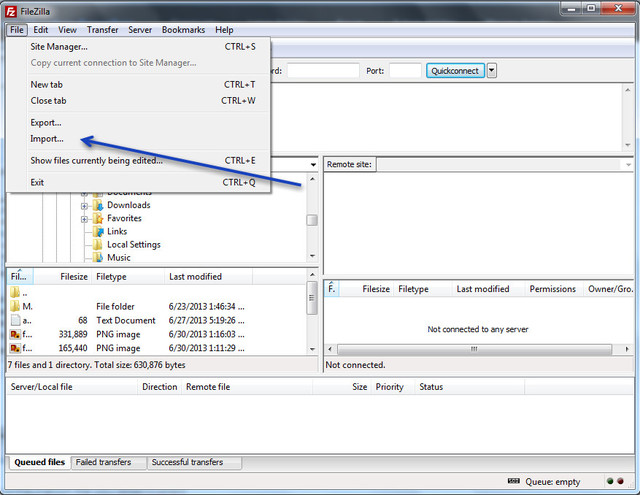
2. Go to File > Site Manager
3. In the new popup window > click on “New Site”
4. Now you have to type your FTP information given by your server provider or if you are managing your own website on cPanel, your HOST will be – “Your primary domain on the server”, User – “Cpanel username” and Password – “cPanel password”.
You don’t usually have to provide the ftp port, you can simply leave it empty. If you host server configured the FTP to be accessed on a custom port, you should ask them for the same. You can contact your server provider for all these informations.
5. Click on “connect” and you can see full directory listing of your server’s file. You can delete, upload or download the files from the server to your computer or vice versa.
Alternate Methods
I. Quick connect:
If you are looking for quick option to connect your server via FTP temporarily – this could be your saviour. The Filezilla provides “quickconnect” option, which enable you to connect to your FTP server without much hassle.
* Just open Filezilla and fill up the information provided by your server provider.
* Click on “quickconnect”
* You’ll find the full directory listing of the server in “Remote site” block.
II. Import FTP configuration from cPanel Account
You can simply import the FTP configuration from your server’s cPanel account. It is the easiest method to connect to your cPanel Powered server.
* Login to your cPanel account
* You’ll find “FTP accounts”, under “Files” (as shown in image below):
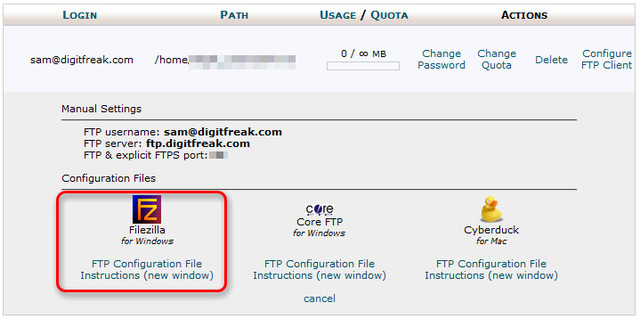
* click on the FTP account you want to download the configuration file for.
* You’ll find some FTP clients listed under the FTP account name, click on “FTP Configuration file”
* Click on save when prompted.
* Now open FileZilla > File > Import
* Browse to the configuration file you downloaded.
* click “ok” if prompted.
* Go to “Site Manager” > select your site name from left panel and click on connect
* You’ll get connected to your server.
If you are too confused with the above information, just have a look at the video below:
Top 10 best website list is populated by the Alexa website rankings. The list reflects the current website status on Alexa, which ranks websites on the basis of popularity and internet traffic.
Alexa automatically ranks any website on the internet, and has the largest database of website ranking information.
We will be listing the website as per the rank given to it on the Alexa or sorted by the most popular one. The websites are sorted by the Alexa ranking & US ranking may differ from the actual Alexa rank.
We have skipped some of the websites from the list, simply because they would make no sense to actual global traffic or they were based on other language than English.
So, top 10 websites on the internet? Which are they? Here is the full list:
1. Google
Google has been the most popular and largest search engine in the internet history. It enables users to search the world’s information, including webpages, images and videos.
Facebook is the most popular social networking website on the internet, which helps people connect with the one they love and want to stay in touch with. It is a social utility which helps users to keep up with friends, upload photos, share links and videos.
YouTube is a video sharing service provided by google. It helps users to share your videos with the people who matters to you. You can upload, tag and share your videos.
Yahoo has been the most popular internet portal ever since it was lauch. It has lost its charm a little after Google took over the internet business. It is still a major internet portal and service provider offering search results, customizable content, chatrooms, free e-mail, clubs and pager.
It is the most popular serch engine in china. It started spreading its business to other services and is quite successful. Baidu is leadin chinese language search engine, that provides “simple and reliable” search experience. It is more popular than Google “China” and people just love it.
It provides mp3 and multimedia contents and make it easy to search the same.
Amazon is worlds most popular website, which basically works with its customers and affiliates. Customers can find and discover anything they might want to buy online, and endeabors to offer its customers the lowest possible price.
Wikipedia is largest online encyclopedia on earth. The users can add or modify the contents and discover information they seek. It has been a little controversial, when some users reported the facts and information provided on the website to be incorrect.
Bing is the search engine developed and maintained by Microsoft itself. It was advertised as the more user friendly and better search engine than Google. Even its name is based on the teaser element to Google – Bing = Because it’s not Google. It features web, image, video, local, news, and product search.
This is more similar to amazon.com. It does provide the customer service which helps users to discover goods and items they want to purchase. But, it is more like person to person auction site, rather than direct sale from the companies.
Tumblr is one of the most popular free online blogging platform, which enable users to create a blog for any topoic. Users ca post anything (from anywhere!), customize everything, and find and follow what you love.
![Bitdefender Internet Security 2014 – the only security suite you’ll ever need [Review]](https://digitfreak.com/wp-content/uploads/2013/08/1.jpg)
 Well, I know that no one reads the End User License Agreement, so here is a summary-
 But then, you don’t need to press many “Next” buttons (only if you didn’t choose the “Customize my Installation” option, if you did they just ask you the directory where you want to install the antivirus). You are done with the installation, restart your computer and you’re good to go.


![[How to] install leaked OS on your blackberry 10 phone](https://digitfreak.com/wp-content/uploads/2013/08/digitfreak_201300000515.jpg)
![[How to] block undesired Facebook game invitation for good](https://digitfreak.com/wp-content/uploads/2013/07/digitfreak_201300000356_blocking.jpg)
 Stopping the onslaught on game invite notifications is actually as simple as clicking an X button next to the offending notice. Yes, it would be oh-so-nice if Facebook could learn that after clicking “no” 37 times, you don’t want to play. But it’s just not that smart (or maybe it’s laziness), so turn ’em off.
![[How to] connect to a FTP server and transfer files to your computer [Filezilla]](https://digitfreak.com/wp-content/uploads/2013/06/5008797644002300127.jpg)
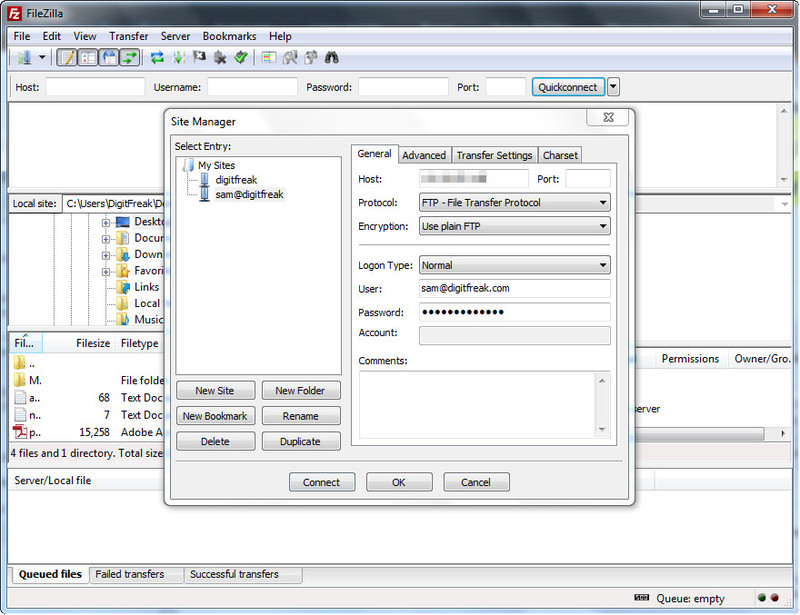 4. Now you have to type your FTP information given by your server provider or if you are managing your own website on cPanel, your HOST will be – “Your primary domain on the server”, User – “Cpanel username” and Password – “cPanel password”.
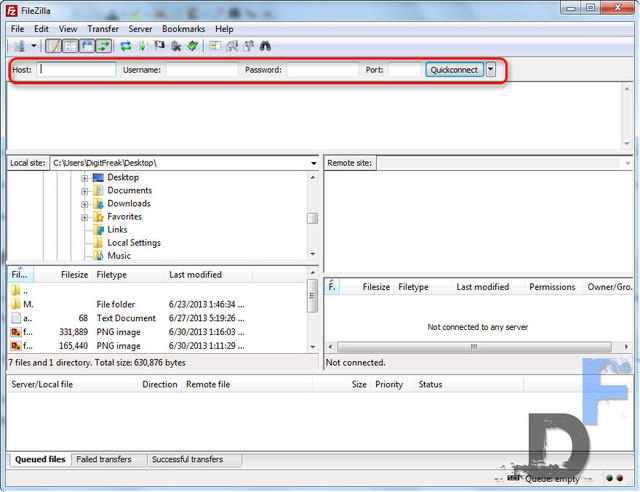 If you are looking for quick option to connect your server via FTP temporarily – this could be your saviour. The Filezilla provides “quickconnect” option, which enable you to connect to your FTP server without much hassle.
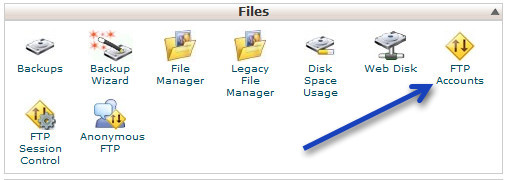
 * Browse to the configuration file you downloaded.
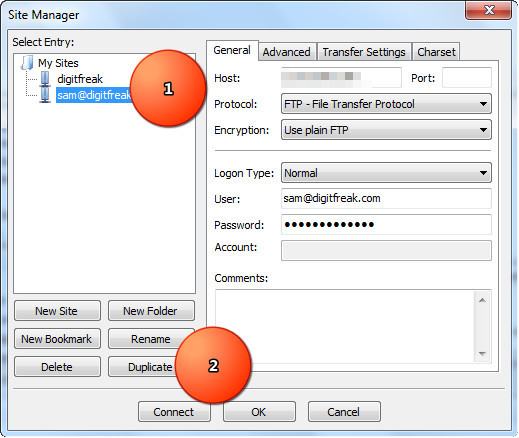 * You’ll get connected to your server.