Tag: install

  • How to Monitor Internet Speed in Ubuntu

    How to Monitor Internet Speed in Ubuntu

    I often use it to monitor the speed while downloading or using internet and stumbled upon a website which takes time to respond — looking at the internet speed indicator tells me whether my internet is working properly or website is not using the bandwidth to load the page, in that case I simply reload the page to make it render properly.

    I will be first to admit it that it is quiet easy to do it on windows Operating system, however you’ll be surprised to know that this can be done as easily on Ubuntu as well. In some cases you’ll feel that it’s better and quicker way to implement on Linux distros than on Windows – which involves downloading a software and installing them on your computer.

    App and repository based Ubuntu distro makes it fun and easier to use. There sure is a learning curve for new users but, it is worth the effort.

    I used Ubuntu 15.04 for this tutorial, but it can be implemented on any version of Ubuntu.

    How to Install

    Webupd8 designed a package which includes various useful applications in a single package such as radio, hotspot, themes and most importantly our Net speed indicator. We will be using this repository to install our net speed indicator to monitor internet speed.

    Step 1.

    Open terminal (Ctrl+Alt+T) and paste the following sudo command.
    sudo add-apt-repository ppa:nilarimogard/webupd8
     

    Step 2

    Update your repository.
    Sudo apt-get update
     

    Step 3

    Install netspeed indicator using this command.
    sudo apt-get install indicator-netspeed
    Tips: You can also check the internet usage by all ports using a simple command “ifconfig”.

    terminal ifconfig

  • Mega launched the Firefox extension for easier cloud file management

    Mega launched the Firefox extension for easier cloud file management

    Mega launched a new Firefox extension for the better experience with their online file storage service. The browser extension, which has been ‘preliminary reviewed’ by Firefox maker Mozilla, is billed as ‘secure and invisible’.

    digitfreak 00071 mega homepageOn your next visit you will notice that Mega has changes the notification window for the browser suggesting you to install Firefox extension (if you are using mega on Firefox), rather than prompting you to install Google Chrome to enjoy the service at its best.

    The browser extension, the dialog box promises, brings “vastly improved download performance” and will allow users to “batch-download an unlimited number of files without any size restrictions”.

    digitfreak 00069 firefox addonMEGA just got a new CEO, open Internet advocate and entrepreneur Vikram Kumar, after a successful launch that saw over 1 million users upload approximately 50 million files so far.

    [Download Mozilla Firefox Addon]

  • How to install/Update Firefox on Linux Mint, Ubuntu… or any other debian based Linux distribution

    How to install/Update Firefox on Linux Mint, Ubuntu… or any other debian based Linux distribution

    Basically Firefox on Ubuntu provides 4 modes of update. Daily Channels (nightly Builds), Firefox Beta, Firefox for future (named aurora), and then comes the stable release.

    all you need to know is the basic terminal commnad to make everything simpler. Here you go.

    1. Ubuntu: ubuntu-mozilla-daily ppa! (nightly Build)

    Many howtos on this subject will tell you to install Firefox pre-versions through Mozilla’s ppa ubuntu-mozilla-daily.

    Using this ppa will not only install the latest Firefox 10 nightly build, used to be called “minefield” – updated daily! It will also update your current Firefox and Thunderbird to test versions.

    These testing versions are not meant to be stable. Avoid this ppa unless you know exactly what you’re doing!
    If you want to install firefox on production machine, scroll down to #4

    open terminal and run the following commands:

    sudo apt-add-repository ppa:ubuntu-mozilla-daily/ppa
    sudo apt-get update && sudo apt-get upgrade
    sudo apt-get install firefox

    2. The Firefox Beta ppa: mozillateam/firefox-next

    The firefox-next ppa will replace your current Firefox installation with the current available version in Mozillas Beta channel. Simply run these two commands in a terminal:

    sudo apt-add-repository ppa:mozillateam/firefox-next
    sudo apt-get update && sudo apt-get upgrade
    sudo apt-get install firefox

    3. Firefox For the Future (Aurora)

    You may also have a look at the Firefox Aurora ppa.

    open terminal and run the following commands:

    sudo apt-add-repository ppa:ubuntu-mozilla-daily/firefox-aurora
    sudo apt-get update && sudo apt-get upgrade
    sudo apt-get install firefox 

    Note: you can use only one of these three channels (Aurora, Beta, and Daily) at the same time! rememember that Aurora is not stable and is for developers only. It is the test version and a place where Mozilla team tests their new scripts and approach. So, until and unless you are a dev, we won’t recommend you to install Aurora for any purpose.

    4. Firefox Stable Releases

    Firefox Stable is comes bundled in most of the Linux distros. You won’t need to install or upgrade it manually because linux team updates it automatically each time you run the system update. Since Ubuntu 11.04 “Natty Narwhal”, Ubuntu will update automatically to the newest stable Firefox version when it is released. (it may take a few days more, though) This is also valid for Ubuntu 11.10 “Oneiric Ocelot” and upcoming releases.

    However, if due to some reason you don’t have it installed already. you can follow the simple steps below.

    open terminal and run the following commands:

    sudo apt-add-repository ppa:mozillateam/firefox-stable
    sudo apt-get update && sudo apt-get upgrade
    sudo apt-get install firefox

    That’s all you are ready to have Latest version of Mozilla Firefox. You just need to choose which channel you want to go with. We would prefer stable or beta version. nightly builds and aurora are unstable most of the time and they can really make you slam your head on the wall!

    *Don’t subscribe/install two ppa channels at the same time, it would lead to a conflict.

    *To remove the ppa, use this terminal command -> sudo apt-add-repository remove {channel name you want to remove}

  • Things you can do after installing Ubuntu 11.10

    Things you can do after installing Ubuntu 11.10

    Ubuntu 11.10 is quite a large over-ripped (and wrapped) version of it’s predecessor. The new Ubuntu 11.10 Oneiric ocelot was released on Oct 13th 2011. I have been using Ubuntu 11.10 since it’s release (and even before, when alha 1 was released). Ever since the arrival of Unity, many new and old Ubuntu users are looking for ways to improve the functionality aspect of Ubuntu and customize the Unity environment to their respective needs. Here are the few tips and tricks you can opt for, for your new Ubuntu 11.10 :


    1) Installing Restricted extras during Installation

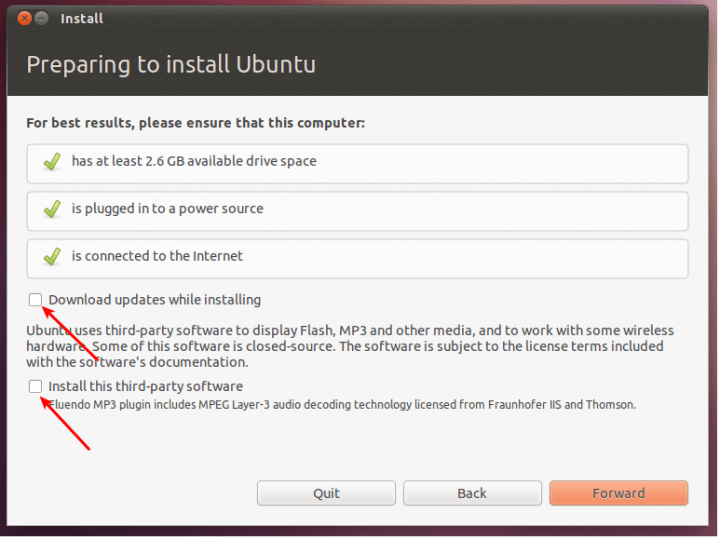
    * Starting from Ubuntu 11.04 release, you can install restricted codecs package(which include Adobe Flash, MP3 codecs and such) during installation of Ubuntu OS itself.

    Screenshot* Notice the arrows pointing to the boxes in the screenshot above. If you tick both of them during the Ubuntu installation process(make sure you are connected to the internet before doing so), restricted extras package will be installed automatically and you will be able to play mp3’s and watch flash videos(YouTube videos for example) right after Ubuntu installation is complete.

    * But there is a catch. If you have a slow internet connection(which is very rare these days), ticking the boxes shown in the screenshot above will unnecessarily lengthen the installation process. I for one prefer to do all that after installing Ubuntu. If you are like me, the next two steps are for you.


    2) Update Repositories

    * After you install brand new Ubuntu 11.10, the first thing you need to do is to update repositories and make sure you have the latest updates installed(Like I said before, you need to do this only if you haven’t ticked the boxes shown in the above screenshot).

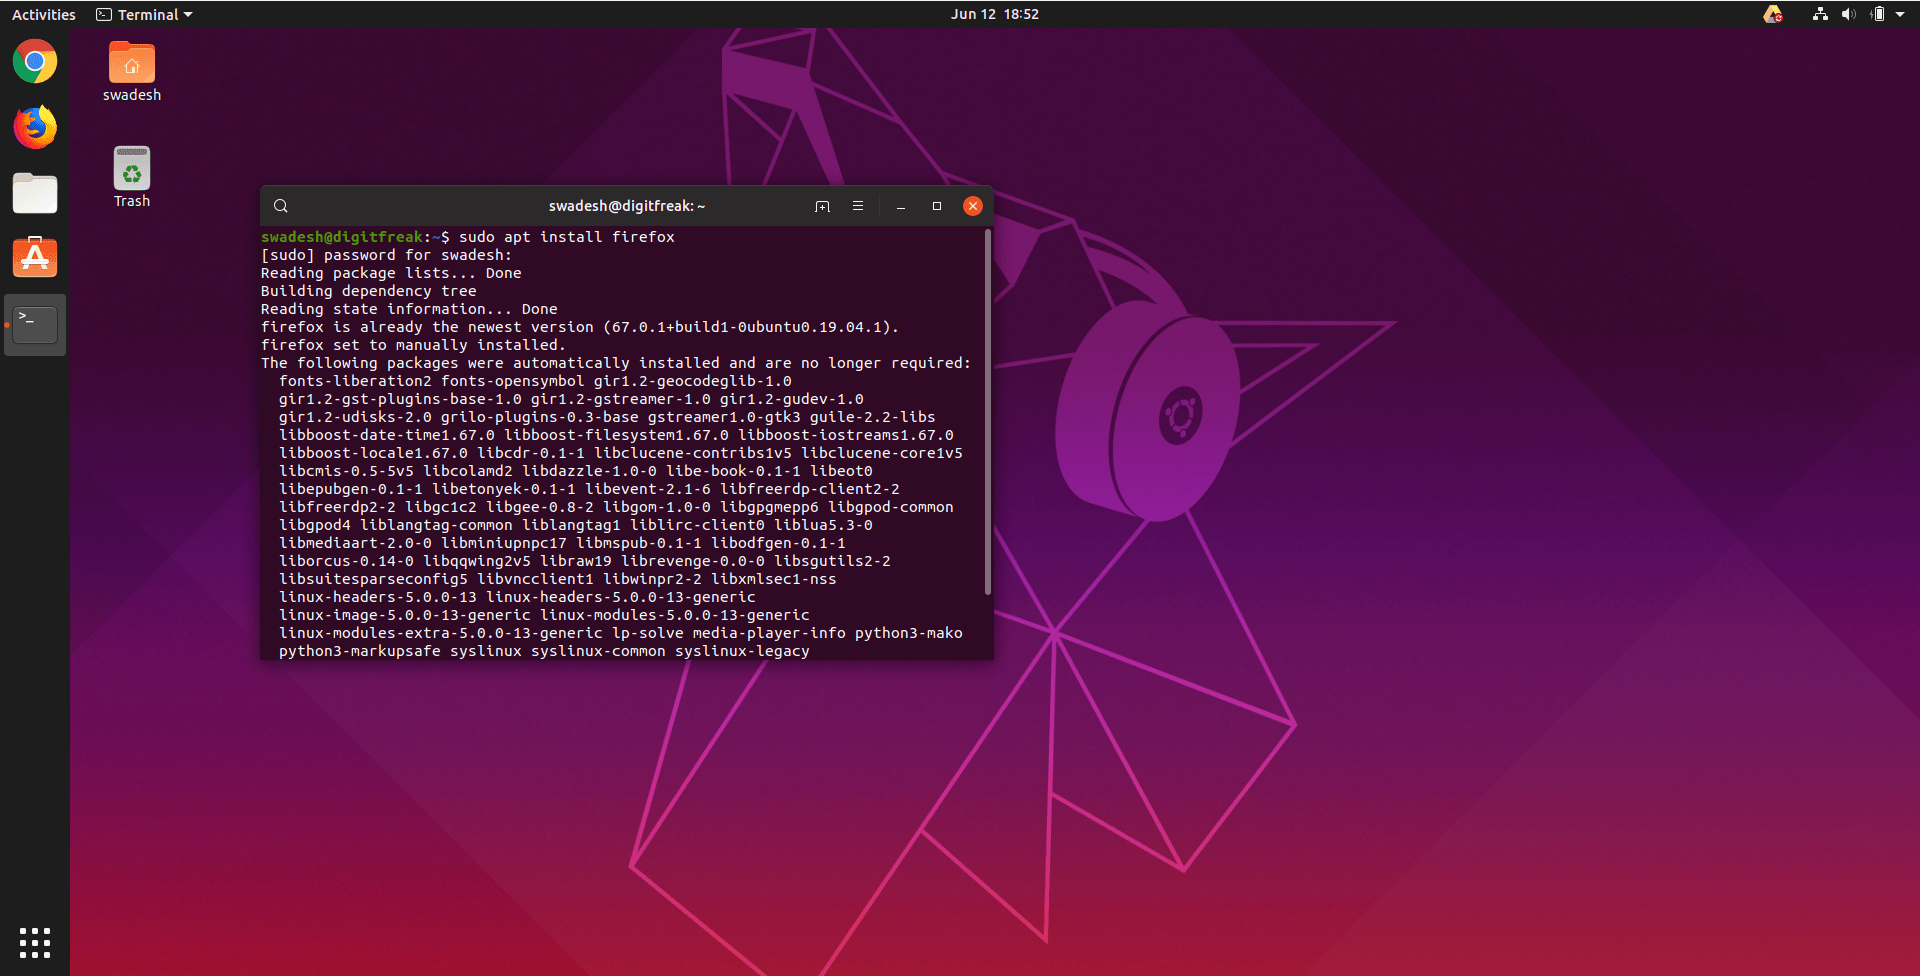
    *Open Terminal(Ubuntu 11.10 Keyboard Shortcut: Ctrl + Alt + T) and copy-paste the following command into Terminal. 

    sudo apt-get update && sudo apt-get upgrade

    * Done. Ubuntu repositories have been successfully updated.


    3) Install Ubuntu Restricted Extras

    * Install the “ubuntu-restricted-extras” package. This will enable your Ubuntu to play popular file formats like mp3, avi, Flash videos etc. Click Here OR simply copy-paste the command below into Terminal to install the package(You need not do this also if you have ticked the ‘right’ boxes).

    sudo apt-get install ubuntu-restricted-extras

    * Done.


    4) Enable Full DVD Playback(Dual Layer DVD Support)

    * Though installing the restricted extras package will solve most of your problems, you may not be able to play dual layer dvds yet in your Ubuntu.

    * For that, you need to install libdvdcss2 package from medibuntu repositories. Simply do the following in Terminal.

    sudo wget –output-document=/etc/apt/sources.list.d/medibuntu.list http://www.medibuntu.org/sources.list.d/$(lsb_release -cs).list && sudo apt-get –quiet update && sudo apt-get –yes –quiet –allow-unauthenticated install medibuntu-keyring && sudo apt-get –quiet update

    sudo apt-get install libdvdcss2

    * Done.


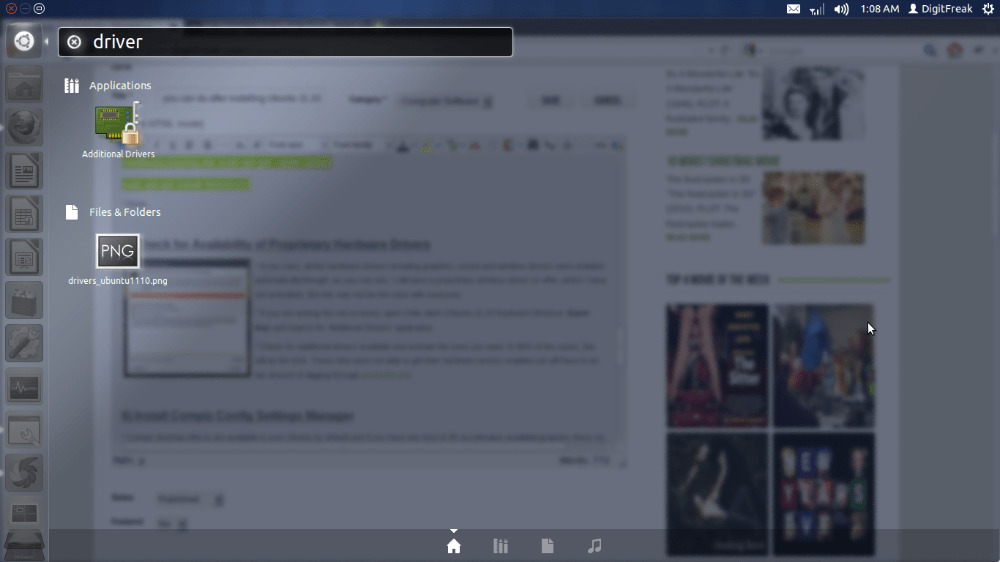
    5) Check for Availability of Proprietary Hardware Drivers

    driver copydrivers ubuntu1110
    * In my case, all the hardware drivers including graphics, sound and wireless drivers were enabled automatically(though, as you can see, I still have a proprietary wireless driver on offer, which I have not activated). But this may not be the case with everyone.

    * If you are among the not-so-lucky, open Unity dash (Ubuntu 11.10 Keyboard Shortcut: Super key) and search for ‘Additional Drivers’ application.

    * Check for additional drivers available and activate the ones you want. In 90% of the cases, this will do the trick. Those who were not able to get their hardware drivers enabled yet will have to do fair amount of digging through ubuntuforums.


    6) Install Compiz Config Settings Manager

    digitfreakccsmCompizConfig Settings Manager 019
    * Compiz desktop effects are available in your Ubuntu by default and if you have any kind of 3D acceleration available(graphics driver ie), you are good to go with Compiz.

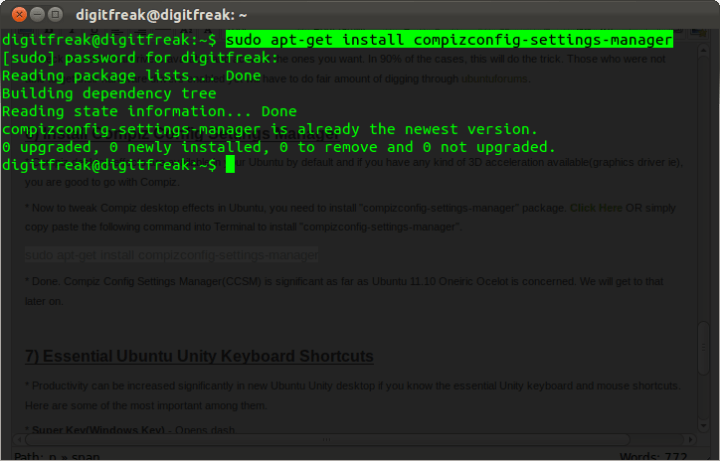
    * Now to tweak Compiz desktop effects in Ubuntu, you need to install “compizconfig-settings-manager” package. Click Here OR simply copy paste the following command into Terminal to install “compizconfig-settings-manager”.

    sudo apt-get install compizconfig-settings-manager

    * Done. Compiz Config Settings Manager(CCSM) is significant as far as Ubuntu 11.10 Oneiric Ocelot is concerned. We will get to that later on.


    7) Essential Ubuntu Unity Keyboard Shortcuts

    * Productivity can be increased significantly in new Ubuntu Unity desktop if you know the essential Unity keyboard and mouse shortcuts. Here are some of the most important among them.

    * Super Key(Windows Key) – Opens dash.

    * Hold Super Key and hit 1, 2, 3 etc – Open an Application from Launcher. When you hold the Super Key, specific numbers will be displayed in order above each application.

    * Alt + F1 – Put keyboard focus on the Launcher, use arrow keys to navigate, Enter key launches the application, Right arrow exposes the quicklists if an application has them.

    * Alt + F2 – Opens dash in special mode to run any commands.

    * Super + A – Opens up applications dash.

    * Super + F – Opens up files and folders dash.

    Super + W – Spread mode, zoom out on all windows in all workspaces.

    * Super + D – Minimize all windows(acts as Show Desktop). Hitting it again restores them.

    * Super + T – Opens trash can.

    * Super + S – Expo mode (for everything), zooms out on all the workspaces and let’s you manage windows.

    * Ctrl + Alt + T – Launch Terminal.

    * Ctrl + Alt + L – Lock Screen.

    * Ctrl + Alt + Left/Right/Up/Down – Move to new workspace.

    * Ctrl + Alt + Shift + Left/Right/Up/Down – Place window to a new workspace.

    * F10 – Open the first menu on top panel, use arrows keys to browse across the menus.


     Mouse Shortcuts/Tricks for Ubuntu Unity

    * Clicking and holding an icon and then dragging it around will allow you to reorder it on the launcher. You can also drag it off to the right of the launcher to move it around. Note that you need to make an explicit movement to the right to move the icon off the launcher before you can move it around.

    * Dragging and Dropping an icon into the trash can will remove it from the Launcher.

    * Moving and holding the cursor on the left side for a few seconds will launch Unity dock.

    * Moving the cursor to top-left corner(near Ubuntu icon) will launch Unity dock as well.

    * Scrolling the mouse wheel while over the Launcher scrolls the icons if you have too many and need to move around quickly.

    * By Scrolling the mouse wheel while over the Sound icon on top panel helps you increase or decrease system volume.

    * Middle click on an application’s launcher icon – Open a new instance of the application in a new window. Very useful at times. In laptops with touchpads, hitting left/right click buttons together is akin to middle click.

    * Maximizing – Dragging a window to the top panel will maximize it.

    * Restore/Unmaximize – Dragging the top panel down OR double clicking on the top panel will do.

    * Tiling – Dragging a Window to the left/right border will auto tile it to that side of the screen. One of the highlights of new Unity experience.


    And Some Useful Window Management Shortcuts(Generic)

    * Alt + F10 – Toggle between Maximize/Unmaximize current window.

    * Alt + F9 – Minimize current window.

    * Alt + Tab – Toggle between currently open windows.

    * Alt + F4 – Closes current window.

    * Alt + F7 – Moves the current window(both keyboard and mouse can be used).


    8) Enable Transparency for Unity Top Panel

    ccsmCompizConfig Settings Manager 021
    * Launch CCSM. Hit Super + a and search for CCSM.

    * After launching CCSM, select Ubuntu Unity Plugin from ‘Desktop’ category. Now choose the Experimental tab from above.

    * There you will see the ‘Panel Opacity’ option. Change it to the value you like.


    9) Increase/Decrease the Launcher Icon Size

    CompizConfig Settings Manager 021* Just as before, Launch CCSM(Super + a and search for CCSM) and then browse to Ubuntu Unity Plugin. Choose ‘Experimental’ tab.

    * Adjust the value of ‘Launcher Icon Size’ by simple scrolling. The default value of ‘Launcher Icon Size’ is 48, but I like it around 40 for my laptop.


    10) Change Desktop Size

    * By default, Ubuntu 11.10 Oneiric Ocelot gives you four workspaces to play around. Keyboard shortcut for activating the four workspaces is Super + s. Now, if you want to increase/decrease that number do the following.

    * Launch CCSM yet again, and select General Options from the category ‘General’. Select the tab ‘Desktop Size’ and choose the values you want. Simple as that.


    11) Add your Favourite Places As Quicklist for Home Icon in Unity

    Unity quicklistsQuicklists are something that I thought would be included as a default feature in Ubuntu 11.10 Oneiric Ocelot(at least some of them). But that didn’t happen. Home Menu quicklist in my opinion, is a must have feature(see screenshot to know how it will look like). Follow the steps to add your favorite places as quicklists.

    * Copy ‘Home Folder’ launcher file to your home directory. For that, you need to open Terminal(Unity Shortcut: Ctrl + Alt + T) and copy-paste the following commands.

    cp /usr/share/applications/nautilus-home.desktop ~/.local/share/applications

    * Open the file in your favorite text editor. I am using Gedit here.

    gedit ~/.local/share/applications/nautilus-home.desktop

    * Now replace the content of the file with the following text.

    [Desktop Entry]

    Name=Home Folder

    Comment=Open your personal folder

    TryExec=nautilus

    Exec=nautilus –no-desktop

    Icon=user-home

    Terminal=false

    StartupNotify=true

    Type=Application

    Categories=GNOME;GTK;Core;

    OnlyShowIn=GNOME;Unity;

    X-GNOME-Bugzilla-Bugzilla=GNOME

    X-GNOME-Bugzilla-Product=nautilus

    X-GNOME-Bugzilla-Component=general

    X-Ubuntu-Gettext-Domain=nautilus

    X-Ayatana-Desktop-Shortcuts=Videos;Documents;Music;Pictures;Downloads

    [Videos Shortcut Group]

    Name=Videos

    Exec=nautilus Videos

    TargetEnvironment=Unity

    [Documents Shortcut Group]

    Name=Documents

    Exec=nautilus Documents

    TargetEnvironment=Unity

    [Music Shortcut Group]

    Name=Music

    Exec=nautilus Music

    TargetEnvironment=Unity

    [Pictures Shortcut Group]

    Name=Pictures

    Exec=nautilus Pictures

    TargetEnvironment=Unity

    [Downloads Shortcut Group]

    Name=Downloads

    Exec=nautilus Downloads

    TargetEnvironment=Unity

    * And restart Unity. Hit Alt + F2 and run the following command to restart Unity.

    unity –replace

    * Done. If that doesn’t work, you might need to log out and log back in to restart Unity.


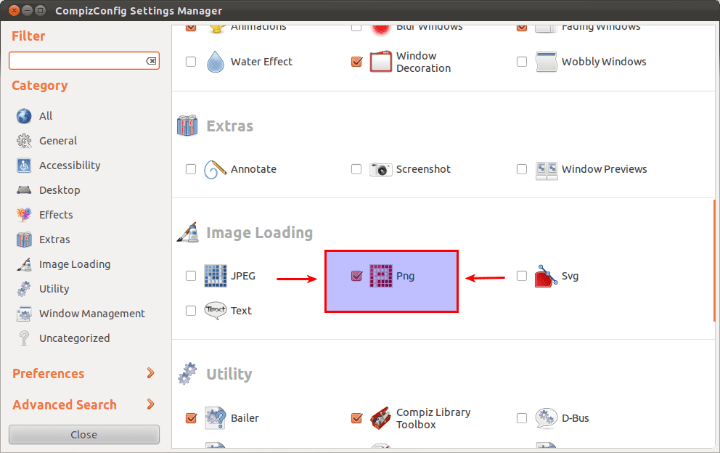
    12) Enable Uity Grab handles

    CompizConfig Settings Manager 022CompizConfig Settings Manager 023CompizConfig Settings Manager 024unity grab handles
    This is another feature that I thought would be included as a default. Unity grab handles are a easy and eyecandy way of resizing windows, better suited for touch screen devices though.

    * Launch CCSM(just search for CCSM in Unity Dash).

    * Make sure that the category Png(highlighted above) is ticked.

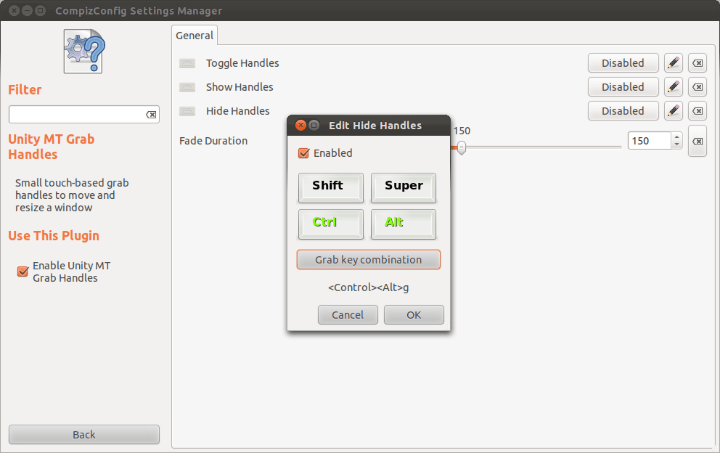
    * In the Uncategorized section at the bottom of CCSM, make sure that Unity MT Grab Handles is ticked as well. Click on Unity MT Grab Handles option now.

    * You will see that the Toggle Handles option is Disabled by default. Click on the Disabled button and tick the resulting Enabled box.

    * Hit Grab key combination button and select the shortcut you want. As you can see in the screenshot above, Control + Alt + g was my choice. Its up to you.

    * Done. Unity Grab Handles are enabled in Ubuntu 11.10 successfully.


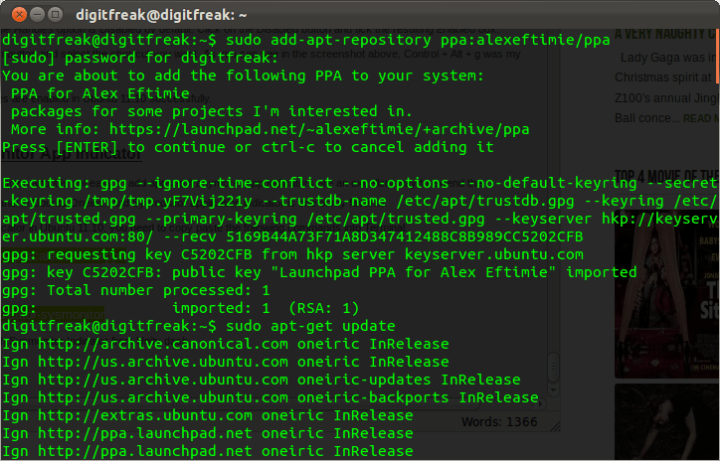
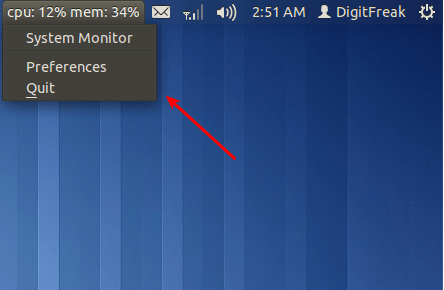
    13) Install sysmonitor App Indicator

    Unity’s top panel is locked down and it is not easy to add apps to it anymore. App Indicators are an excellent way to extend the functionality of Unity top panel in Ubuntu Oneiric. And Sysmonitor application indicator is one of my favorite.

    digitfreak2Screenshot at 2011-12-15 025139
    * To install Sysmonitor Indicator in Ubuntu 11.10, you need to copy paste the following commands into Terminal.

    sudo add-apt-repository ppa:alexeftimie/ppa

    sudo apt-get update

    sudo apt-get install indicator-sysmonitor

    * Done. Now, simply launch Sysmonitor Indicator from Unity dash.


    14) Install Gnome Shell on Ubuntu

    Screenshot at 2011-12-09 112836
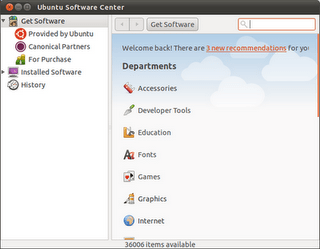
    Installing GNOME Shell in Ubuntu is not “mission impossible” anymore. Ubuntu 11.10 Oneiric Ocelot is GNOME 3.0 based and installing GNOME Shell in Oneiric is just a click away. Instead of one simple GNOME interface, now you have two, each one unique and special in its own way. Here is how you install it. Just search for ‘GNOME Shell’ in Software Center OR do the following in Terminal.

    sudo apt-get install gnome-shell

    Read How to Install Gnome 3 in Ubuntu 11.10, for more details and further configurations.

  • how to install software on Ubuntu using command line | for dummies

    Ubuntu is a Linux distribution and as they say, Linux is for geeks. Although Ubuntu makes it too easy on you by offering you really nice and cool ways to search and install software, there always is a more sophisticated way to search and install software, there always is a more sophisticated way to do it. To install software from the terminal, you should know the right commands to be used. Before installing the software however, you must get the updated list of software from the Ubuntu servers, at least once. Performing any software install using built in commands for package

    management would require internet connection (except when you are removing them).

    The most used command for installing software from the command line is ‘apt-get’.

    To get the updated list of packages from the Ubuntu servers, run :

    sudo apt-get update

    This will make Ubuntu contact the servers and fetch the list of software packages and consider them the next time when installing software. So if it happens that someone says that a particular software or some specific version of it is available in the Ubuntu repos but your system does not agree, run an update. Remember however that an update is different from an upgrade. While an update gets only the list of software from the servers, an upgrade will actually get those packages and install them on the machine.If you wonder what the ‘sudo’ command does, it makes you the root user when you enter the command. If you do not use ‘Sudo’ in the begin

    ning of the command, the command will fail because it requires admin privileges on machine to install software.

    Installation of programs on Ubuntu is also a simple job. You just have to change the action for the apt-get and add in the package name of the software which you want to install.

    To install gimp, for example, type this into the terminal:

    sudo apt-get install gimp

    The above command will automatically find out whether gimp is already installed or not. If it is installed, you will be notified. If it is not installed, apt-get will find out how much data it needs to download in form of software and dependency packages, how much space will it consume on disk after installation and then prompt you if you want to continue. If you think that it is fine to go with, just confirm and it will automatically download, install and update the menus to reflect the changes.

    Now if you wonder what if the internet connection break down while downloading packages, let us tell you that you will have to type in the same command again to make Ubuntu complete the installation. Be not worried however because the download will resume exactly from the point where it broke down from.

    Another question that would come up when installing software from command line is : How do i search for a particular software package? There is no search bar! Well, as a surprise to many, apt-get does not help you search for packages in Ubuntu repositories, but aptitude does. So install aptitude first.

    sudo apt-get install aptitude

    After aptitude gets installed, you can search for packages by using the command in format :

    aptitude search <package_name>

    For example, if you wanted to install chromium but ‘apt-get install chromium’ is saying that the package name is incorrect, you should first search for the exact package name. Once you get to know the name, install the package using apt-get.

    sudo apt-get install chromium-browser

    Even if every graphical program is failing, you can make use of the terminal and install something new on the machine.

    How to update your Ubuntu using terminal aka command line :

    If you want to update your Ubuntu in terminal you need to remember a simple command line.

    first you need to update the list of new updates available officially by Ubuntu. to do this type :

    sudo apt-get update

    it will refresh your Ubuntu update list with newly available updates. Then you need to finally run a command to update the system.

    sudo apt-get upgrade

    you will be asked a confirmation whether you want to update the system along with the information about how much data will be downloaded and what space it will consume on your HDD.

    press ‘y’ if you want to update or type ‘n’ (without quote) if you don’t want to update Ubuntu at that time.

    Note: when you enter password in terminal, it doesn’t show up like it does in GUI mode (the ” *** “) however the terminal is accepting your inputs it doesn’t show up any significant characters.

    Please click on pictures to enlarge

  • How to Install Softwares on Ubuntu

    How to Install Softwares on Ubuntu

    We said Ubuntu comes with everything which a home user would need, but we keep coming up with ways to want more! In this section we should show you what Ubuntu comes with and how you could have those things which you do not get in the default package.

    What comes pre-installed with Ubuntu?

    Ubuntu is a great OS when it comes to ‘install-n-go’ situation. The first reason is that you can run it from USB/CD without installing it. The second reason is the availability of software.

    Unlike the default Windows installation which would require a messaging client, an office suite, an antivirus to complete the picture, Ubuntu comes pre-installed with almost everything one needs to get the basic job done.

    Web browsing: You have one of the best software available with Ubuntu as default web browser. it is the same software which holds the record for maximum downloaded in 24 hours. it is fast, secure and offers lot of functionality with add-ons. ok, no more riddles, we are talking about Firefox.

    PIM: Although we are used to the web mail, there are some cases and people requiring the old email client method to read the email. Outlook you say? Well, we do not have windows in the picture here. nonetheless, the software Ubuntu offers is a great one. it’s called evolution. It can manage your Email, Calendar, Contacts and a few other to-do items. Nice replacement for Outlook; and a free one.

    Social: Man is a social element and web has become a social circle. Thanks, to MZ. You can use Gwibber to update your status to both Facebook and Twitter. In case you ask ‘how to tweet’, well it has support to twitter to too!

    Office: We have already talked enough about this. LibreOffice can take care of all your needs, almost.

    Bit Torrent: This is one technology which has been made infamous largely because of it’s wrong use. However, there is legitimate software, especially free ones which are distributed over bit torrent networks. Ubuntu comes with ‘Transmission’, a simple, intuitive client to take care of torrents.

    Chat: Before there was Facebook, there was yahoo messenger. people who belong to the pre-facebook era still are in love with yahoo and Gmail messengers. it allows them to talk to buddies not only in the SMS style but also in the phone and 3G style. Ubuntu’s answer is empathetic. It comes with a chat client called Empathy which facilitates text, voice and video calls over Google and Yahoo (and many, many other) networks.

    Music:Windows media player might be the best bet for those who have nothing to do outside of the word ‘MP3’. For some who want fewer restrictions with their music, prefer free codecs. Ubuntu comes with banshee as the music manager which easily takes care of your existing music as well as allows you to purchase new music from Ubuntu store. It however does not play MP3. Do not be disappointed. We give you two reasons : first, you can always ask Ubuntu to get the MP3 and other restricted format codecs; second, their are alternate and most powerful player out their. you can always go for VLC (which 70% of user uses to play any kind of media)

    Pictures: If you have shotwell, you will have a nice feature set to help you manage your pictures. Shotwell is the picture album manager with basic editing capabilities to satisfy your needs.

    That is much of an exhaustive list but then as we said, Ubuntu does come with the basic software for everyday purpose.

    Installing new software packages

    Though Ubuntu has everything we would need in our everyday lives, we show you the trick for the one which would be special. Ubuntu categorizes software into the categories according to how open they are. To get the most out of the online software treasures, first enable all available repositories.

    To do this, you need to launch the Ubuntu software center. You should find it as the last item of the Application menu in the Gnome shell. In Unity, you can search for it on the dash and you will have it. After the window opens, edit the software sources by clicking the edit menu and then selecting software resources. On the first tab, named Ubuntu software, make sure that all the repositories (main, universe, multi verse and restricted) are enabled. This will give you the most number of options for installing software. After making the changes, close the window. Ubuntu will automatically try to get online and update it’s list of software packages. Once it is done you can search for the software in Ubuntu Software center and install the one which you want.

    Not only this, since the new release of Natty Narwhal (version 11.04). Ubuntu software center also facilitates the rating system so that you can get to know how good or bad a software os considered to be in the eyes of those who have used it. However, if you think that a software has been rated by too few people and you believe that it’s the on which can help you complete the task, go ahead and try it (bandwidth meter be in front of your eyes though) and tell others how well it worked.

    Ubuntu Software_Center

    Once you select software for installation, USC will automatically find out which other packages are needed to make software run and installs them. These additional software packages required to make a particular software run are called dependencies. If you wonder why is it necessary at all, let us get back to the description of /lib directory. We already said that Linux maintains a single set of software libraries. We also gave a sample example where we said that if a software (say a picture management application) wants to use the Bluetooth device connected to the computer, it will have to use the library which can communicate with the hardware and get the work done for software. in this case, the first software (the picture manager application) depends on the Bluetooth library without which it might not work properly. In such a condition, we call the package which provides the Bluetooth library as a dependency for the picture manager application.

    Using Ubuntu software Center is not the only way to install new software. For a fine level control, you might have to start up the synaptic package Manager which does the same work as Ubuntu software center. the difference lies in the level of control offered by these two different looking programs. While Ubuntu software center (OK, lets call it USC henceforth) simply shows you the software which you want to install, Synaptic shall show you both the requirements, the dependencies, the size to be downloaded and consumed after the installation of the software, individual file progresses and a lot more options to choose from. Synaptic is for those who understand what software packages are and how to install them. Using synaptic package manager is slightly more difficult than using USC.

    i know it’s little difficult for the newbie to get totally used to the new interface and steps to get the job done, but once you are the pro you’d love to be called ‘a Linux user’ .

    Next time i will tell you how you can install softwares in Ubuntu in more pro/geeky way.

    so stay tuned.