Tag: files

  • How to batch rename multiple files or folders to add suffix/prefix

    How to batch rename multiple files or folders to add suffix/prefix

    Ever tried to batch rename multiple files or folders on your computer? Well, editing just a few of them won’t necessarily flip your anger switch, but when there are hundreds or thousands of files to be renamed, it got to be a little inconvenient.

    Recently, while working with my new Free image hosting website, I ran into some problems. Apparently, I decided to use Amazon S3 as my underlying storage solution to scale the platform in order to serve the anticipated surge in service demand. To achieve this, I had to rename more than 9,000 files, which includes the full-size image, thumbnail and resized pictures. This particular migration required me to add a ‘suffix’ to each and every image before uploading them to Amazon S3. I was certain that I could edit all of these files manually, one-by-one. However, after going through the first few hundred images in 30 minutes it became clear to me that it is not going to be an easy task. So, I started calculating and concluded that to rename all those 9,000 images, it would require 40 hours of continuous editing. Can you believe that?

    TL;DR: I needed something to edit and add suffix to more than 9,000 files.

    Hunt for the solution

    I have a separate droplet (VPS instance) for my image hosting website, which gives me the flexibility to provide better service to the users as it often gets too crowded at times. First, I thought I would do it on my server itself using the command line, as my main VPS server provided by digitalocean runs latest Ubuntu distro. Linux is a very powerful Operating system, and one can achieve anything, given it falls right into its programming capabilities. However, doing so would totally kill the motive of writing this article. If publishing this article means helping many others who are struggling to find the solution to the same problem, then why give up?

    First, I tried to find out if Windows Operating system natively supports this feature. I am well aware that you can rename multiple files at once with desired suffix and incremental numbering by simply selecting all the files to be renamed and pressing F2 key on the keyboard, but it is nowhere near what we actually want to achieve here. That leaves us with the tedious command prompt or the new WindowsShell to execute some command based instructions. However, I won’t touch this segment in this article as it will be a little overkill for this simple task.

    renaming multiple files in windows operating system windows 10 adding number at the end suffix

    That brings me to the next phase of ‘solution hunt’ –  The search for a dedicated third party software/application. A simple google query leads me to multiple websites which claimed to provide the solution. However, when tested individually, I concluded there are two simple yet powerful tools which are capable of achieving just what we want. The best thing is that they’re all free.

    The Solution: Batch Rename Multiple Files or Folders

    The solution I found is still an overkill for what we wanted to achieve, but they’re a complete solution to anything that requires batch renaming of files on windows. In fact, they’re so powerful that even an old school command line junky would say goodbye to all those nifty codes.

    Bulk Rename Utility

    Bulk Rename Utility immediately became one of my favorite tools as it helped me rename all my 9,000 files with the click of a button.batch rename multiple files or folders bulk rename utility windows batch file rename tool software rename multiple files suffix prefix add replace

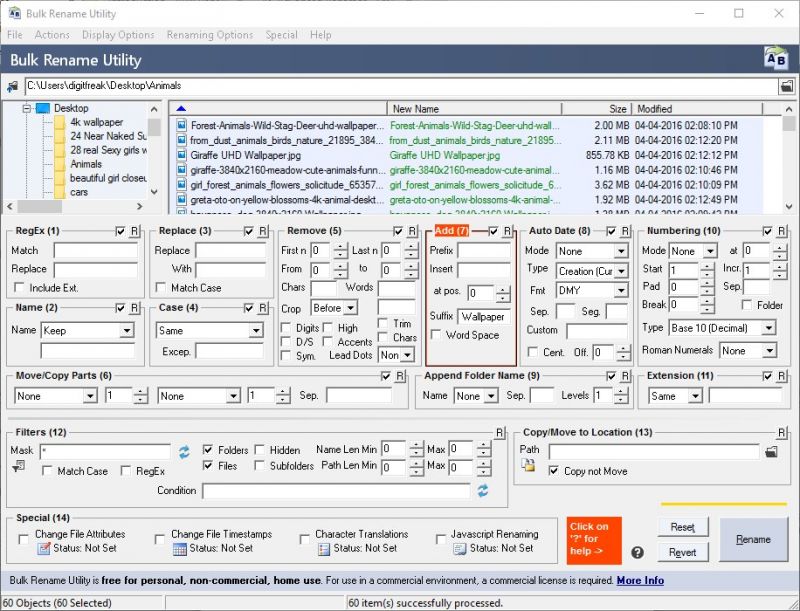
    All I had to do it select the folder where my files were located, put the keyword I wanted to add to all the files in the “Suffix” box.

    There is a huge list of options that make it one of the most powerful file renaming tool atm. You can rename multiple files quickly in any manner you want, rename photos (even the exif meta data), rename mp3 files, change file creation and modification time stamps and so on.

    Advanced Renamer

    Advanced Renamer is a free program for renaming multiple files and folders at once. By configuring renaming methods the names can be manipulated in various ways. You can setup advanced batch job using this powerful tool in minutes. There are 14 different methods that enable you to change the names, attributes, and timestamps of files in one go.

    Bactch rename multiple files or folders Advanced renamer windows batch file rename tool software rename multiple files suffix prefix add replace

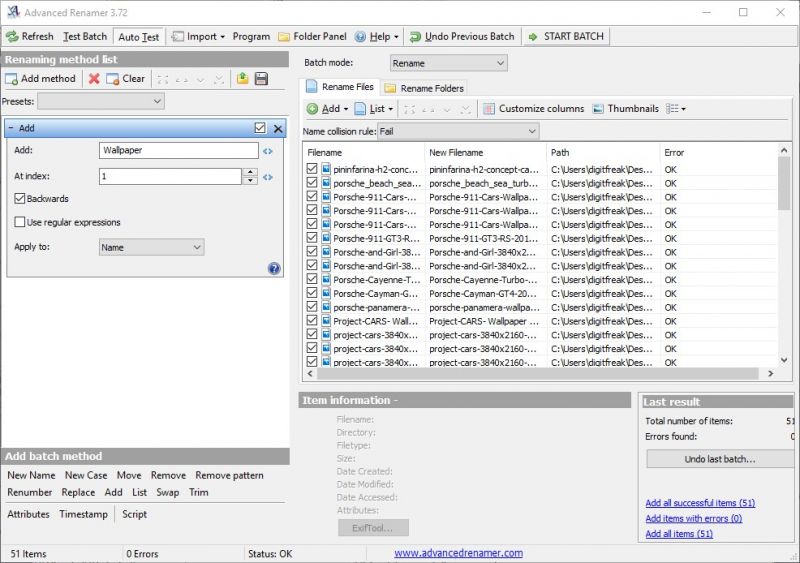
    Advanced Renamer is pretty much same as the tool mentioned above, but I personally felt it was little less newbie friendly. However, there is nothing it can’t achieve that you can do on BulkRenameUtility.

  • What is public and private BitTorrent Tracker, and which one you should use?

    When you want to share files with someone else, or a group of people, where do you go? Odds are, you’re surfing torrent search engines. But, did you know that torrent search engines don’t always allow you the greatest selection of files?

    Some of them also host illegal content, and do nothing to sweep up the mess. You’re left to fend for yourself as a user – and that can get dangerous. Here’s where private trackers can help.

    Why Use A Private Tracker

    Companies, like Vuze or uTorrent+, restrict access to content, effectively putting up a “wall” between you and the files being shared. Some companies do this to effectively block or filter illegal content being shared on these networks. Others do it to protect the privacy of users. Sometimes, it’s a little bit of both. With a private tracker, you can also gain access to a larger variety of files, faster download speeds, higher-quality files, and strong communities that support you.

    What Does “Private” Mean?

    In this case, “private” doesn’t necessarily mean what you think it means. Mostly, “private” means that it’s an exclusive community. There are a lot of benefits, but there are also a lot of rules you must pay attention to. There are also guidelines you must follow or you’ll be kicked out of the community.

    A bittorrent tracker is a server that regulated the communication between those downloading and those uploading content. Private bittorrent trackers are selective about who gets to use the site and who doesn’t.

    Contrast this to sites to popular torrent search sites, that allow users to use the sites unregulated. When you’re on such a search engine, it’s the wild west. Files are unregulated and it is up to the user to know what kind of files, which may include spyware and malware, they download onto their machine.

    With private sites, there are rules regarding the ratio of uploads to downloads. You can’t just download torrents and then delete them. You need to spend some time seeding them too. Some sites will ban you if you have a low ratio, and others will just restrict what you can do on that site.

    There are also rules that restrict invites. The users you bring into the community reflect on you. If they harm the community, it can also harm your stance in the community. This is a double-edged sword. On the one hand, it limits growth of the community. On the other hand, the members that are there are tight-knit.

    Finally, there are rules on uploading. If you upload files to the site, they need to be of a certain quality, format, or they must use specific organizational structure. Many torrent search engine sites carry a very disorganized system of files. Private sites, on the other hand, are all about quality and organization.

    There may be other rules too, like no illegal content, though these vary from site to site.

    The Benefits To You

    There are a lot of rules to follow with nearly every private site, but, what do you get out of it? Plenty. There’s usually a fantastic selection of torrents, high-quality files, really fast downloads due to seeding policies and fast internet connections of users, and some increased privacy.

    Should You Use A Private Tracker?

    Whether you use a private tracker depends on a few things. First, don’t use one because you think it affords you more personal privacy. That might be true in some cases, but it’s only a coincidence. Users on private sites tend to be very serious. Finally, this is a great option if you just want to join a small community and build relationships with other users.

  • The Year Is Ending: Is Your Computer Ready?

    The Year Is Ending: Is Your Computer Ready?

    Another year is coming to a close, and as we get closer to the ball dropping and flipping the calendar page to 2014, think about getting your computer in working shape and ready to start fresh with the New Year.
    Taking time to clean up your computer now and taking care of a few important issues will actually save you time down the road, especially if things go wrong.

    While no one wants to think about the possibility of their computer crashing and losing all of their data, the fact is, it happens, thanks to viruses, overloaded hard drives and other issues. Even if you don’t lose your data, failing to keep your computer up to date and clean increases the likelihood you’ll fall victim to a cybercrime, and have to spend a great deal of time and money fixing the damage.

    That being said, you can prevent some of the most significant computer problems by planning ahead and taking time at the end of the year to perform a few simple tasks.

    Changing Passwords
    Security experts recommend changing your passwords, particularly those for high stakes accounts like your bank, every 60 to 90 days. The reality is few people actually do make the changes unless prompted to — and that presents a security risk, especially if you use the same password for all of your accounts like so many people do. When a cybercriminal accesses one password, he or she may try those credentials in a number of places and stumble upon a great deal of information. So at the end of the year, change all of your login credentials, taking care to make the passwords challenging and unique. If you have trouble remembering the passwords, invest in password management software to keep them safe.

    Manage Security Protection
    It’s Dec. 31 – do you know where your antivirus protection is? Check your protection on a regular basis to ensure you have the latest virus definitions and your automatic updates are occurring properly. Check the expiration date of your virus protection to determine how much time is left; if you’re close to running out of time, update it now so you don’t have any gaps in your protection.

    In addition to updating your virus protection, install any updates to your operating system or add-ons that you’ve been putting off. Doing so will repair any vulnerabilities in your system that can be easily exploited by criminals. Also, double-check your firewall protection and your wireless Internet connections. If your wireless router is not password-protected, make that a priority; if your connection is already locked, change the password to thwart hackers.

    Run a Backup
    Losing your data can be devastating. While the best hard drive data recovery software will most likely recover your files if your computer crashes, running regular backups of your machine doubly ensures you won’t lose any of your precious files, photos or other data, and your recovery will be quick and relatively painless.

    Before you back up your files, delete unnecessary “stuff” from your hard drive. Do you need to keep every single photo from your daughter’s dance recital — even those that are blurry or where her eyes are closed? Deleting the files you no longer need and moving those files that are important, but using cloud storage or a removable disk will keep everything organized and can improve your machine’s performance.

    z 00133Develop a Recovery Plan
    The best way to avoid losing your mind if something goes wrong is to have a recovery plan in place. A computer crash can be devastating — and if you have to purchase a new computer or hard drive, not having all of your data can make the transition frustrating, not to mention disheartening when you realize everything is gone forever. That’s why it’s important to run regular backups, and know where to go for help should things go awry. Research your recovery options, watch a video tutorial and reviews for recovery services and know exactly who to contact before you have a problem. Having that information easily accessible will help get you back up and running as soon as possible.

    Getting your computer ready for a fresh start in the New Year takes a few hours, but the rewards are great. Not only will you be secure in the knowledge your machine is protected and running as well as possible, you’ll also have the peace of mind of knowing you won’t be left high and dry — should something go wrong.

  • [How To] Schedule downloads using Internet Download manager

    [How To] Schedule downloads using Internet Download manager

    If you rely on traditional download managers to achieve the scheduling tasks, you might be out of luck. There are many download managers available on the internet, but “Internet Download Manager” is something that we freaks use for download purpose at regular basis. It is not only capable of scheduling the downloads, but you can also maintain the order in which you want the downloads to be initiated.

    So, How you are going to schedule your files on IDM? Don’t worry we are here to help.

    [Download Latest version of Internet Download Manager]


    Instructions:

    7013000641. Adding Files to the Queue

    When you click on any link to download files, IDM automatically detects the file type and offers the confirmation window to select from various options. You can change category, provide download destination to save your file along with three actions — “Download Later”, “start Download” and “Cancel” along with details about the file size which appears on the right side of the confirmation window.

    If you want to schedule your file to be downloaded later, Just click on “Download Later” button. Upon clicking, it will offer you to choose from the pre-defined scheduling queue.

    701300063
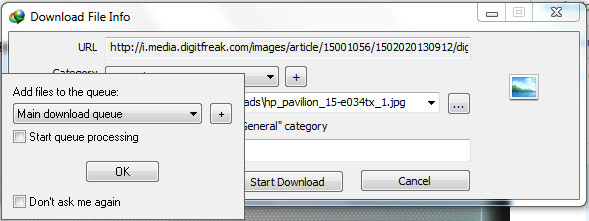
By default “Main download queue” will be selected, and you can start processing the queue right away if you check the “start queue processing” right before clicking on “OK” button. You can also check “Don’t ask me again” to remember your preferred setting.

    We just want to add our file to the list of queue. So, just click on “OK”.


    2. Tweaking Settings

    Go to internet download manager and double click on “Main Download Queue” at the bottom left corner of the window. You’ll be greeted with the default scheduling settings.

    701300069 copy
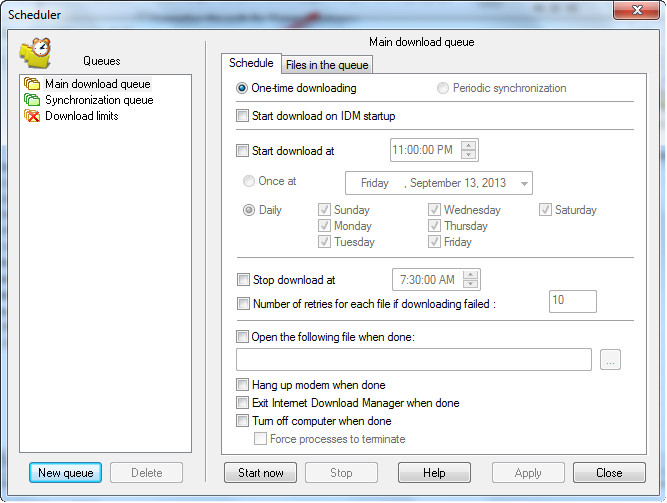
There are two types of scheduling options – “One time download” and “periodic Synchronization.” — As the name suggests “One Time Download,” processes download queue and deletes files from download queue when their download is complete and “periodic synchronization,” IDM checks if the files in the queue have been changed on the server, and if changed, it will download new files and replace old on new ones. All files will stay in the queue after synchronization.

    Then comes the real powerful tools and options. The IDM offers a wide flexibility, that can dynamically schedule your file for any practical requirements. You can specify the start and stop time/date/periodicity, Number of retries for each file if downloading failed, open any specific file when download is completed, disconnect internet, exit download manager and turn off your computer automatically.

    The powerful tools offered by IDM are very useful for maintaining the download queue and your scheduling needs.


    3. Scheduling and downloading Files

    Adding Files to the download queue is very easy. You can go with the option mentioned in step 1 above or you can manually add the files to the download queue. Right click on the file > Hover to “Move to queue > select the queue you want to move the files to.

    701300070
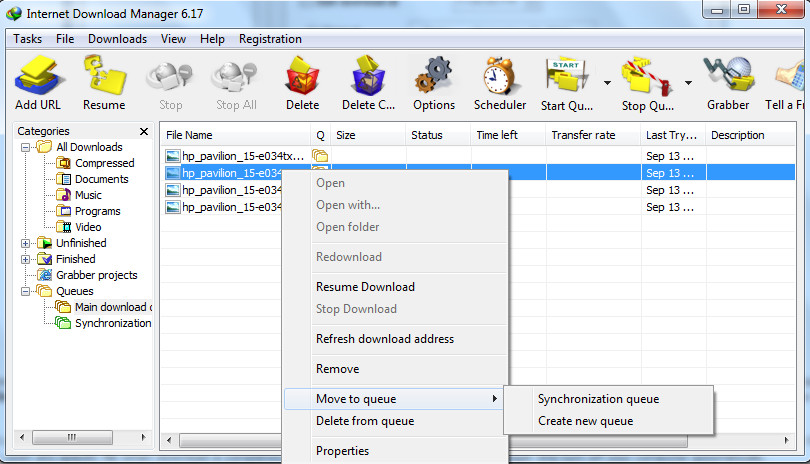
To manage the queue and files, click on “Files in the queue” tab. You can change the order of downloads for one or several selected files by using arrow buttons or by using drag & drop. You can also delete download tasks from the queue with Delete button.
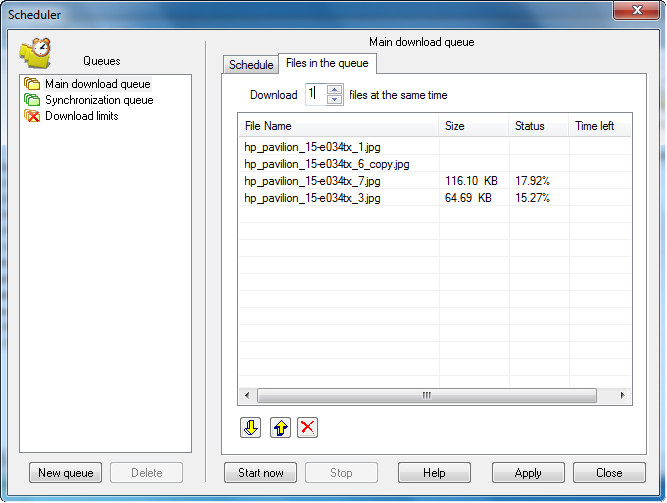
    701300066701300068

    After starting a queue processing IDM starts downloading one file or several files at the same time from the queue. You can set the number of downloaded files at the same time for each queue individually in the corresponding list box.

    There are sites that don’t allow opening more than one connection from one computer. If you want to download several files from such site, you should create a separate queue for this site and set “Download” 1 “file at the same time” on this tab. Also you should add such sites to the list of exceptions in IDM “Options->Connection” tab with 1 connection to always download one file using only one connection.
     
    4. Your download will start at the time you scheduled the downloads in settings. If you want to start your schedule right away, just click on “start now” button.
  • [How to] connect to a FTP server and transfer files to your computer [Filezilla]

    [How to] connect to a FTP server and transfer files to your computer [Filezilla]

    FTP (File Transfer Protocol) has been a popular method to transfer files easily over the network. If you are a tech savvy or managing a server for your website or contents – you might have stumbled upon this handy feature.

    FTP is quite useful when you need to transfer files over a network or to your computer from a server (or vise Versa).

    If you are a webmaster or web developer – this is something you use on a regular basis. It helps you effectively manage your files on the server and upload or download the contents with ease.

    Needless to say that most of the people are using seedboxes for downloading contents over p2p network and sometimes they just can’t figure out how to transfer the files from their seedbox to the computer.

    Some of us are not too tech savvy and wonder how to do this magic. If you are reading this article – you must be looking for the same answer.


    Instructions:

    1. Download & Run FileZilla (You can use any FTP client according to your choice)

    5008797644002300127

    2. Go to File > Site Manager

    3. In the new popup window > click on “New Site”

    5008797644002300146
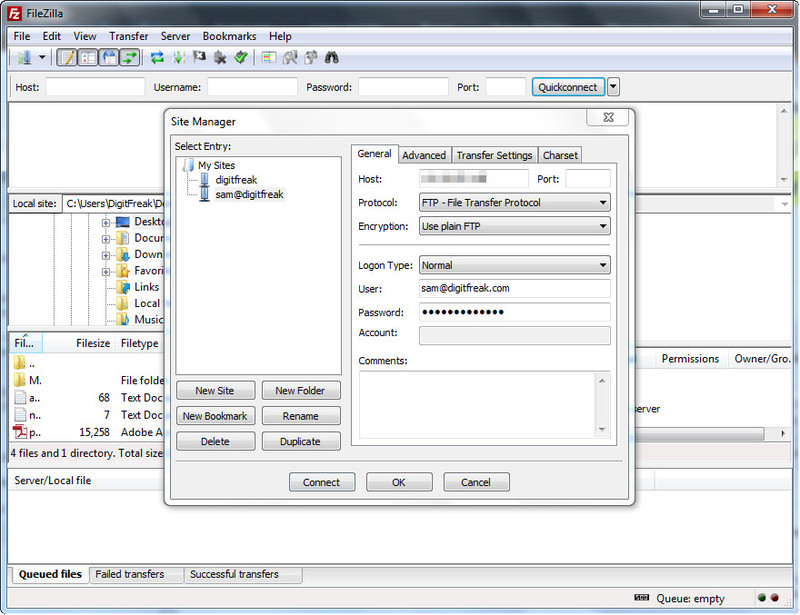
4. Now you have to type your FTP information given by your server provider or if you are managing your own website on cPanel, your HOST will be – “Your primary domain on the server”, User – “Cpanel username” and Password – “cPanel password”.

    You don’t usually have to provide the ftp port, you can simply leave it empty. If you host server configured the FTP to be accessed on a custom port, you should ask them for the same. You can contact your server provider for all these informations.

    5. Click on “connect” and you can see full directory listing of your server’s file. You can delete, upload or download the files from the server to your computer or vice versa.


    Alternate Methods

    I. Quick connect:

    5008797644002300147
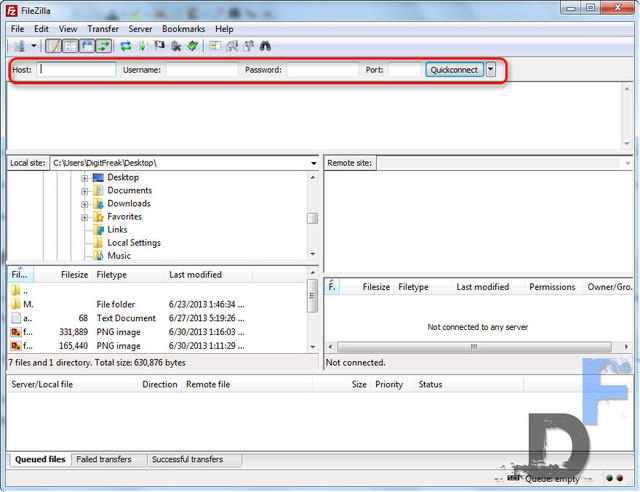
If you are looking for quick option to connect your server via FTP temporarily – this could be your saviour. The Filezilla provides “quickconnect” option, which enable you to connect to your FTP server without much hassle.

    * Just open Filezilla and fill up the information provided by your server provider.

    * Click on “quickconnect”

    * You’ll find the full directory listing of the server in “Remote site” block.


    II. Import FTP configuration from cPanel Account

    You can simply import the FTP configuration from your server’s cPanel account. It is the easiest method to connect to your cPanel Powered server.

    * Login to your cPanel account

    * You’ll find “FTP accounts”, under “Files” (as shown in image below):

    ftp accounts

    * click on the FTP account you want to download the configuration file for.

    * You’ll find some FTP clients listed under the FTP account name, click on “FTP Configuration file”

     5008797644002300133

    * Click on save when prompted.

    * Now open FileZilla > File > Import

    5008797644002300151* 
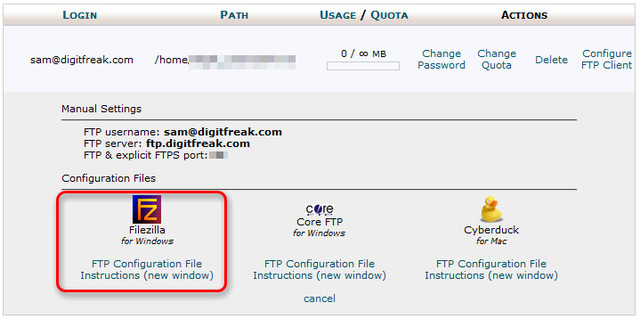
Browse to the configuration file you downloaded.

    * click “ok” if prompted.

    * Go to “Site Manager” > select your site name from left panel and click on connect

    connect* 
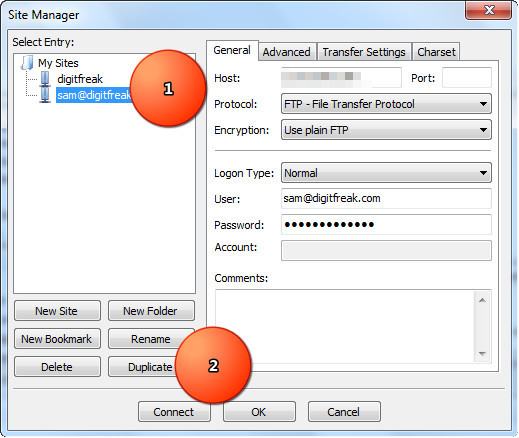
You’ll get connected to your server.


    If you are too confused with the above information, just have a look at the video below:

  • [How To] find temporary cache folder of Internet download manager (idm) for incomplete download files

    [How To] find temporary cache folder of Internet download manager (idm) for incomplete download files

    It is sure a very helpful software and makes our work easier and comfortably simple. Sometimes you might have been wondering, where IDM is storing all your files before presenting the final output you get after the finished download. Well, it is simple – Your files are unfinished and it should be in the temporary folder. Once you Know where to look, You are almost there.

    IDM saves your cache files of incomplete downloads at this location:

    C:\Users\digitfreak\AppData\Roaming\IDM\DwnlData

    Replace digitfreak with your computer username.

    You will find folders which are indexed by the names of your current unfinished downloads. This is what we were looking for. One thing that we notice is that these files have no extension.

    If you are downloading multiple files at once, like a music album, you’ll find that there are exactly the same number of files without extensions. To get the preview of the files, you can copy one of them to other location and add an extension at the end.

    Play or open the file with the software which can run it.


    Warning


    *Never rename the folder or file you are download in the temp folder of IDM or you might end up with the non-resumable download.