Yeah, I agree there are some applications that can help you change the folder color and you can easily change the folder icon using the “properties” context menu.
But, have you ever tried to change the folder icon to your favorite image? The thing is that you can’t change the folder icon into the image you want it to be, simply because windows can only recognize the icons with it’s unique file extension — “.ico” – leaving you with the manual image conversion process.
Even if you are stubborn and want to do things manually, it would consume lots of time and needs some considerable amount of efforts to convert 100s of images into .ico file – and sometimes, you don’t get the good results with the image conversion tools, because they cannot retain the same image quality as the source file.
We came across a really simple and beautiful tool that accomplishes the same task, but with minimal efforts and a negligible amount of time. “Folder Changer” is the utility that can change the folder color according to your preference, and it does convert any picture/image into a folder icon.
Let’s have a look at the steps you need to follow to get this work.
Instructions
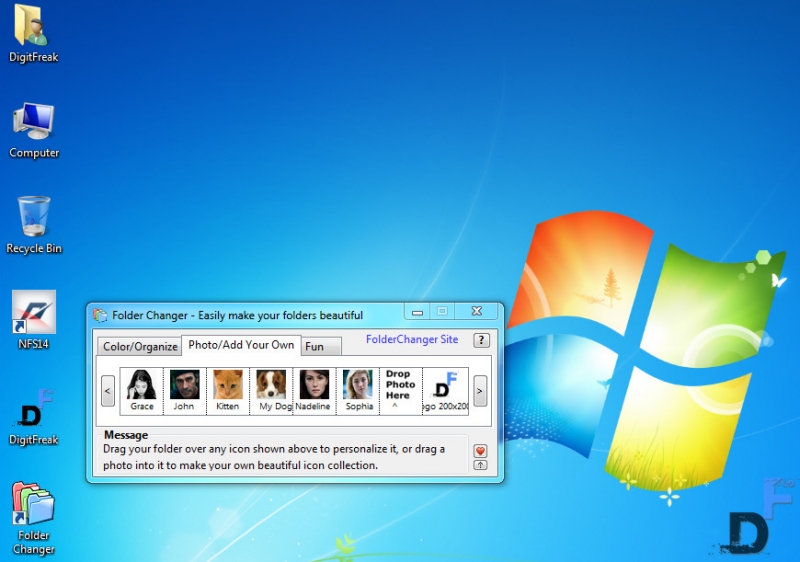
1. Download the software “FolderChanger” and install the software
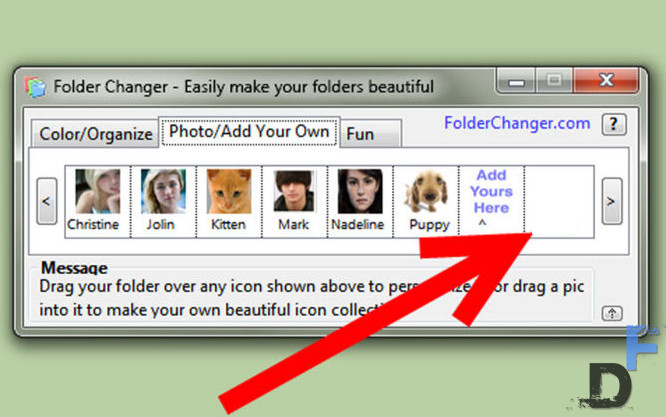
2. Select “Photo/Add Your Own” tab of FolderChanger.
3. Drag and drop your favorite photo into FolderChanger.
4. Wait a few seconds for PhotoChanger to convert your photo into an icon.
5. Drag and drop your Desktop folder over the icon inside FolderChanger.
Light bulbs have always been significant to the success and bright future, ever since it was invented. We actually can’t imagine life without bulbs and other light emitting medium that brightens our life.
Incandescent lights have acquired the same almost spherical design since the very beginning; It sure evolved a little over the time and became a little more power efficient and productive. But, that is about it change now!
Philips has invented a new light the bulb that is now only power efficient, but it has a new unique flat design. Using just 10.5 watts to give off 800 lumens, the SlimStyle LED offers the usual upgrade in energy efficiency, but the true story is the shape of the thing.
Unlike traditional bulbs, it’s flat, with a string of LEDs arranged into a horseshoe that arcs out from the base of the bulb. The new shape is designed to do a better job of dispersing heat than traditional LEDs and eliminate the need for weighty aluminum heat sinks.
(Credit score: Colin West McDonald/CNET)
The clearest distinction in what you’ll be able to get from the two bulbs comes with directionality. Each bulb declare to be omnidirectional, which means that they solid mild evenly in all directions, and with the basic form of its bulb, that is no doubt authentic with Cree. With the SlimStyle, then again, you can notice dissimilar dim areas to each and every side of the LED’s arc.
The impact is principally notice in a position should you use the SlimStyle below a lampshade. This is not to assert that the SlimStyle could not remove darkness from a room, however, it’s the type of factor that some users would possibly find distracting.
The SlimStyle LED (right) when compared with the Cree 60-watt substitute LED (left).
Another key distinction between the two bulbs is the guarantee. Philips offers three years of restricted protection while Cree offers a trade-best ten.
Three years is healthier than anything else you would be expecting from an incandescent bulb designed for 12 months lifespan at most, however for an LED that guarantees to remain over twenty years, it is a bit underwhelming, and indubitably nowhere close to as reassuring as what Cree is offering.
In the end, it would all come right down to the SlimStyle’s price level. If the absence of heat sinks is sufficient to preserve the price per bulb some the place around $10 or less, then the SlimStyle LED stands to make rather a lot of feel — specifically to consumers who’re making first-time improvements from newly out of date incandescents, and who don’t seem to be having a look to spend very so much in the course of. Any larger than that, although, and it will be difficult to think about why you would go along with Philips over the $12.97 Cree bulb.
In order to get the most out of Google Maps, whether looking out from a computer or a phone, listed here are 5 tips that will help you find your way more straightforward and faster.
1. Create a Multi-Cease Route
Google Maps used to only permit you to map out directions between two locations. Now, plan out a whole route in one go. When you enter directions, click the plus signal instantly below the directions so as to add another cease. Add as many as you need and plan the final day, all in one sitting.
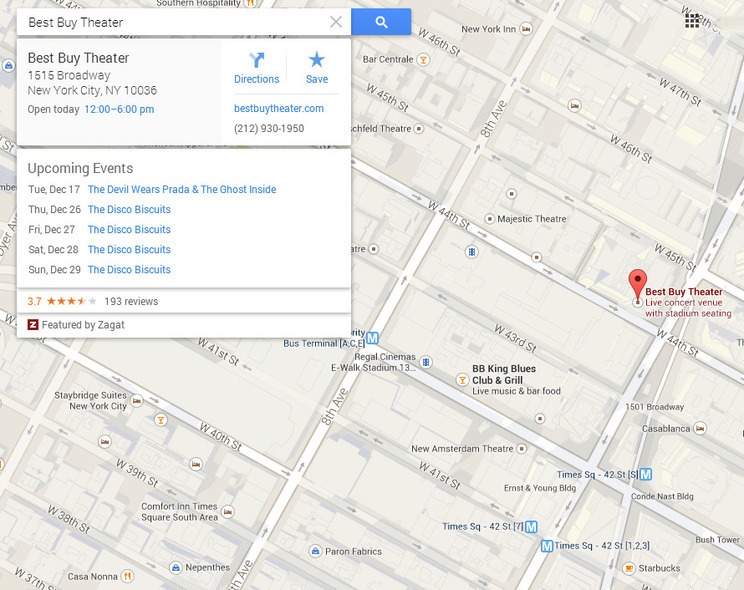
2. Check Out Upcoming Events
Whether going out in a brand new city or simply exploring your personal outdoor, finding events can take quite a bit of digging. Google Maps makes it a little bit more straightforward. When you select an event venue on the map, a listing of upcoming occasions will seem. From there, buy tickets or e-book passes to no matter you are involved in.
3. Visuals With out Pegman
All of us love Pegman, the little feature-less figure users can plop down on a map to look the street view. This instrument has some issues, although, as an instance when a truck blocks the entrance of a restaurant.
The new Google Maps saved Pegman but in addition brought a photograph carousel, so you will discover images of native areas and skylines. That you may open the carousel by clicking the coloured squares in the backside-right nook. Some areas even embrace a photograph “tour.”
4. Save Mobile Maps for Offline Mode
It may be a ache to make use of Google Maps offline. It will probably take awhile to load and eats up an excellent quantity of data when you are no longer careful.
If you wish to access directions on the go, simply cache the map sooner than beginning your ride. To take action, seek for the directions you want. Then in the search bar, type “Okay Maps” and search. This will likely save the map on the screen and let you access directions offline.
Picture: Flickr, Alissa Walker
5. See Google’s Recommendations
Not sure where to move or what to do? Unsure of the main tourist attractions in a brand new location? Let Google suggest some for you.
By typing an asterisk into search, Google will select explicit attractions in the viewable portion of the map. The selections embrace museums, eating places, outlets and other sightseeing locales for communities each large and small, even supposing it only highlights the local Chilis.
There are a couple of hidden Windows tips, tips and keyboard shortcuts in order to make your workflow smoother and quicker, without a whole lot of effort on your section.
We have now highlighted just a few of the most respected methods in the gallery above. The majority of the tips apply to Windows 7, with the few exceptions mentioned on explicit slides. What’s your favourite Windows secret? Tell us in the comments section below.
1. Select and Focus Taskbar Applications
To select and focus applications in the taskbar, hold down the Windows key, press T, and use the arrow keys or type T many times. This permits you to scroll thru the pinned applications without ever touching your mouse.
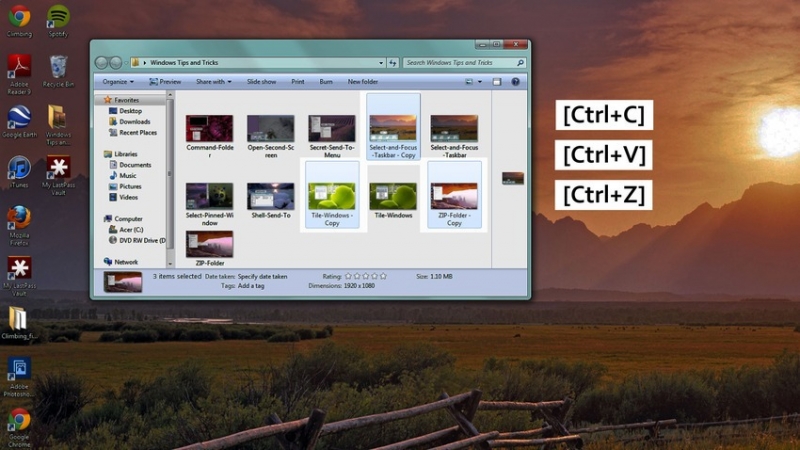
2. Copy, Paste or Undo a File Move
The general publicrecognizes that the key commands Ctrl+C, Ctrl+V and Ctrl+Z are handy for copying, pasting and deleting textual content, however, were you aware that you need to use these instructions for records data as neatly?
3. Tile Windows
With Windows, 7 got here Aero Snap, or the meansto maximise a window by dragging it to the side of the screen. However, what if you wish tosimply tile your windows?
Open TaskManager (Ctrl+Shift+Esc), choose the applications you are looking to tile (Ctrl+Click), rightclick, and select Tile Horizontally or Tile Vertically. Select-pinned-window
4. Open an Application
To start an application that’s pinned to the taskbar, hold the Windows key and press the number that corresponds with its location (Win+number from one to 9).
5. Manage Your Applications
To open a brand new window of the similar application (as an example, to open a brand new Chrome window or a second Desktop folder), hang the Shift key, the Window key and then a bunch from one to 9. If you wish toweb pagethru the open windows, press Control, Window, and a bunch, from one to 9.
6. Pin Any Item to the Taskbar
By default, Windows 7 only lets you pin applications to the taskbar. However,if you wish to pin a uniqueitem like a file or folder, follow these simple steps.
Drag and drop the file onto your desktop (If the item is in the Favorites folder, observe these additional steps)
Rightclick > New > Shortcut
Type in: explorer “C:shortcutsFavorites – ShortcutName.lnk”
Name the shortcut
The Shortcut will now appear as a folder, which that you mayrightclick to pin to the taskbar
7. Open a Command Prompt
To access the open a command option, hold down the Shift key and right–click a folder.
This tip only works for Windows 7 or Vista. To do that on Windows XP, it’s a must to use a registry hack.
8. Get entry to the Secret “Send To” Menu
Were you aware that there is a secret “Send To” menu that you couldaccess with the Shift key? Hold down Shift, right–click the folder and select the “Send To” menu. This permits you toaccessa completely new set of file locations, so which you canquickly relocate a folder without the hassle.
9. Alter the Default “Send To” Menu
If you wish totrade the options that seemto your default “Ship To menu,” type “shell:send to” into the location bar of a folder. That you may then drag and drop new folder locations to the Send To folder.
10. Open Any File or Webpage
The Run Command is a simple way to open any file, application or website. Use the Win+R keyboard shortcut to open the Run dialog field. From right here, type in the title of any application and hit Enter. You couldadditionally enter a URL straight away into this container to open up any web page.
11. Create a Zip Folder
A zip folder is the quickest way to movea big selection of files. To create a zip folder, rightclicka standard file folder and choose the “Send To” option. The “Compressed (zipped) Folder” option will compress your folder and make it easier toupload the files in one fell swoop.
The newest Netflix app update in the Play Store has a brief changelog, however what’s there has been a long time coming. That is proper, correct profile reinforce has made its way to Android after being available on just about each other platform, and Netflix customers are going to be extraordinarily chuffed about that reality.
No more managing of a couple of debts, and no more mixing of suggestions when you could have a number of completely different individuals sharing an account or software.
Simply see your most contemporary motion pictures and presentations totally break free the others the use of the account. We’re positive more than a number that you may have been ready for this one — snag the update from the Play Store hyperlink here.
The web tools and tips are necessary to identify the web market, its appeal to the audience and the web graphics. After developing a website, a series of tests are necessary to ensure the website is free from glitches and runs smoothly. A good website is constantly maintained and promoted for it to achieve its main objectives.
Steps of Building a Website
Step 1. Website Research
Before coming up with a website plan, a thorough website research is vital. Web research equip developers with complete details of what is required in developing website. Among research areas include functions of the site, available similar types of website in the internet and the best choice of website for given particular demand. During research, the web developers also determine the domain name and web hosting server, which will be appropriate for the desired outcome.
Step 2. Plan a Website
Improper planning leads to failure. After a thorough research, time should be designated to develop a website plan based on the information collected during research. The main function of plan include determining the number of website pages, selecting and sorting website contents, creating and managing website security and copyright demands. Finally, a website developer must ensure the needed technical knowledge is available. Based on the technical competency, a website builder can decide to start from scratch or use pre-built templates such as WordPress.
Step 3. Design a Website
This is the phase of implementing the work of research. This is the stage where technical competency of web developers is evaluated. Most developers create their designs by drawing a comparison with other excellent sites. Artistic application of color, theme and the general page design are vital in this phase. Depending on the goal of the website, proper fonts, spacing, typography and images must be incorporated. A good design should appeal to the audience.
Step 4. Code a Website by CSS and HTML
Coding makes the website fully functional HTML or XHTM document through the use of HTML, JavaScript, CSS, ASP and PHP. In other words, coding involve adding programing language to the designed document for interactivity. For database driven websites, Microsoft Access or MySQL are required.
Step 5. Launch a Website
Once the website has been developed, launching is necessary. Before launching a site, a pre-launch test are necessary. Pre-launch tests are useful in determining whether the website is compatible wholly in fully in all browsers, accessible all visitors and error free. Pre-launch also gives the developer opportunity to validate the web HTML and CSS scripts. Search Engine Optimization is also carried out in this phase. SEOs makes the website easily visible in the internet through key word search. Finally, launching require proper tool to upload the site in the internet.
Step 6. Promote a Website
Once a website has been launched, the intended audience must be alerted. Without effective web marketing, despite its design, it can be useless. Web marketing can be achieved through affiliate marketing, email marketing, adoption of social media, search engine marketing, content marketing and mobile marketing.
Step 7. Maintain a Website
This is an ongoing phase. Maintenance keep websites effectively running. Maintaining websites involve constant updates, upgrades and managing security loopholes.


 In the end, it would all come right down to the SlimStyle’s price level. If the absence of heat sinks is sufficient to preserve the price per bulb some the place around $10 or less, then the SlimStyle LED stands to make rather a lot of feel — specifically to consumers who’re making first-time improvements from newly out of date incandescents, and who don’t seem to be having a look to spend very so much in the course of. Any larger than that, although, and it will be difficult to think about why you would go along with Philips over the $12.97 Cree bulb.
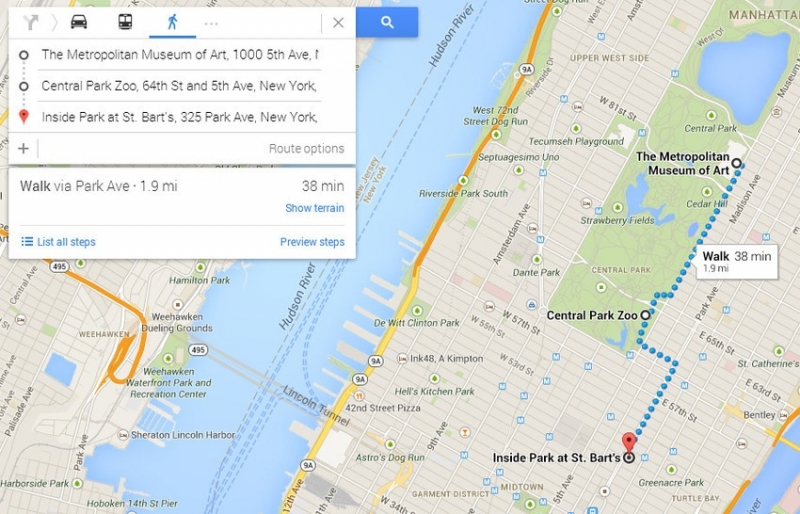
 Whether going out in a brand new city or simply exploring your personal outdoor, finding events can take quite a bit of digging. Google Maps makes it a little bit more straightforward. When you select an event venue on the map, a listing of upcoming occasions will seem. From there, buy tickets or e-book passes to no matter you are involved in.
 All of us love Pegman, the little feature-less figure users can plop down on a map to look the street view. This instrument has some issues, although, as an instance when a truck blocks the entrance of a restaurant.
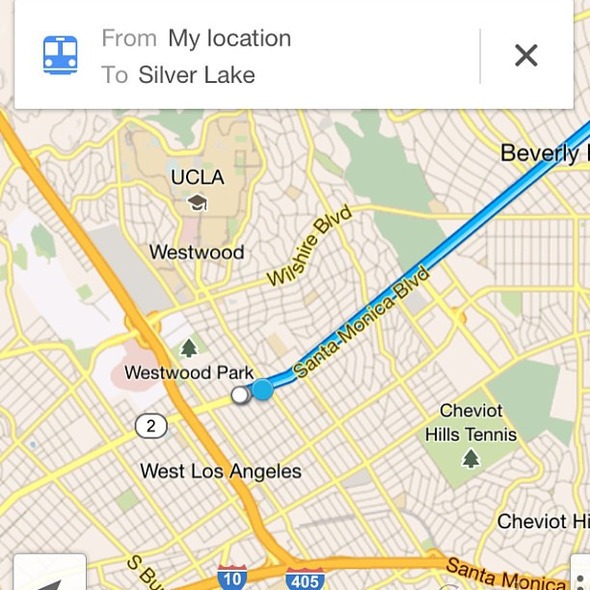 It may be a ache to make use of Google Maps offline. It will probably take awhile to load and eats up an excellent quantity of data when you are no longer careful.
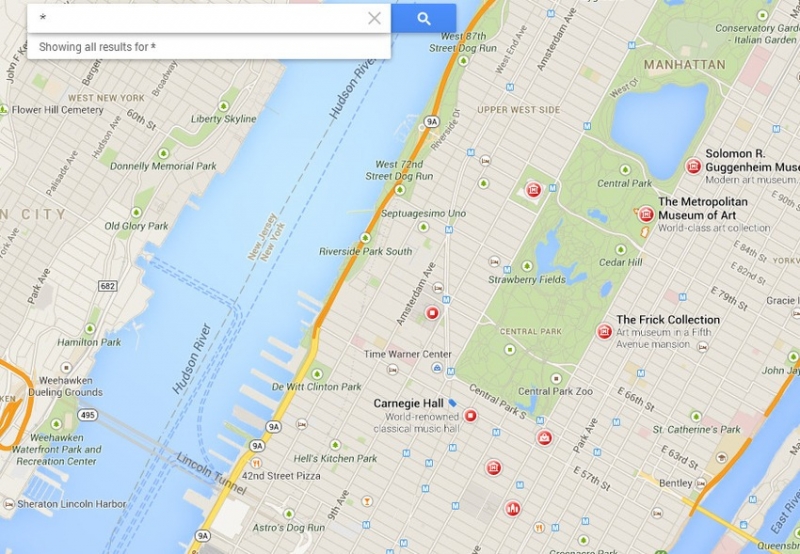 Not sure where to move or what to do? Unsure of the main tourist attractions in a brand new location? Let Google suggest some for you.
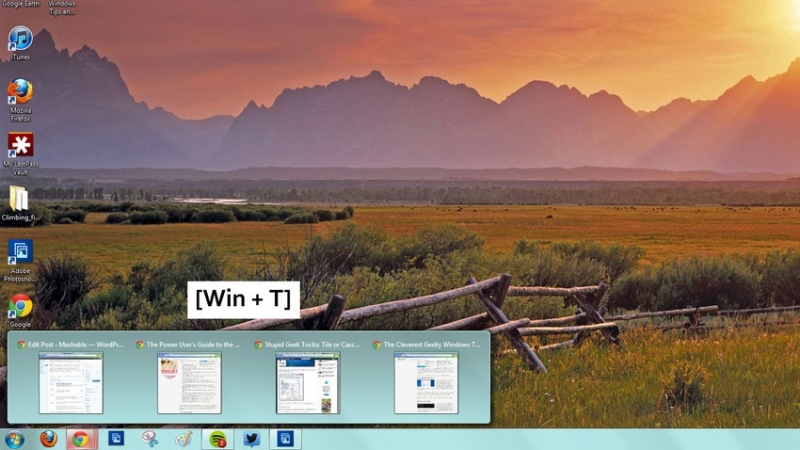
 The general public
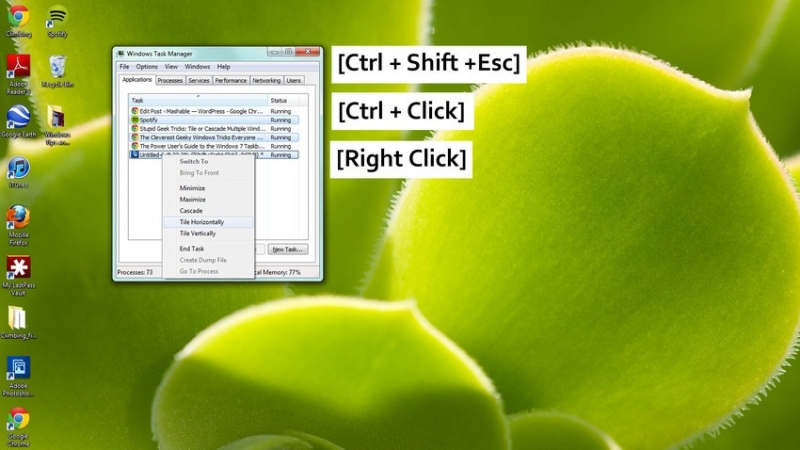 With Windows, 7
 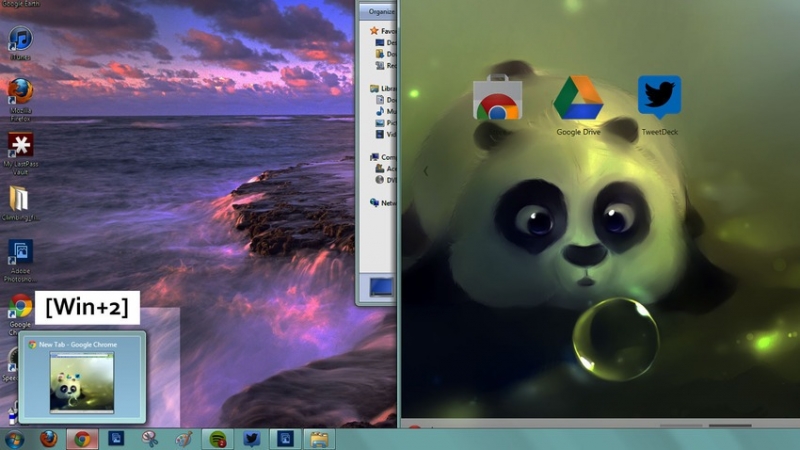 To start an application
 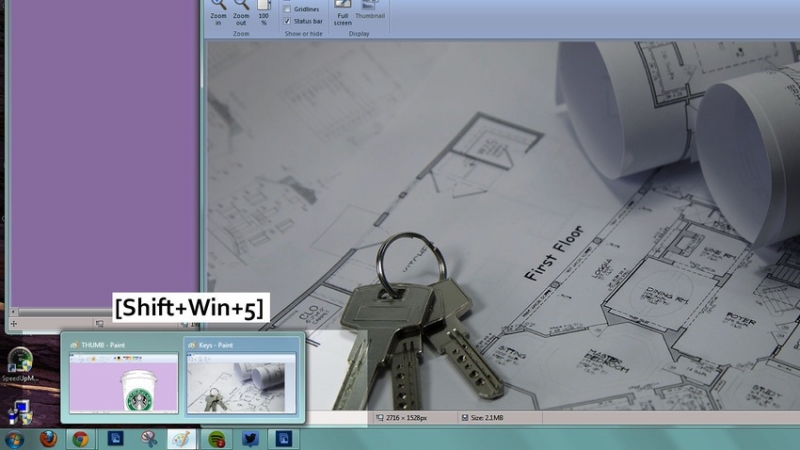 To open
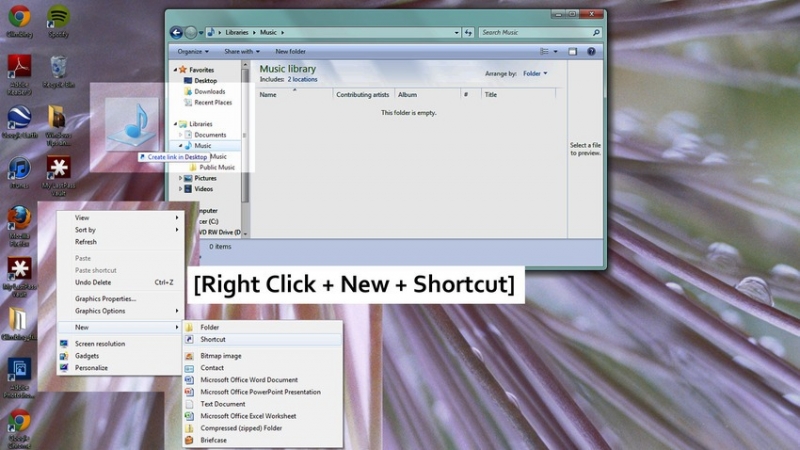
 To
To 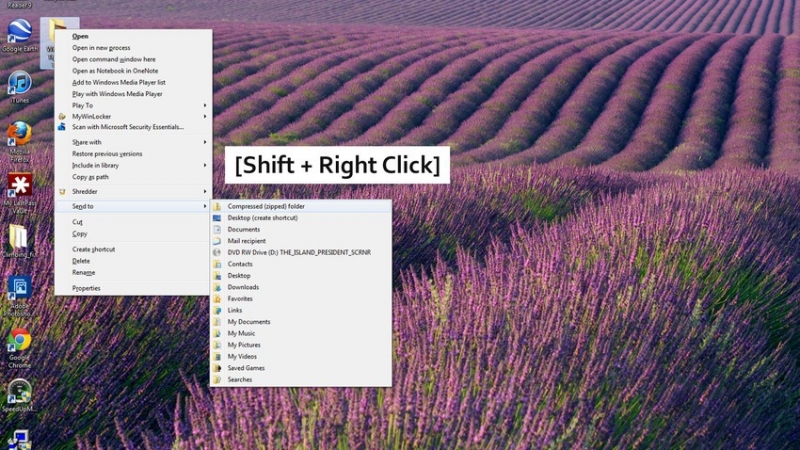 Were you aware
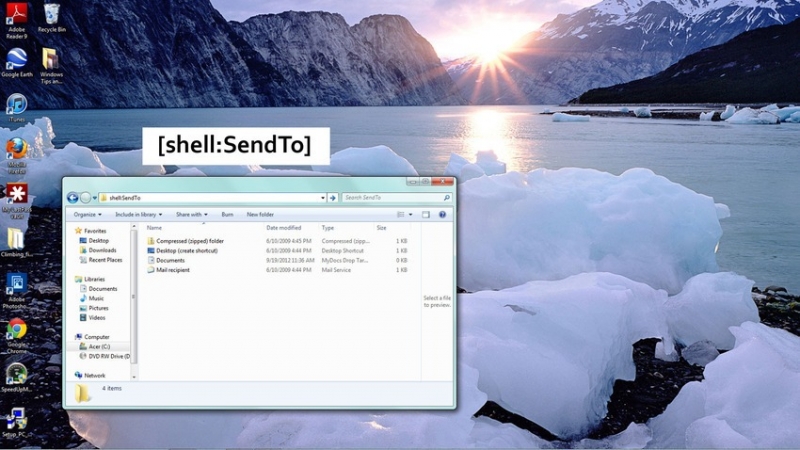 If you wish to
 The Run Command
 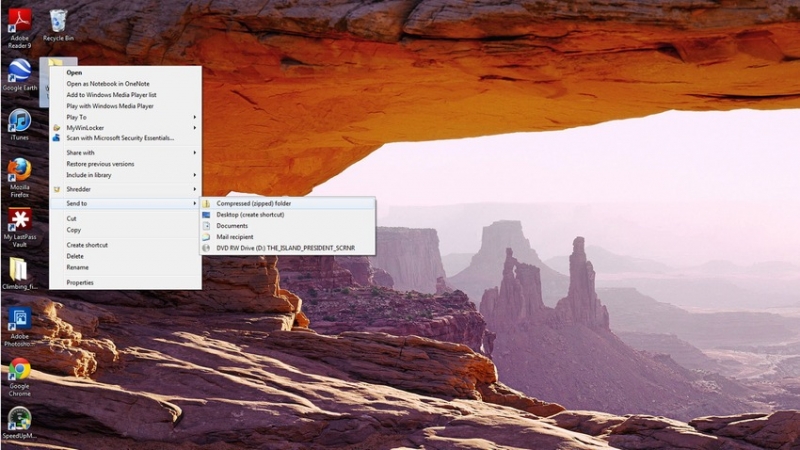 A zip
A zip