Tag: click

  • Windows 10 is spying on you! – Fix 35+ Privacy issues with a single click

    Windows 10 is spying on you! – Fix 35+ Privacy issues with a single click

    Windows 10 has been installed on more than 70 Million computers, and it doesn’t seem to be slowing down anytime soon. Microsoft is aiming to upgrade 1 billion computers within a year or two — these numbers seems insignificant now as they have already crossed 7% of their target within 2 weeks of launch. With seamless multi-device support, Windows 10 is slated to appear on plethora of Windows-powered devices, which will only boost the numbers of active windows, 10 users.

    See Also: Here’s how to force Download Windows 10 update on your computer

    There is a reason everyone is recommending Windows 10 over the current OS — it is packed with amazing features, yet so familiar with the previous version of Windows OS. Microsoft finally decided to bring back start menu and similar UI functions that we are all accustomed to since windows 7, which is trying convince users who fear to use new OS simply because it is time-consuming to learn new functions.

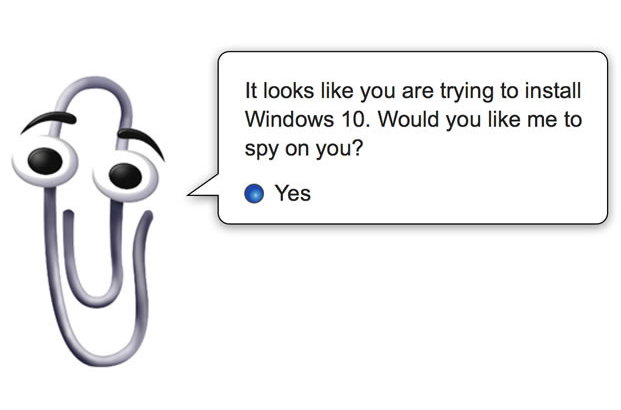
    Recently, when the news broke that Microsoft, by default, is monitoring everything you do on Windows 10 – it quickly added to the list of reasons not to fall into the trap of free upgrades offered by Microsoft to existing Windows 7 or 8.1 users. We cannot deny that Microsoft has rigged the new OS to get the automated feedback and user interaction with the computer, and they expect us to understand that it is only to help them make our experience better.This isn’t entirely unusual: recent versions of Windows, unless you explicitly say otherwise, have reported some kind of data back to Microsoft.

    can i spy on you?


    While Installation, a click through “Express Settings” allows Windows 10 operating system to gather up your contacts, text and touch input, calendar details, and a lot more, including:

    • Location Data
    • Biometrics and Handwriting data
    • Advertisement and its Tracking Code
    • Apps access to your personal information
    • Windows Defender and Sample submissions
    • Microsoft OneDrive
    • Cortana & Web search
    • Telemetry services
    • Webcam and Microphone Access
    • Sync Data with other Devices
    • Using Microsoft account, Instead of local account
    • Sending Feedback & diagnostics reports to Microsoft
    • and many more…

    Fortunately, for the privacy freaks (I am the one myself), there is a free tool which can help you disable these settings that send your personal data to Microsoft. You can do it manually if you don’t want to install third party application to tinker with the privacy settings, but it is a painful process to go through all of these sections and turn off 35+ options one-by-one – just follow this handy guide.

    Simple tool to fix privacy Issue

    A german developer pXc-coding, released a software dubbed DoNotSpy10 which allows you to disable a total of 37 Windows 10 privacy issue with just one click.

    donotspy10

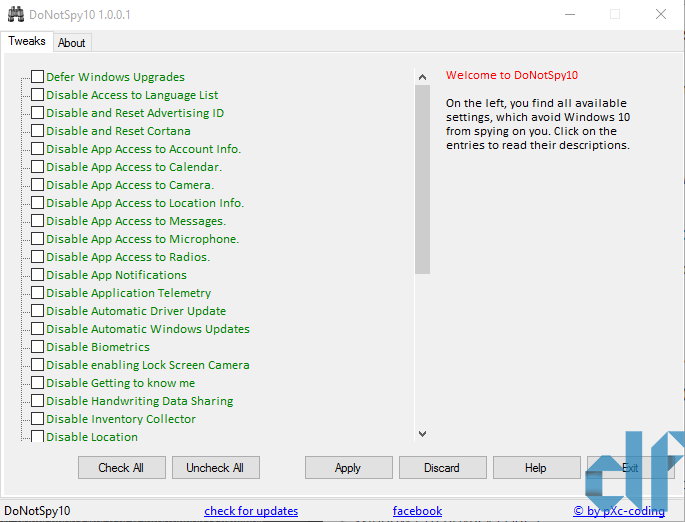
    It is a centralized interface that features a list of options that might be tracking your activity on the Windows 10 PC. Clicking on any item will populate the description of the feature at the right side of the window. You can select the one you’d want to disable based on your preference, and click Apply.

    Note: Your Antivirus may detect this tool as adware or malicious in nature, but you can safely ignore it.
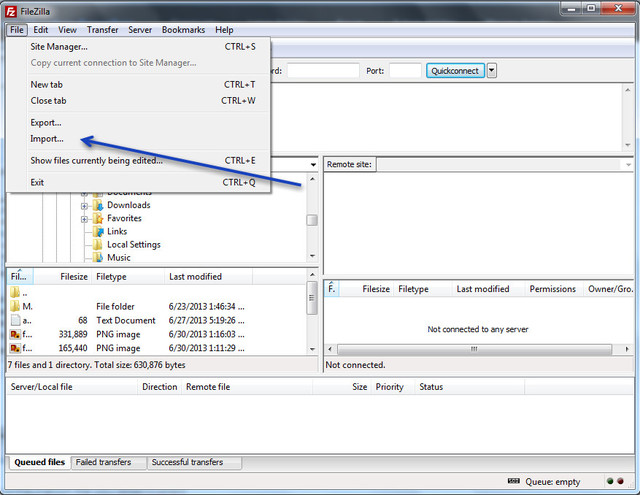
  • [How to] connect to a FTP server and transfer files to your computer [Filezilla]

    [How to] connect to a FTP server and transfer files to your computer [Filezilla]

    FTP (File Transfer Protocol) has been a popular method to transfer files easily over the network. If you are a tech savvy or managing a server for your website or contents – you might have stumbled upon this handy feature.

    FTP is quite useful when you need to transfer files over a network or to your computer from a server (or vise Versa).

    If you are a webmaster or web developer – this is something you use on a regular basis. It helps you effectively manage your files on the server and upload or download the contents with ease.

    Needless to say that most of the people are using seedboxes for downloading contents over p2p network and sometimes they just can’t figure out how to transfer the files from their seedbox to the computer.

    Some of us are not too tech savvy and wonder how to do this magic. If you are reading this article – you must be looking for the same answer.


    Instructions:

    1. Download & Run FileZilla (You can use any FTP client according to your choice)

    5008797644002300127

    2. Go to File > Site Manager

    3. In the new popup window > click on “New Site”

    5008797644002300146
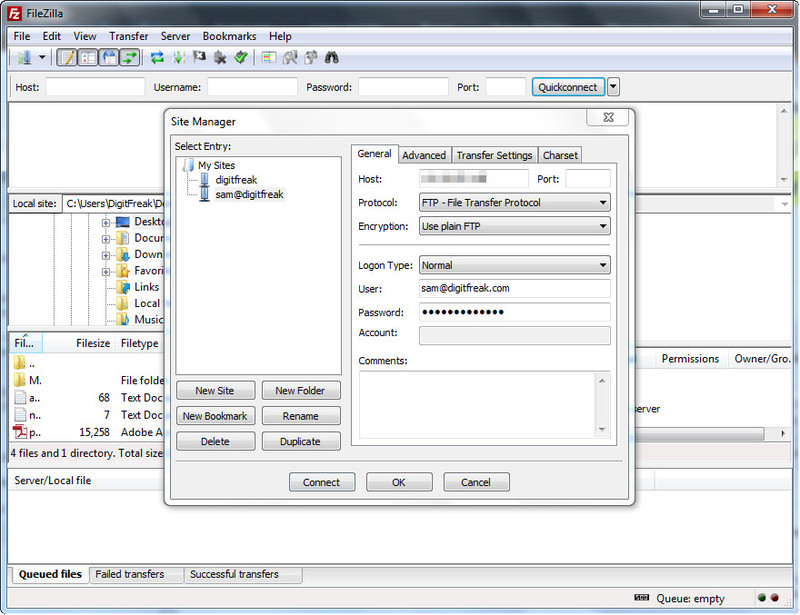
4. Now you have to type your FTP information given by your server provider or if you are managing your own website on cPanel, your HOST will be – “Your primary domain on the server”, User – “Cpanel username” and Password – “cPanel password”.

    You don’t usually have to provide the ftp port, you can simply leave it empty. If you host server configured the FTP to be accessed on a custom port, you should ask them for the same. You can contact your server provider for all these informations.

    5. Click on “connect” and you can see full directory listing of your server’s file. You can delete, upload or download the files from the server to your computer or vice versa.


    Alternate Methods

    I. Quick connect:

    5008797644002300147
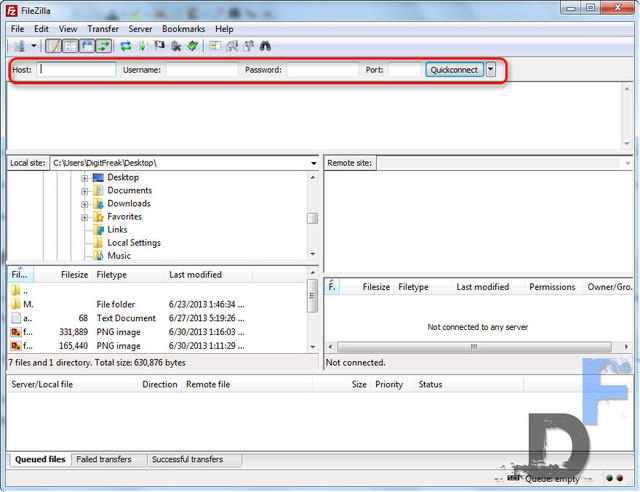
If you are looking for quick option to connect your server via FTP temporarily – this could be your saviour. The Filezilla provides “quickconnect” option, which enable you to connect to your FTP server without much hassle.

    * Just open Filezilla and fill up the information provided by your server provider.

    * Click on “quickconnect”

    * You’ll find the full directory listing of the server in “Remote site” block.


    II. Import FTP configuration from cPanel Account

    You can simply import the FTP configuration from your server’s cPanel account. It is the easiest method to connect to your cPanel Powered server.

    * Login to your cPanel account

    * You’ll find “FTP accounts”, under “Files” (as shown in image below):

    ftp accounts

    * click on the FTP account you want to download the configuration file for.

    * You’ll find some FTP clients listed under the FTP account name, click on “FTP Configuration file”

     5008797644002300133

    * Click on save when prompted.

    * Now open FileZilla > File > Import

    5008797644002300151* 
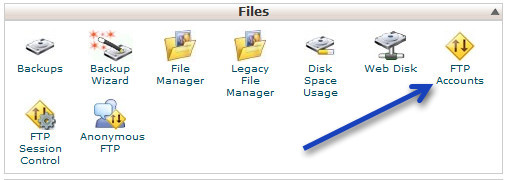
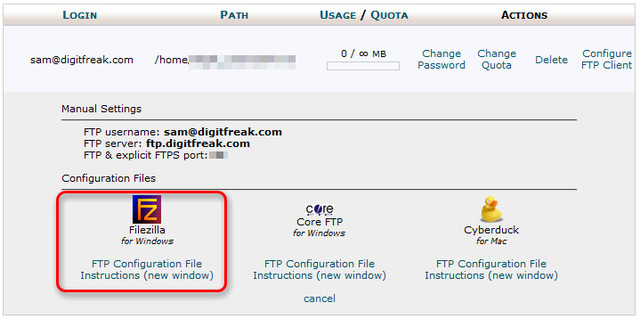
Browse to the configuration file you downloaded.

    * click “ok” if prompted.

    * Go to “Site Manager” > select your site name from left panel and click on connect

    connect* 
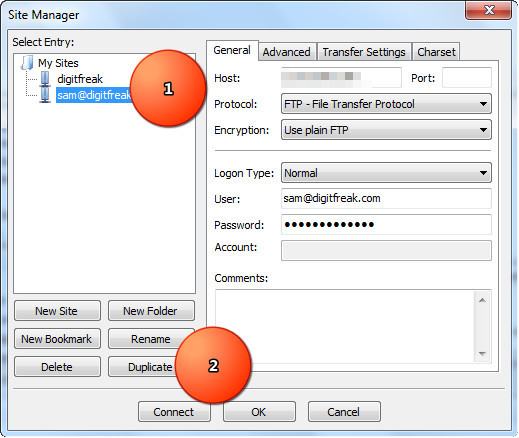
You’ll get connected to your server.


    If you are too confused with the above information, just have a look at the video below:

  • [How To] Delete your Facebook search history

    [How To] Delete your Facebook search history

    You have a huge crush on one of your friend’s ex-girlfriend and you used to visit her profile so often. You might think that nobody else knows your little secret – other than yourself.

    There are lots of similar events you might have searched for – on Facebook which could be little embarrassing if you lookout for it now. You might even don’t remember what you searched in the past.

    But, Facebook does…!

    Facebook stores every single keyword you searched for in their database. Although, the privacy setting of this section is set to only you, but it might be little kinky to see all your searches stored at one place – even the embarrassing ones.

    Here’s a quick step to delete your Facebook search history:


    Instructions:

    facebook profileStep 1 – Go to your profile and click on “Activity Log” on the lower left corner of your cover photo.


    activity log
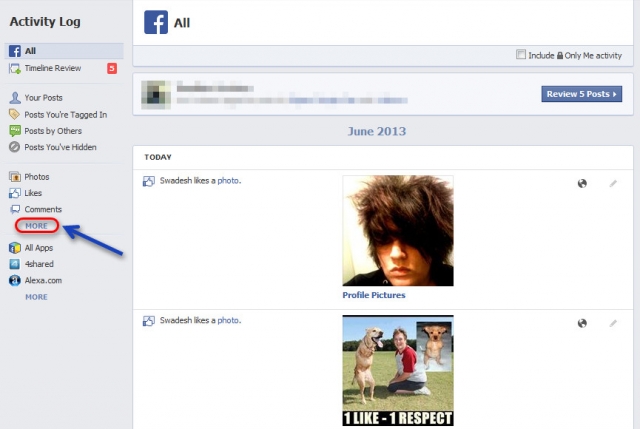
Step 2 – Click on “more” on the left side of the activity log to reveal the options related to your account. You have to focus on the third column – See Image.


    click on search
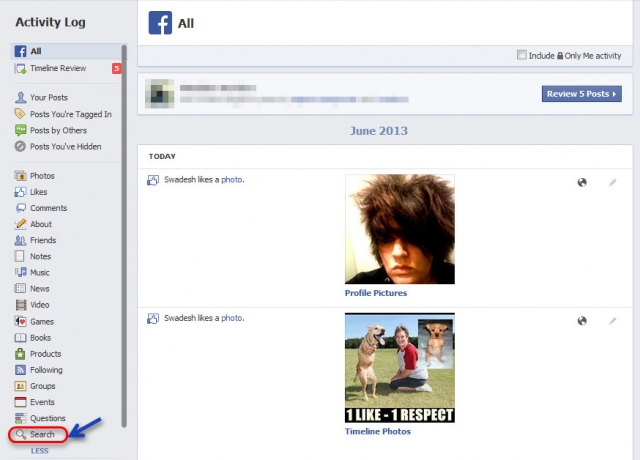
Step 3 – Scroll down the expanded list and you will see “search” as the last option. Click on it.


    clear searches
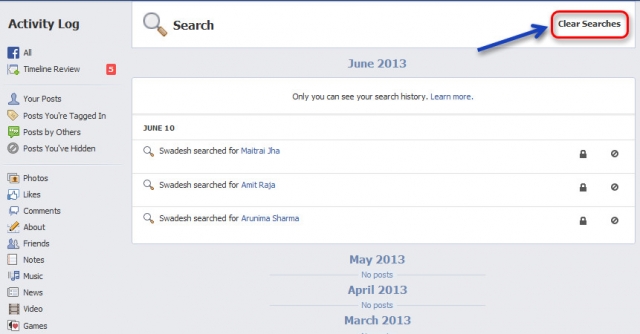
Step 4 – You can now view your Facebook search history, in date order. To get rid of it, simply click “Clear Searches”


    pop up message
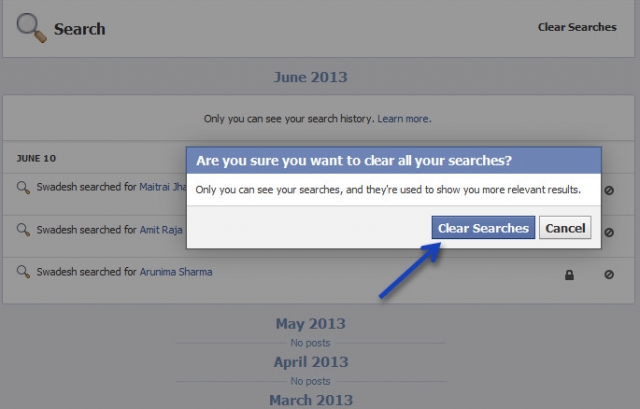
Step 5 – A new pop-up message will apear. Click on “Clear Searches” again – and you are done.

  • How to Connect Internet On Ubuntu (3G/UTMS/2G/GPRS)

    How to Connect Internet On Ubuntu (3G/UTMS/2G/GPRS)

    Ubuntu detects all the external media by its own automatically without any problem, however, it is not fairly possible to detect all the devices out there without any issues, some devices cannot be detected (which is very rare). Here is the instruction you can follow to setup a new connection for GPRS/3G/4G network configuration. To set up a new connection you can follow these steps.

    1. on the upper right corner of the screen click on a triangular shape which is the indicator or internet connections on Ubuntu just like on Windows or Mac.

    task bar_Gnome_ubuntu_11_10

    2. After clicking on it, go to “Edit Connections” and click on it.

    3. You will be greeted with a new pop-up window.

    Screenshot at_2011-10-25_135920

    4. Click on “Mobile Broadband” tab. Click on “Add” button.

    6. Choose you country

    7. choose your internet service provider. If it is not listed by default you can add manually. But most likely it will be there.

    8. Click “Continue” and then “Apply.”

    9. Go to the triangular icon we clicked at the beginning and select your connection from the drop down list. Ubuntu will connect to your ISP and viola you can now surf the internet without any problem.

    10. If you want to get your internet connected automatically at the system startup, Go to “Edit Connections” (that we visited before), click on “Mobile Broadband” tab, select your connection from the list and click on “Edit” button. In the Next window you will see a checkbox at the top tick the “checkbox” where it says “Connect Automatically” and you will get connected to your internet connection automatically at the system start up.

  • How to Install TeamViewer on Ubuntu via Terminal

    How to Install TeamViewer on Ubuntu via Terminal

    TeamViewer works on a variety of operating systems including Windows, Mac OS X and Linux. After downloading the TeamViewer .deb installation package for Ubuntu, open a terminal window and use the dpkg command to install the program on your computer.

    Step 1

    Navigate in your browser to TeamViewer.com and click

    Download” at the top of the page.

    Step 2

    Click the “Linux” icon, and then click the link to download the 32-bit or 64-bit .deb package for Ubuntu. Save the file on the desktop.

    Step 3

    Click the “Applications” pull-down menu at the top of the screen, and then click “Accessories” and “Terminal.”

    Step 4

    Type “cd Desktop” and press “Enter.”

    Step 5

    Type “sudo dpkg -i teamviewer_linux.deb” and press “Enter.” Ubuntu prompts you to enter your user password. Type the password and press “Enter” again. Ubuntu begins unpacking and installing the package. When the installation process is complete, the terminal window returns to the “/Desktop$” prompt.

    Step 6

    Close the Terminal window. Click the “Applications” pull-down. Open the “Internet” section and click “TeamViewer 6” to launch TeamViewer.