Tag: drive

  • How to Create Windows 10 Bootable USB drive

    How to Create Windows 10 Bootable USB drive

    The latest operating system from Microsoft is out and the company is offering updates for Windows 7, Windows 8 and Windows 8.1. These existing versions can either directly be updated or users can download Windows 10 and create a bootable disk for a fresh installation. Let’s look at the process that helps easily create bootable device for Windows 10 installation.

    The final release of the much awaited Windows 10 finally out and is available for download and installation. While Microsoft claims that this version of Windows is far ahead of anything that we have seen so far, it will be a while before any such claims by the company can be validated. In the meantime it isn’t a bad idea to install and use Windows 10 since the operating system looks indeed promising and so far has received good feedbacks.

    If you didn’t receive the automated update from Micrsoft, head over to our post where we explained how you can force download the Windows 10 upgrade on your Windows 7 or 8.1 computer.

    z 00032

    If you are using a licenced version of Windows 8.x and Windows 7, these ones can directly be upgraded to the latest version of Windows. However if you are unwilling to directly update your exiting version of Windows and want to have a separate installation on your computer of Windows 10 along with your existing OS, you can make a bootable USD drive of your copy of Windows 10.

    Instructions

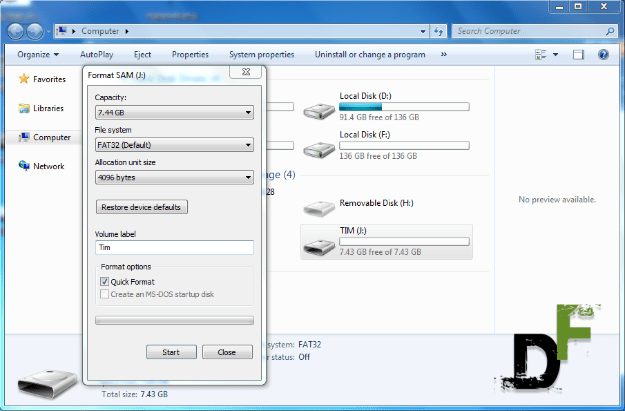
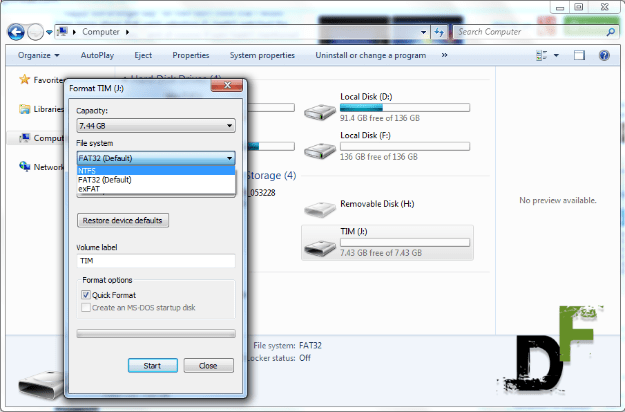
    The process is very simple and involves few easy steps. For this purpose you need a USB drive free of any data on it. Even if there is any data stored on your drive, it will be formatted at the time of creating a bootable device. Windows 10 installation file and setup process requires you to have at least 3 GB of space on your drive, therefore use a USB drive of minimum 4 GB. For creating a bootable drive, download Windows 10 media creation tool. It can be downloaded from the website of Microsoft.

    media creation tool

    Before you download the media creation tool, first check if you have a 32-bit or a 64-bit version. To check it, follow the path Start> Control Panel> System and Security> System> System Type. You will get the information about the version from here.

    Once these prerequisites are in place, run “Media creation tool” that you downloaded from Microsoft website and select “create installation media for another PC.” z 00035

    Select Language, architecture, and Edition of Windows 10 you’d like to make the bootable USB and press next.

    z 00036

    In the next window, you will be prompted to choose installation media which can either be a USB flash drive or iso file to make a bootable DVD.

    z 00037

    Select USB flash drive and press next.

    Once the computer boots from the USB drive, you will view the Install Windows page. Click Next on it and Install the Windows 10 OS. If your computer already has a licenced Windows 7, Windows 8, Windows 8.1 or a Windows 10 OS, you do not have to enter the product key. Select the option ‘Upgrade this PC now’ and then you may choose either to upgrade the current installation or select another drive and install Windows 10 in which case the selected drive will be formatted. Selection of the drive can be done when you will view the prompt ‘Where do you want to install Windows’.

    Creating a bootable USB drive is a simple process and anyone can easily create a bootable device. The same process can be followed to make a bootable DVD but a USB is faster.

  • How to make a bootable Windows USB anytime!  [windows and ubuntu platforms]

    How to make a bootable Windows USB anytime! [windows and ubuntu platforms]

    The only way to do was through a bootable pen drive carrying windows. I thought that I knew the method to do that but when I tried it all failed. I even looked for the method online but all I could find were complicated ones and required a software or two. Another trouble added to the heap was that they were all from windows point of view but as a user of ubuntu I was stuck there.

    Through this tutorial you can make a windows bootable pen drive anywhere anytime. It is so simple that now I think that I already knew it. yeah actually this was the method I kept forgetting and now when I remember it I can share it with you all.

    steps you need to follow :-

    1. Get a USB drive first but the drive must have space for the setup of windows you are intrested in making a bootable version of. For example if you wish to make a bootable USB for windows 7 then the USB must be of 4GB or above capacity as the setup size of windows 7 is about 3GB.

    windows 1windows 2
    2.
    Format the particular USB drive into NTFS partition.If you don’t know how to do that the following steps will lead you to it in windows platform:-
        – Go to “My Computer” and select the USB drive you have connected in the system.
        – Right click on the USB drive and select “Format”.
        – A window opens up where you can select the type of partition you wanna format that pen drive into. Select “NTFS” from the file system option.

        – Click on “Format” and you are done.

    If you are an ubuntu user then you need to follow the following steps:-
         – Open your “disk utility” by searching it through the ubuntu dashboard.
         – There select your USB drive from the left-hand side panel.
         – Now in the right pane click on “Unmount Volume”
         – Next click on the “format volume” button. A new window will come up where select the partition type as NTFS and format your drive through the wizard. If your formatting is done then you are also good to go to the next step.

    Now your USB drive is formatted in NTFS partition type we can move towards the third and final step.

    ubuntu 1ubuntu 2ubuntu 3
    3.
    For the last and final step of this tutorial you need to have the setup of the respective windows version, or you can even have the disc of that version. Just copy the whole setup of the operating system from that folder or CD and paste it into the USB drive. Don’t put the setup inside any folder inside the USB stick, just it paste it openly into the drive.


    If you wish to use the left over space in the drive for carrying something then you can make any folder inside the drive and put the content there.
    So it is as simple as that. Your bootable pen drive for windows is ready. Just restart your pc and boot from the drive using boot menu and you can now install windows on that pc without any worries. And also for your information i would like to add that this method is not limited to those who don’t have DVD drives but should be used by everyone as the installation process speeds up and your disk is also not scratched much.


    requirements:-

    1. A USB drive that has enough capacity to hold the setup files of windows.

    2. The installation disc or copied files of the same disc of windows.


    Hope this tutorial solves all your troubles, as it clearly solved all of mine. If not then you can ask for any other help from us freaks here as Digitfreak is always here to help you out when you are in a digital puddle. Feel free to write your views below.